Ever dreamt of having your own eCommerce site, having the flexibility of customizing it entirely, and actually launching the business you always wanted to… but couldn’t for so many reasons?
In this guide, we attempt to reveal the mysteries of successfully building your own eCommerce platform.
We would do it in 3 simple Steps!
Ladies & Gents - start your engines!
- Step 1: Warming Up
- Step 2: Creating a database for the shop
- Step 3: Downloading and Configuring OpenCart
Note: If you want to get your server up and running with opencart already installed, or what is known as “Chicken-Run” 😉, please follow this link to access your Client Area: https://www.ssdnodes.com/manage/clientarea.php, and choose opencart from the Apps dropdown selection. Whereas if you like it the old original way building it from the ground up, keep reading 💪
Step 1: Warming Up
First get your web hosting from a reputable and trustworthy provider like SSD Nodes (check out our amazing anniversary deals), with the server environment for your preferred Linux Distribution.
For this post, we are using Ubuntu 20.04, so take note if there are some minor changes depending on your distribution.
So, let us install the 2 needed components: Apache web server to make the OpenCart store publicly available on the web, along with PHP scripting language.
Install Apache
Before installing Apache, first, update the system repositories
sudo apt updateNext, install apache web server by running the command
sudo apt install apache2 apache2-utilsThe following commands can be used to start and enable Apache2 service to always start up with the server boots, as well as to check its status:
sudo systemctl enable --now apache2
sudo systemctl status apache2
You can verify that Apache is really running by opening your favorite web browser and entering the URL http://IP_Server_Address, if it is installed, then you will see the following:
![]()
Install PHP 8
To install PHP 8, we start by adding a third-party PPA to Ubuntu:
sudo add-apt-repository ppa:ondrej/phpThen, we update the packages cache in the system and install PHP packages:
sudo apt update
sudo apt install php8.0 libapache2-mod-php8.0
After installation, restart Apache using the following command:
sudo systemctl restart apache2Once successfully installed, we confirm the using the following command:
php -vWe also need to install additional PHP extensions to support OpenCart, we run the command below
sudo apt install php8.0-curl php8.0-zip php8.0-gd php8.0-mbstring php8.0-xml php8.0-common php8.0-dba php8.0-mysql php8.0-odbc php8.0-phpdbgAnd... Restart Apache
sudo systemctl restart apache2To test PHP, create a text file named info.php with the content below. Save the file, then browse to it to see if PHP is working:
nano /var/www/html/info.phpIn this file, paste the following code:
<?php
phpinfo();
?>
Save it by pressing Ctrl-x, then y, and Enter
Try to access it at http://IP_Server_Address/info.php. If the PHP info page is rendered in your browser then everything looks good and you are ready to proceed further.
Step 2: Creating a database for the shop
The next step is to create a database on the MariaDB free and open source database engine that is flexible, robust and easy-to-use.
Install MariaDB
sudo apt install software-properties-common mariadb-server mariadb-clientThe commands below can be used to start and enable the MariaDB service to always start up when the server boots, as well as to check its status:
sudo systemctl enable --now mariadb
sudo systemctl status mariadb
Next, we need to secure our database platform to ward off any intruders or anonymous users.
To accomplish this, run the command:
mysql_secure_installationThis will present you with a series of questions that require you to set a strong password for the root user, remove test database and anonymous users and disallow remote login as root.
For security reasons, Hit Y (Yes) for all of the prompts.
Configure Database & user for OpenCart
Login to MariaDB
mysql -u root -pIn this guide, we will create a database called opencartdb. Feel free to choose any name
CREATE DATABASE opencartdb;Next, create the database user and assign all privileges to the user
CREATE USER 'opencartuser'@'localhost' IDENTIFIED BY 'strong-password';
GRANT ALL PRIVILEGES ON opencartdb . * TO 'opencartuser'@'localhost';
The above command creates a database user opencart_user and grants all privileges to the user.
Note: remember to replace the strong_password attribute with your own strong password.
Finally, flush privileges and exit the database engine:
FLUSH PRIVILEGES;
EXIT;
Step 3: Downloading and Configuring OpenCart
Downloading OpenCart
With the database configured, now we need to download the OpenCart zipped file.
First, navigate to /tmp directory
cd /tmpDownload the zipped file using the command below
wget https://github.com/opencart/opencart/releases/download/3.0.3.7/opencart-3.0.3.7.zipOnce downloaded, unzip the OpenCart zip file as shown extract the zipped file
apt install unzip
unzip opencart-3.0.3.7.zip
We need to move this directory to the webroot directory – /var/www/html
mv upload/ /var/www/html/opencartConfiguring OpenCart Directory
The next step is to copy a few configuration files as shown in the commands below:
cp /var/www/html/opencart/config-dist.php /var/www/html/opencart/config.php
cp /var/www/html/opencart/admin/config-dist.php /var/www/html/opencart/admin/config.php
Next, modify file permissions of the OpenCart directory to make it writable to the Apache web server
chmod -R 755 /var/www/html/opencart/Finally, change ownership of the OpenCart directory to www:data
chown -R www-data:www-data /var/www/html/opencart/Et Voila!
Head out to your browser and browse your server’s IP address of domain name
http://IP_address/opencart/install/index.php
1. You may read through the license, check "I agree to the license", and press “Continue”.

2. A list of pre-installation requirements that need to be met for successful installation of OpenCart.

3. You need to fill in the spaces below #1 by adding the database connection details (username/password, database name) established when you created the store's database using MySQL Databases.
Under #2, you should create a new username and password for administration access to the OpenCart shop. When finished, you may press "Continue".

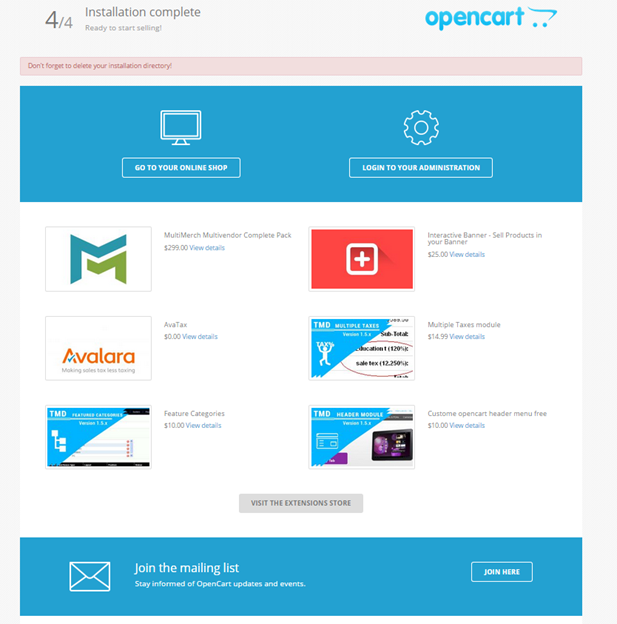
Now that installation is complete, the "install" folder is no longer required and it should be deleted.
Navigate to /var/www/html/opencart, and execute:
rm -rf install/Head out to your browser and browse your server’s IP address of domain name
For opening the StoreFront: http://IP_address/opencart/
For opening the Admin Interface: http://IP_address/opencart/admin/
In the Admin interface, you will be advised to change the location of the ‘storage’ folder.
DO NOT do it Automatically, as the interface proposes to you, since it messes up the directories paths in the config file, but choose the Manual Mode, as follows:
1. Move /var/www/html/opencart/system/storage/ to /var/storage/ by executing:
sudo mv /var/www/html/opencart/system/storage/ /var/storage/2. Edit config.php file found in /var/www/html/opencart/, by changing the line
define('DIR_STORAGE', DIR_SYSTEM . 'storage/');
to
define('DIR_STORAGE', '/var/storage/');
3. Edit config.php file found in /var/www/html/opencart/admin/ by changing the line
define('DIR_STORAGE', DIR_SYSTEM . 'storage/');
to
define('DIR_STORAGE', '/var/storage/');
That’s all - You did it!! 🙌🏻
You now have the option to browse the Front End of your own shop or choose to log into the Administration side, and customize your own eCommerce platforms!
If you liked this piece, please share it with your friends & colleagues on Facebook, Twitter, Reddit and others on the sharing module to your right.
Want us to write about a particular topic? Please send us an email at [email protected] so we add it to our pipeline.
A note about tutorials: We encourage our users to try out tutorials, but they aren't fully supported by our team—we can't always provide support when things go wrong. Be sure to check which OS and version it was tested with before you proceed.
If you want a fully managed experience, with dedicated support for any application you might want to run, contact us for more information.