

AWS CLI is a command-line tool that gives you direct control over Amazon Web Services from your terminal. Once you install AWS CLI on Ubuntu 26.04, you can manage EC2 instances, synchronize files with S3 storage, inspect CloudWatch logs, and handle IAM users without switching to the AWS Management Console. The CLI enables you to script complex deployments, automate routine tasks, and integrate AWS services into your development workflows directly from the command line.
In this guide, you'll install, configure, and run the AWS CLI on Ubuntu 26.04 using the official Amazon installer. If you're new to running your own box, read what is a VPS first, and keep a beginner's guide to DevOps terminology open if any of the wording here is unfamiliar.
Key Takeaways
The AWS CLI is the official command-line client for AWS. You install it on Ubuntu 26.04 from an Amazon-provided binary, point it at an IAM access key, and then drive AWS services from your shell.
- Check your CPU architecture with
uname -mbefore downloading, because AWS ships separate x86_64 and aarch64 installers. - Install
curlandunzipfirst. The installer arrives as a zip archive. - Use the official installer rather than
apt, which gives you AWS CLI v2 and the current release. - Run
aws configureonce to store your Access Key ID, Secret Access Key, default region, and output format. - Confirm the credentials work with
aws sts get-caller-identitybefore you try anything else. - Create a Lightsail instance with
aws lightsail create-instancesafter listing bundles. - Create an S3 bucket with
aws s3api create-bucket, then upload files withaws s3 cp. - Launch a PostgreSQL database with
aws rds create-db-instance, then open port 5432 to your server's IP before connecting withpsql.
Read the rest of this guide for the full step-by-step instructions.
Prerequisites
Before you begin:
- Deploy an Ubuntu 26.04 server.
- Need one? SSD Nodes runs cheap VPS hosting starting at only $5.50 per month on the 3-year plan. The rate is locked for life, so it never creeps up on renewal. You also get 24/7 support and a 14-day money-back guarantee, which is enough room to test your AWS CLI workflows and back out if they don't fit. Pick any of the 14 locations and follow along.
- SSH to your Ubuntu server using PuTTY for Windows or OpenSSH for Linux and macOS.
- Create a non-root user with
sudoprivileges. You'll use the user details to run the commands in this guide. - Prepare your AWS credentials, including the following:
- Access Key ID.
- Secret Access Key.
You should create the access keys above in the AWS Identity and Access Management (IAM) console.
Verify your System's Architecture
AWS provides separate installer packages for different CPU architectures. Using the correct installer for your system is essential because the wrong package will not run properly. Follow the steps below to update your system and check your CPU's architecture.
- Update your system's package information index.
$ sudo apt updateThis command refreshes Ubuntu's package metadata and prepares your system for new installations.
- Install the
curlutility andunziptool to download and extract the AWS CLI installer.$ sudo apt install curl unzip -yThe
curlpackage downloads the installer archive, whileunzipextracts its contents. The-yflag automatically confirms the installation prompt. - Check your system's CPU architecture.
$ uname -mOutput:
x86_64The command returns
x86_64for Intel or AMD 64-bit processors, oraarch64for ARM64/Graviton systems. - Note your system's architecture, you'll need this information to select the appropriate installer in the next step.
Install AWS CLI with the Official Installer
The official installer from AWS provides the latest version as a pre-built binary package. This is the recommended method for installing AWS CLI in a production system.
- Download the AWS CLI installer using the URL that matches your CPU architecture.For
x86_64systems:$ curl "https://awscli.amazonaws.com/awscli-exe-linux-x86_64.zip" -o "awscliv2.zip"For
aarch64(ARM64/Graviton) systems:$ curl "https://awscli.amazonaws.com/awscli-exe-linux-aarch64.zip" -o "awscliv2.zip"The
curlcommand downloads the installer archive and saves it asawscliv2.zipin your current directory. - Extract the new archive.
$ unzip awscliv2.zipThis command extracts the installer files into an
awsdirectory in your current location. - Run the installation script to install AWS CLI.
$ sudo ./aws/install --bin-dir /usr/local/bin --install-dir /usr/local/aws-cliThe
--bin-diroption places theawscommand in/usr/local/bin, making it accessible to all users. The--install-diroption stores the main files in/usr/local/aws-cli, keeping the installation organized and separate from system packages. The installer displays a confirmation message when it completes.Output:
You can now run: /usr/local/bin/aws --versionThis message confirms that you've successfully finished installing the CLI and your system has linked the AWS CLI binary properly.
- Clean up the package files.
$ rm -rf awscliv2.zip aws/Removing these files frees up disk space now that the installation is complete.
- Check the AWS CLI version.
$ aws --versionOutput:
aws-cli/2.X.X Python/3.X.X Linux/7.X.X-X-generic exe/x86_64.ubuntu.26Your version number and kernel string may differ based on the release date and your system. The output confirms that you have installed the AWS CLI. The presence of
exe/in the trailing platform string indicates that you've used the official installer.
Configure the AWS CLI with Credentials
The AWS CLI binary does not interact with AWS services until you provide credentials and a default region. The aws configure command runs a setup wizard that guides you through this process.
- Start the configuration wizard.
$ aws configureThe command prompts you to enter the AWS Access Key ID, Secret Access Key, default region, and output format.
AWS Access Key ID [None]: enter_your_access_key_id AWS Secret Access Key [None]: **************************************** Default region name [None]: ap-south-1 Default output format [None]: json- The Access Key ID identifies your IAM identity.
- The Secret Access Key signs your API requests.
- The Default region tells AWS where to send most API calls.
- The Output format controls how results appear in the terminal. Use
jsonfor structured, parseable output.
After entering the above values, AWS CLI saves the configuration to
~/.aws/credentialsand~/.aws/config.
Note: Those keys now sit in plain text on the server, so tighten inbound access before you go further. Advanced Firewall Groups let you restrict traffic to your own IP from the SSD Nodes dashboard for only $2 per month, with no nftables syntax to memorize. See Introducing Firewall Groups for Simpler Server Security for the setup. It fits any server holding cloud credentials.
Run the AWS CLI
Running a live aws command confirms that your credentials work and that the AWS CLI can communicate with AWS services successfully.
- Retrieve the identity of the currently authenticated user.
$ aws sts get-caller-identityOutput:
{
   "UserId": "AIDAEXAMPLE123",
   "Account": "123456897412",
   "Arn": "arn:aws:iam::123456897412:user/admin"
}
This command returns your account ID, user ARN, and user ID, confirming that your installation and credentials are functioning correctly.
Create an AWS VPS Instance
Now that your AWS CLI is working, you can proceed and create Lightsail instances without using the AWS web console. The AWS CLI is faster and scriptable, letting you automate tasks and avoid repetitive clicks. The web console is easier for beginners, but CLI gives consistency, efficiency, and integration with DevOps workflows.
- List available Lightsail bundles in your region:
$ aws lightsail get-bundles --region ap-south-1Output:
{ "bundles": [ { "price": 5.0, "cpuCount": 2, "diskSizeInGb": 20, "bundleId": "nano_3_1", "instanceType": "nano", "isActive": true, "name": "Nano", "power": 298, "ramSizeInGb": 0.5, "transferPerMonthInGb": 512, "supportedPlatforms": [ "LINUX_UNIX" ], "publicIpv4AddressCount": 1 }, ... ] } - Create a new VPS by specifying
nano_3_1as the bundleID.$ aws lightsail create-instances \ --instance-names my-vps-test \ --availability-zone ap-south-1a \ --blueprint-id ubuntu_24_04 \ --bundle-id nano_3_1 \ --region ap-south-1Output:
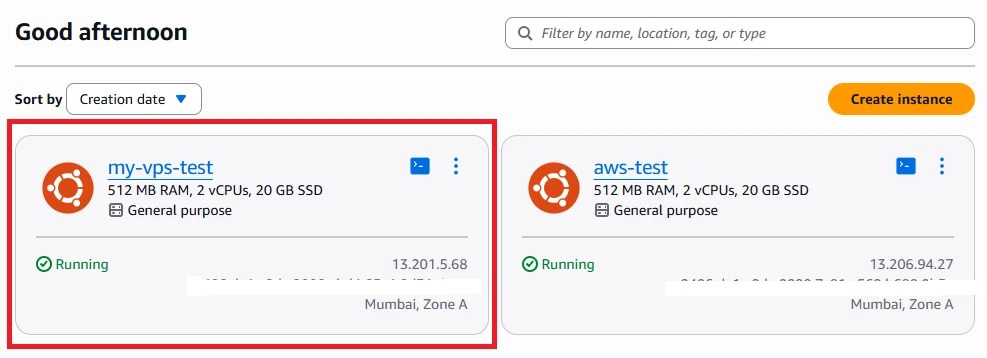
{ "operations": [ { "id": "123e4567-e89b-12d3-a456-426614174000", "resourceName": "my-vps-test", "resourceType": "Instance", "createdAt": "2026-06-16T11:18:27.648000+00:00", "location": { "availabilityZone": "ap-south-1a", "regionName": "ap-south-1" }, "isTerminal": false, "operationType": "CreateInstance", "status": "Started", "statusChangedAt": "2026-06-16T11:18:27.648000+00:00" } ] } - Navigate to the Amazon Lightsail Management Console. You should now see your VPS instance listed.
Create an AWS S3 Bucket
Amazon S3 (Simple Storage Service) is AWS's cloud storage platform for saving and retrieving any amount of data. A bucket is the top‑level container in S3 where you organize and store your files (called objects).
- Run the following command to create a sample bucket. The bucket name should be unique.
   $ aws s3api create-bucket \
   --bucket my-company-backups-001 \
   --region ap-south-1 \
   --create-bucket-configuration LocationConstraint=ap-south-1
Output:
{ "Location": "http://my-company-backups-001.s3.amazonaws.com/", "BucketArn": "arn:aws:s3:::my-company-backups-001" } - List buckets.
$ aws s3 lsOutput:
... 2026-06-16 11:31:16 my-company-backups-001 - Create a sample
hello.txtfile on your Ubuntu server.$ echo "Hello World" > hello.txt - Upload the file to the AWS sample bucket you created above.
$ aws s3 cp hello.txt s3://my-company-backups-001/Output:
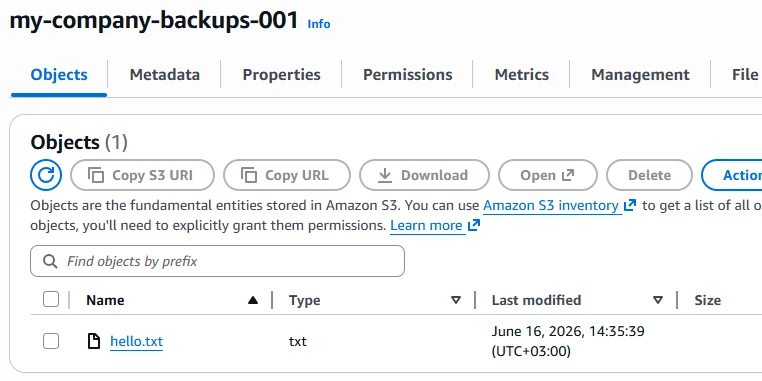
upload: ./hello.txt to s3://my-company-backups-001/hello.txt - Navigate to the main AWS Management Console. In the search bar, type
S3and select S3 under services. You should now see your bucket on the list.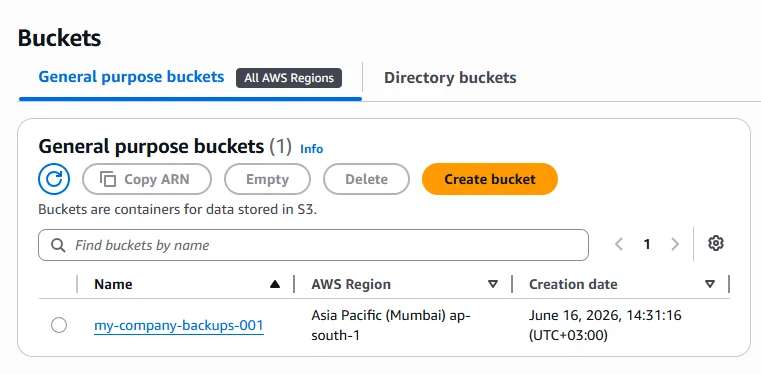
- Select the bucket from the list. The
hello.txtfile that you uploaded to the bucket should display.
Create an AWS RDS Database
Amazon RDS (Relational Database Service) is AWS's managed database service. The service handles backups, scaling, and maintenance for you so you don't need to manage the database infrastructure yourself. To test the AWS CLI, you'll create and connect to a PostgreSQL server.
- List the available PostgreSQL versions.
$ aws rds describe-db-engine-versions \
   --engine postgres \
   --region ap-south-1
Output:
{ "DBEngineVersions": [ { "Engine": "postgres", "MajorEngineVersion": "16", "EngineVersion": "16.8", "DBParameterGroupFamily": "postgres16", "DBEngineDescription": "PostgreSQL", "DBEngineVersionDescription": "PostgreSQL 16.8-R1", "ValidUpgradeTarget": [ { "Engine": "postgres", "EngineVersion": "17.4", "Description": "PostgreSQL 17.4-R1", "AutoUpgrade": false, "IsMajorVersionUpgrade": true, "SupportsIntegrations": true } ... ] ... } ] } - Create a sample database instance. Replace
your_user_nameandyour_secure_passwordwith the correct credentials.$ aws rds create-db-instance \ --db-instance-identifier sample-postgresql-db \ --db-instance-class db.t3.micro \ --engine postgres \ --engine-version 16.8 \ --allocated-storage 20 \ --master-username your_user_name \ --master-user-password 'your_secure_password' \ --backup-retention-period 7 \ --publicly-accessible \ --region ap-south-1Output:
{ "DBInstance": { "DBInstanceIdentifier": "sample-postgresql-db", "DBInstanceClass": "db.t3.micro", "Engine": "postgres", "DBInstanceStatus": "creating", "MasterUsername": "your_user_name", "AllocatedStorage": 20, "PreferredBackupWindow": "17:27-17:57", "BackupRetentionPeriod": 7, "DBSecurityGroups": [] ... }} - Monitor the database status.
$ aws rds describe-db-instances --region ap-south-1Output:
{ "DBInstances": [ { "DBInstanceIdentifier": "sample-postgresql-db", "DBInstanceClass": "db.t3.micro", "Engine": "postgres", "DBInstanceStatus": "creating", }] ... } - Copy the endpoints credentials when the
DBInstanceStatuschanges fromcreatingandbacking-uptoavailable."Endpoint": { "Address": "sample-postgresql-db.xyz.ap-south-1.rds.amazonaws.com", "Port": 5432, "HostedZoneId": "Z2VFMSZA74J7XZ" }, - Install the PostgreSQL client on your Ubuntu server.
$ sudo apt install postgresql-client -y - Navigate to the AWS Management Console.
- Go to EC2 → Security Groups and select the default security group.
- Click Inbound rules → Edit inbound rules → Add rule.
- Choose and enter the following values:
- Type: PostgreSQL.
- Protocol: TCP.
- Port range: 5432.
- Source: Enter your Ubuntu server's public IP address using the CIDR (Classless Inter‑Domain Routing) notation. For instance,
203.0.113.25/32.
The above settings tell AWS to allow traffic from your VPS IP on port 5432.
- Connect to the managed PostgreSQL database that you created earlier using the
psqlcommand.$ psql -h your_database_endpoint_address -U your_user_name -d postgres -p 5432-h: Specifies your RDS endpoint.-U: Logs to the database using the master username you created.-d: Selects the default database AWS creates with the instance.-p: Chooses the port number for the database.
Output:
postgres=>You're now connected to the PostgreSQL database that you created using the AWS CLI.
- Navigate to the main AWS Management Console. In the Search bar, type
RDSand select Aurora and RDS under services. Select the DB Instances. You should now see your PostgreSQL database on the list.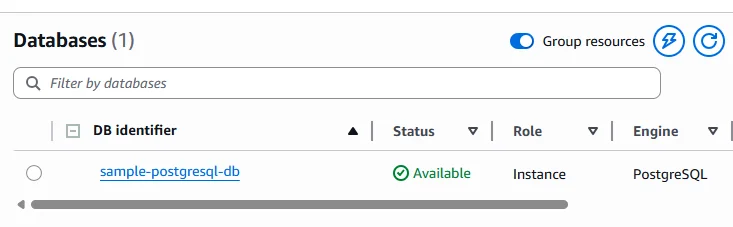
Automate Your AWS CLI Workflows
Once the CLI works, the next step is running it on a schedule instead of by hand. A cron job that pushes a nightly aws s3 sync is the obvious start, but pairing it with a visual workflow tool gives you retries, Slack alerts, and a run history you can actually read. The same server can drive your own infrastructure too: the SSD Nodes VPS API exposes snapshots, reinstalls, and power state over REST, so one workflow can back up to S3 and roll the box back when a job fails. Start with the n8n install guide.
Conclusion
In this guide, you installed AWS CLI on Ubuntu 26.04 using the official Amazon installer. You updated system packages, downloaded the installer for your CPU architecture, and ran the installation script. After verifying the setup, you configured the CLI with your credentials and tested it with a live AWS call. You also explored practical use cases by creating a Lightsail VPS instance, provisioning an S3 bucket, and launching a PostgreSQL RDS database directly from your terminal. Now that you have a working AWS CLI installation on Ubuntu 26.04, lock the server down before you leave credentials sitting on it. Work through VPS security: critical steps to secure VPS servers, then install and configure fail2ban on Ubuntu to shut down repeated SSH login attempts. From there, move your CLI calls into scheduled scripts or a CI/CD pipeline.