
In this tutorial, you will install the Zabbix on an Ubuntu 24.04 server, and configure a MariaDB database, in which Zabbix will store its monitoring data. You will also configure Nginx and PHP on this monitoring server to serve the Zabbix web interface.
Introduction
Zabbix is an open-source Linux management software that monitors the availability and performance of IT infrastructure components.
Zabbix provides real-time monitoring of thousands of metric data from servers, virtual machines, network devices, and web applications. Analyzing the data Zabbix gathers will give you a general idea of the health of your servers and web applications, in addition to helping you detect potential problems before your users report them.
To monitor a server and collect data from it, Zabbix uses an agent that gathers data from different services and sends it to the Zabbix monitoring server. Zabbix supports encrypted communication between the monitoring server and its monitored clients. This ensures that your data is transferred securely over the network.
Zabbix provides a web interface that allows you to monitor your servers (also known as Zabbix clients) and their internal services and manage system settings.

Installing Zabbix on Ubuntu 24.04
To install Zabbix 7 on Ubuntu 24.04, you'll first download the Zabbix repository configuration package, install the Zabbix web frontend with MariaDB database support, Zabbix server, and Zabbix Nginx configuration packages. Next, you'll configure MariaDB for Zabbix, set up Nginx and PHP, then finish up your Zabbix installation through the Zabbix web interface.
Note
If you want to skip all the technical steps of setting up Zabbix on your server and have it installed in minutes, then I have some great news for you! Our team of engineers has prepared a ready-to-use 1-click Zabbix application for your convenience. Just choose one of our servers, and while prompted to choose the operating system, choose Zabbix from the dropdown menu.
Prerequisites
To follow this tutorial you need:
- An Ubuntu 24.04 server with a non-root user with
sudoprivileges. If you haven't noticed, we offer extremely powerful Ubuntu 24.04 VPS servers at a bargain. Take a look at our offerings and prepare for your mind to be blown 🤯. - The LEMP stack (Linux, Nginx, MariaDB, and PHP) installed on your server. Use our Installing LEMP on Ubuntu 24.04 LTS guide to set it up. Or you can use our LEMP 1-Click App to set up LEMP automatically when creating a server.
- A TLS/SSL certificate, because Zabbix can access sensitive information about your infrastructure. Fun fact: All our 1-click applications (including LEMP and Zabbix) come preinstalled with an SSL certificate 🙂
Check out our How to access your server using SSH guide to learn how to access your server and create a sudo user.
Step 1: Installing the Zabbix Server
You first need to install Zabbix onto the server where MariaDB and Nginx should be already be installed. Zabbix offers installation packages for different Linux distributions. Zabbix can be found in Ubuntu's package manager, but it is outdated. To install the most recent stable version, use the official Zabbix repository.
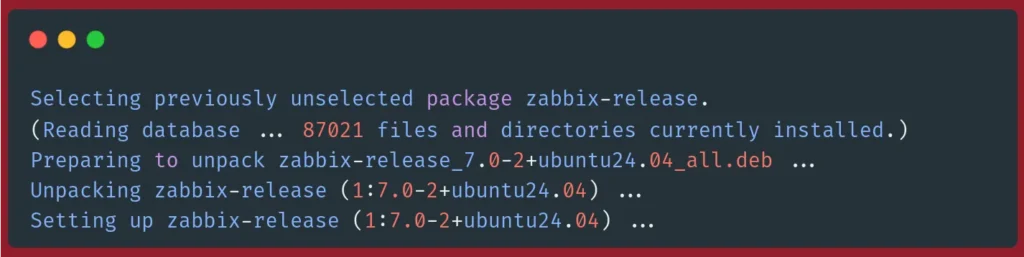
To download and install the latest Zabbix server, first get the Zabbix repository configuration package. This can be done by downloading the Zabbix.deb file using the wget command. This .deb file will be used to add the repository.
Run the following command:
wget https://repo.zabbix.com/zabbix/7.0/ubuntu/pool/main/z/zabbix-release/zabbix-release_7.0-2+ubuntu24.04_all.debOnce the download finishes, you can install it with the dpkg command:
sudo dpkg -i zabbix-release_7.0-2+ubuntu24.04_all.debAfter you run the command above, you will see an output like this:
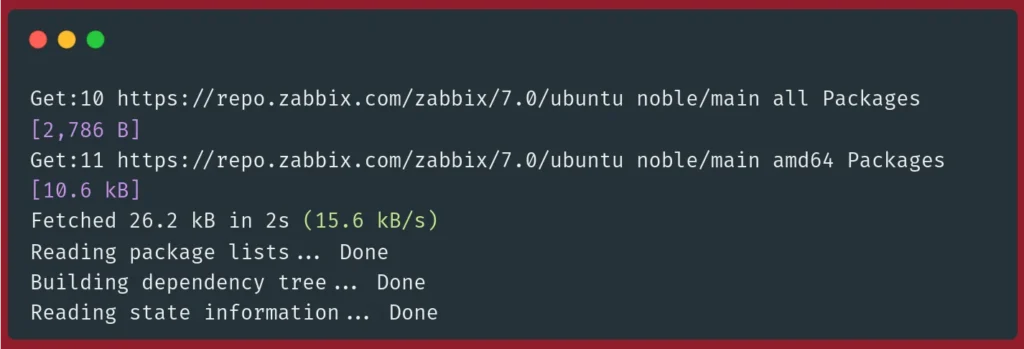
Next, refresh the package index to use this new repository:
sudo apt updateYou should see the following as part of the output:
We are now able to install Zabbix after our server has been updated.
Next, we will install the Zabbix web frontend with MySQL database support and the Zabbix server. Note that we will be using MariaDB, but because its compatible with MySQL, you can just install the MySQL packages and they will work as expected:
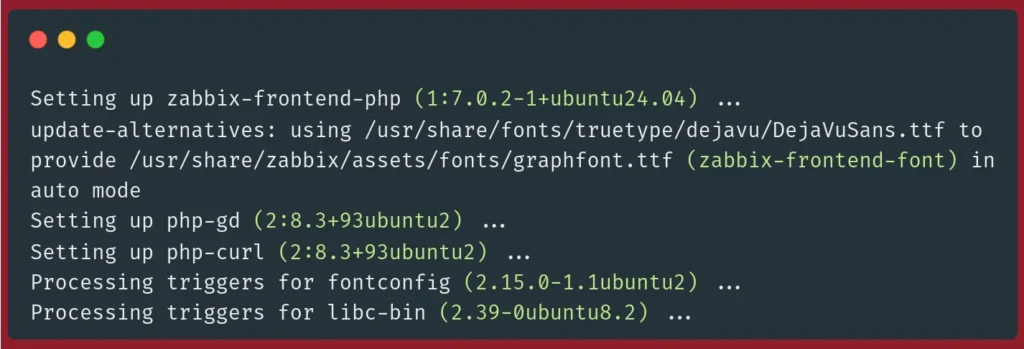
sudo apt install zabbix-server-mysql zabbix-frontend-php zabbix-sql-scriptsHere you install the following packages:
zabbix-server-mysql: Adds MySQL/MariaDB support to zabbix.zabbix-frontend-php: The PHP Zabbix web interface.zabbix-sql-scripts: Zabbix SQL scripts that will create the Zabbix database and its tables.
This command's will take some time to run. Below are the last few lines of the output:
Finally, install the Zabbix Agent, which allows you to collect data about the Zabbix server status.
sudo apt install zabbix-agentAn output similar to the following will signify a successful installation:

To use Zabbix, you must first set up a database that stores the data the Zabbix server will gather from its agents (also known as Zabbix clients). This is the next step.
Step 2: Configuring MariaDB
To configure Zabbix with a functional database, you will need to create a MariaDB database and fill it with basic information. To ensure that Zabbix doesn't log in to your MariaDB database using the root account, you will also create a unique user for this database.
To create a MySQL/MariaDB database, use the mysql client to connect to MariaDB and access its command line interface with the following command:
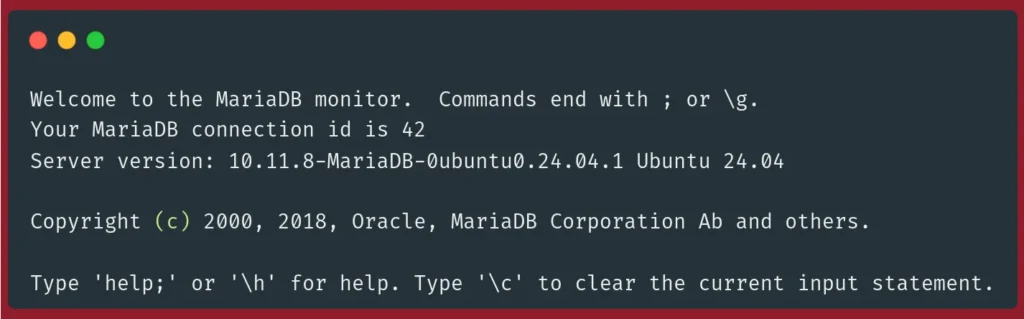
sudo mysqlIf you get an error that contains Access denied for user 'root', this means that the default authentication method has changed, and connecting to MariaDB requires a password for the root account. To solve this issue, use the following command to connect to MariaDB using the root user and a password:
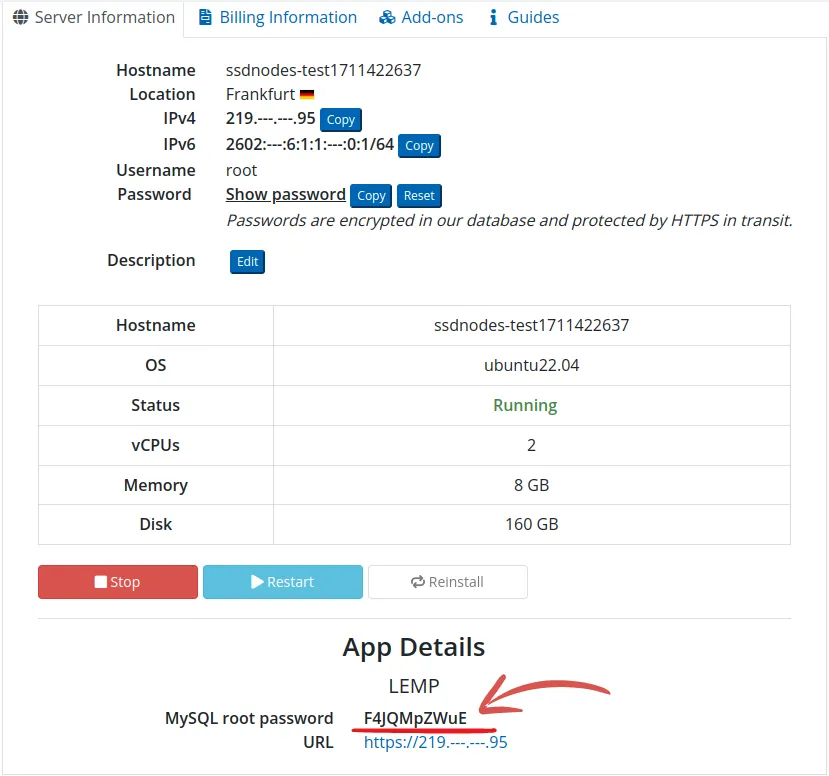
mysql -u root -pYou'll be asked for your MySQL root password, enter it and then press Enter.
Note: If you've installed the LEMP stack using our 1-Click App, you'll find your MySQL root password in the App Details widget on your SSDNodes Dashboard. As demonstrated in the following image:
You should get a prompt similar to the following:
Now you can create a database for Zabbix, We'll name the database zabbix, and add UTF-8 characters support to it:
create database zabbix character set utf8mb4 collate utf8mb4_bin;If you receive an error upon entering the preceding command, make sure you've typed it in correctly, and that you end it with a semicolon (;).
To create a new MariaDB user account for Zabbix, use the following statement in the MariaDB command line interface. Remember to replace password with a strong password for your user account:
create user zabbix@localhost identified by 'password';Here, zabbix is your database user for Zabbix, and password is its password.
Next, you'll need to give all access permissions to the user account that will manage your Zabbix database:
grant all privileges on zabbix.* to zabbix@localhost;Refresh the privileges for the preceding command to take effect and apply the permission changes to the database server:
FLUSH PRIVILEGES;This will take care of both the user and the database. You can exit the database console with the following command:
EXIT;Next, you need to import the initial Zabbix SQL schema and data that Zabbix needs. To do this, run the following command to set up the schema and import data into the Zabbix database. Because the data is compressed, use zcat:
sudo zcat /usr/share/zabbix-sql-scripts/mysql/server.sql.gz | mysql --default-character-set=utf8mb4 -uzabbix -p zabbixWhen prompted, enter the password for your zabbix MariaDB user.
The command will take a while. If you get an error that says ERROR 1045 (28000): Access denied for user zabbix@'localhost' (using password: YES) or something similar, make sure you used the right password for your zabbix user that you've set up earlier in the MariaDB command line.
You must set the database password in the Zabbix configuration file to allow the Zabbix client to access this database. Use your preferable text editor to open the configuration file. In this tutorial, we will be using nano:
sudo nano /etc/zabbix/zabbix_server.confLook for the following section of the file:
### Option: DBPassword
#       Database password. Ignored for SQLite.
#       Comment this line if no password is used.
#
# Mandatory: no
# Default:
# DBPassword=
The file must be modified to change the DBPassword value to the password of the database user. To configure the database, add this line to the end of these comments:
DBPassword=your_zabbix_db_passwordMake sure to replace your_zabbix_db_password with your database password.
Save and close the file, press CTRL+X, followed by Y and then ENTER.
Now you have configured the Zabbix server for connection to the database. Next, configure Nginx to serve the Zabbix frontend.
Step 3: Setting up Nginx
Install the automatic configuration package to configure Nginx automatically:
sudo apt install zabbix-nginx-confAs an output of the above command, you should get the configuration file /etc/zabbix/nginx.conf, and also a link to it in the Nginx configuration directory /etc/nginx/conf.d/zabbix.conf.
Next, you need to make some necessary changes to the /etc/zabbix/nginx.conf file. Open it with nano with the following command:
sudo nano /etc/zabbix/nginx.confThis file contains an Nginx server configuration automatically generated by Nginx. It includes two lines which determine the server’s name as well as what port it listens on:
server {
#        listen          8080;
#        server_name     example.com;
Uncomment these lines and replace example.com by your domain name, and replace port 8080 with port 80:
server {
        listen          80;
        server_name     your_domain;
Set up a Let's Encrypt Certificate
To set up a Let's Encrypt SSL certificate for Zabbix, first install the Certbot client for Nginx:
sudo apt install certbot python3-certbot-nginx -yNext, generate a certificate using the following command, replacing zabbix.example.com with your domain name:
sudo certbot --nginx -d zabbix.example.comEnter your email address and type Y to agree on the terms of service. You'll also be asked whether you want to subscribe to receive emails from the Electronic Frontier Foundation, a founding
partner of the Let's Encrypt project. Type N if you don't want to subscribe to this emailing list.
Next, unlink the default Nginx configuration from the /sites-enabled/ directory. This forces Nginx to use your Zabbix configuration instead of the default configuration:
sudo unlink /etc/nginx/sites-enabled/defaultNext, test your configuration’s syntax using the following command:
sudo nginx -tYou should receive an output that’s similar to the following:
nginx: the configuration file /etc/nginx/nginx.conf syntax is ok
nginx: configuration file /etc/nginx/nginx.conf test is successful
This output shows that there are no errors in the configuration file.
If you receive any errors, review your configuration file and make sure you’ve set your directives and values properly.
Next, reload Nginx for the changes you’ve made to take effect by running the following command:
sudo systemctl reload nginxNext, you will need to modify your PHP configuration to ensure that Nginx can be used to serve Zabbix's frontend.
Step 4: Configuring PHP
The Zabbix web interface uses PHP and requires special PHP server settings. These settings were created by Zabbix during installation, and can be found in the directory /etc/zabbix and are automatically loaded by PHP-FPM. This file should be modified to set your specific time zone. Open the php-fpm configuration of Zabbix:
sudo nano /etc/zabbix/php-fpm.confThis file contains PHP settings that satisfy the requirements of the Zabbix web interface. The default timezone setting is not commented out. You must set the appropriate timezone to ensure Zabbix displays the correct time for you, make sure to replace Africa/Casablanca with your specific time zone:
php_value[max_execution_time] = 300
php_value[memory_limit] = 128M
php_value[post_max_size] = 16M
php_value[upload_max_filesize] = 2M
php_value[max_input_time] = 300
php_value[max_input_vars] = 10000
php_value[date.timezone] = Africa/Casablanca
Save the file and close it.
You may have to uncomment the highlighted timezone line in the code block before you change it to your timezone. This list contains all supported time zones.
Setting up System Locale
In some Ubuntu servers, the default system locale is C.UTF-8, which provides a basic UTF-8 locale for computer usage, while Zabbix need a more comprehensive locale tailored for your language. For example, for English speakers in the United States the full en_US.UTF-8 locale is required by Zabbix.
To see which system locale your server is currently using, use the following command:
locale
If your output is similar to the following:
LANG=C.UTF-8
LANGUAGE=
LC_CTYPE="C.UTF-8"
LC_NUMERIC="C.UTF-8"
LC_TIME="C.UTF-8"
LC_COLLATE="C.UTF-8"
LC_MONETARY="C.UTF-8"
LC_MESSAGES="C.UTF-8"
LC_PAPER="C.UTF-8"
LC_NAME="C.UTF-8"
LC_ADDRESS="C.UTF-8"
LC_TELEPHONE="C.UTF-8"
LC_MEASUREMENT="C.UTF-8"
LC_IDENTIFICATION="C.UTF-8"
LC_ALL=
Then you should set up a more appropriate locale in order for Zabbix to function correctly.
To set up a comprehensive locale and use it instead of the default C.UTF-8 on Ubuntu 24.04, first install the locales package:
sudo apt install locales
Next, edit the system locale file:
sudo nano /etc/locale.gen
Search your locale, and uncomment it. In this example, we’ll uncomment en_US.UTF-8:
# en_US.UTF-8 UTF-8
Save and exit the file.
Generate the locales you just configured:
sudo locale-gen
The output should indicate that the locale is correctly configured:
Generating locales (this might take a while)...
  en_US.UTF-8... done
Generation complete.
Set up your locale using the update-locale and export commands:
sudo update-locale LANG=en_US.UTF-8
export LANG=en_US.UTF-8
Now, check your current locale:
locale
You should see your chosen locale set up correctly:
LANG=en_US.UTF-8
LANGUAGE=
LC_CTYPE="en_US.UTF-8"
LC_NUMERIC="en_US.UTF-8"
LC_TIME="en_US.UTF-8"
LC_COLLATE="en_US.UTF-8"
LC_MONETARY="en_US.UTF-8"
LC_MESSAGES="en_US.UTF-8"
LC_PAPER="en_US.UTF-8"
LC_NAME="en_US.UTF-8"
LC_ADDRESS="en_US.UTF-8"
LC_TELEPHONE="en_US.UTF-8"
LC_MEASUREMENT="en_US.UTF-8"
LC_IDENTIFICATION="en_US.UTF-8"
LC_ALL=
Restart PHP
Now restart PHP-FPM to apply these new settings:
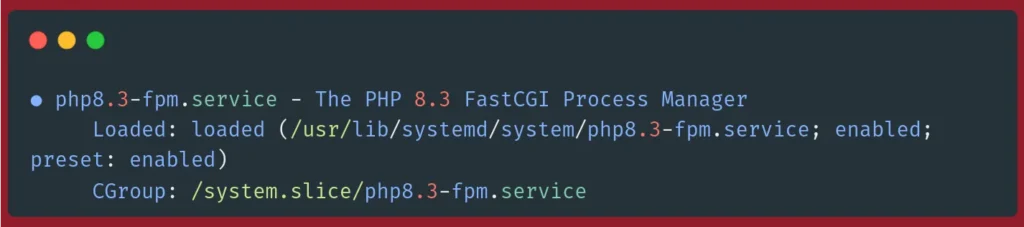
sudo systemctl restart php8.3-fpm.serviceNote: You may have another version of php-fpm installed on your system, so you might have to change 8.3 in the preceding command with your version of PHP. To check your php-fpm version, use the following command:
sudo systemctl status php* | grep fpm.serviceYou should receive the full name and version of your php-fpm service:
After configuring your time zone, you can now start and enable the Zabbix server, Zabbix Agent, Nginx server, and PHP:
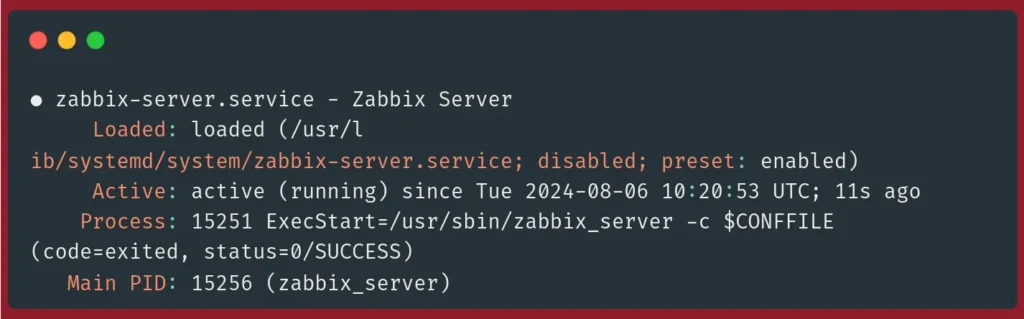
sudo systemctl restart zabbix-server zabbix-agent nginx php8.3-fpmThen check whether the Zabbix server is running properly, run the following command:
sudo systemctl status zabbix-serverYou should see the following output:
Next, enable all the components to start at boot time:
systemctl enable zabbix-server zabbix-agent nginx php8.3-fpmYou now need to configure the Zabbix Web Interface. You will do this in the next step.
Step 5: Configuring Settings for the Zabbix Web Interface
To set up your Zabbix web interface.
Launch your browser and go to the domain name or IP address associated with your Zabbix server:
http://your_zabbix_server_domain_or_ipYou will see the following screen:
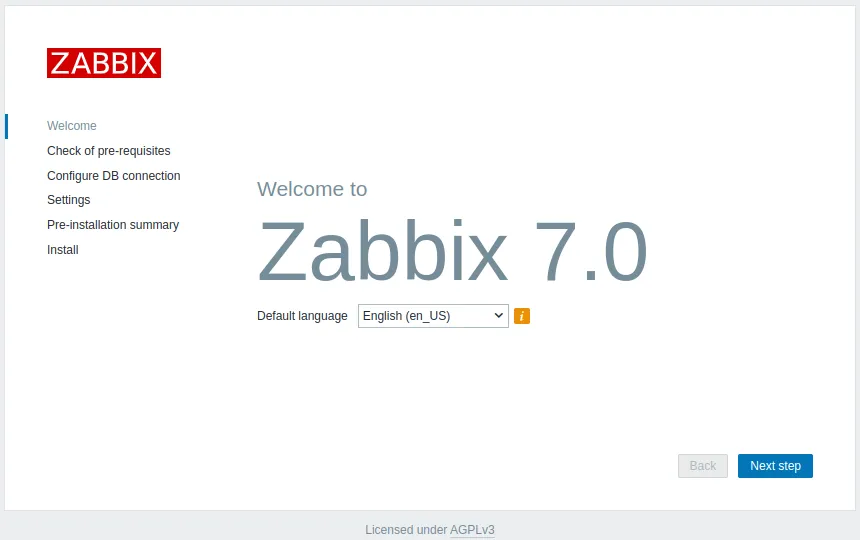
Click Next step.
The next screen will show a table listing all the prerequisites for Zabbix. All items should have an OK tag on the right.
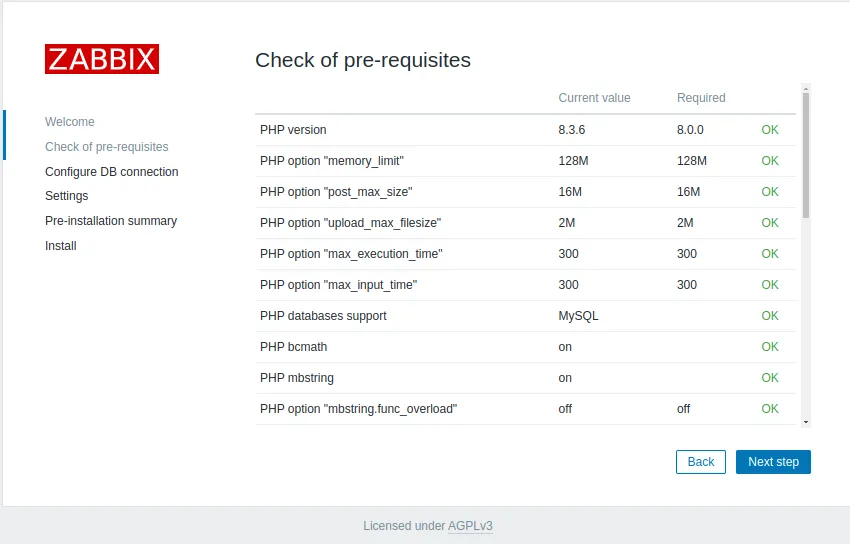
Scroll down to see all the prerequisites. After you have verified that everything is OK, click Next step to continue.
The next screen will ask you for your database connection information.
Your Zabbix server has been informed about your database earlier, but Zabbix's web interface also needs to have access to it.
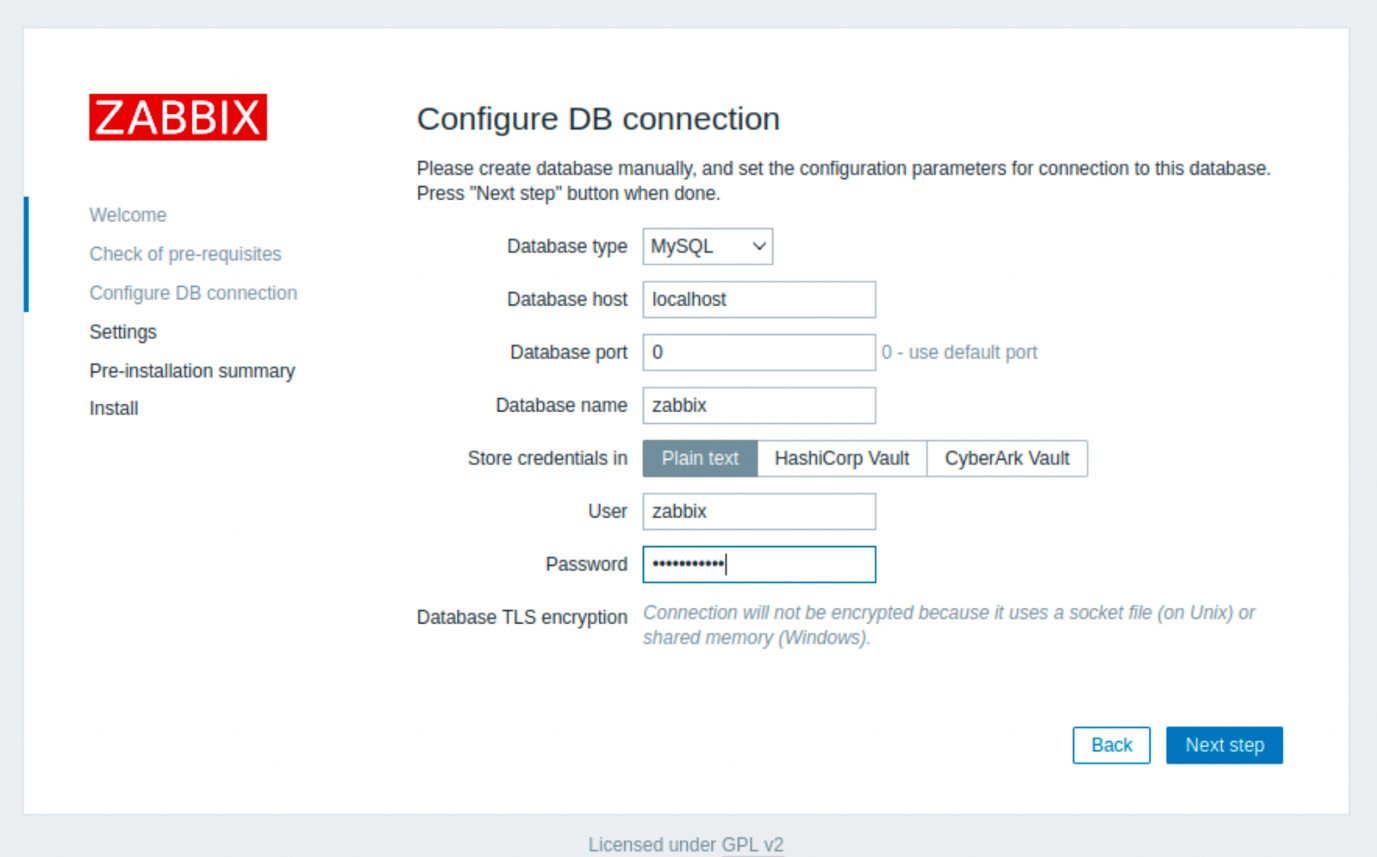
Enter your MariaDB credentials that you created earlier in step 2, then click Next step.
You'll be moved to a Settings screen, just click Next step and leave the default values.
The Zabbix server name is an optional parameter used in the web interface to identify each server in case you are monitoring a lot of servers at once.
The next screen shows a Pre-installation summary so you can confirm everything is correct:
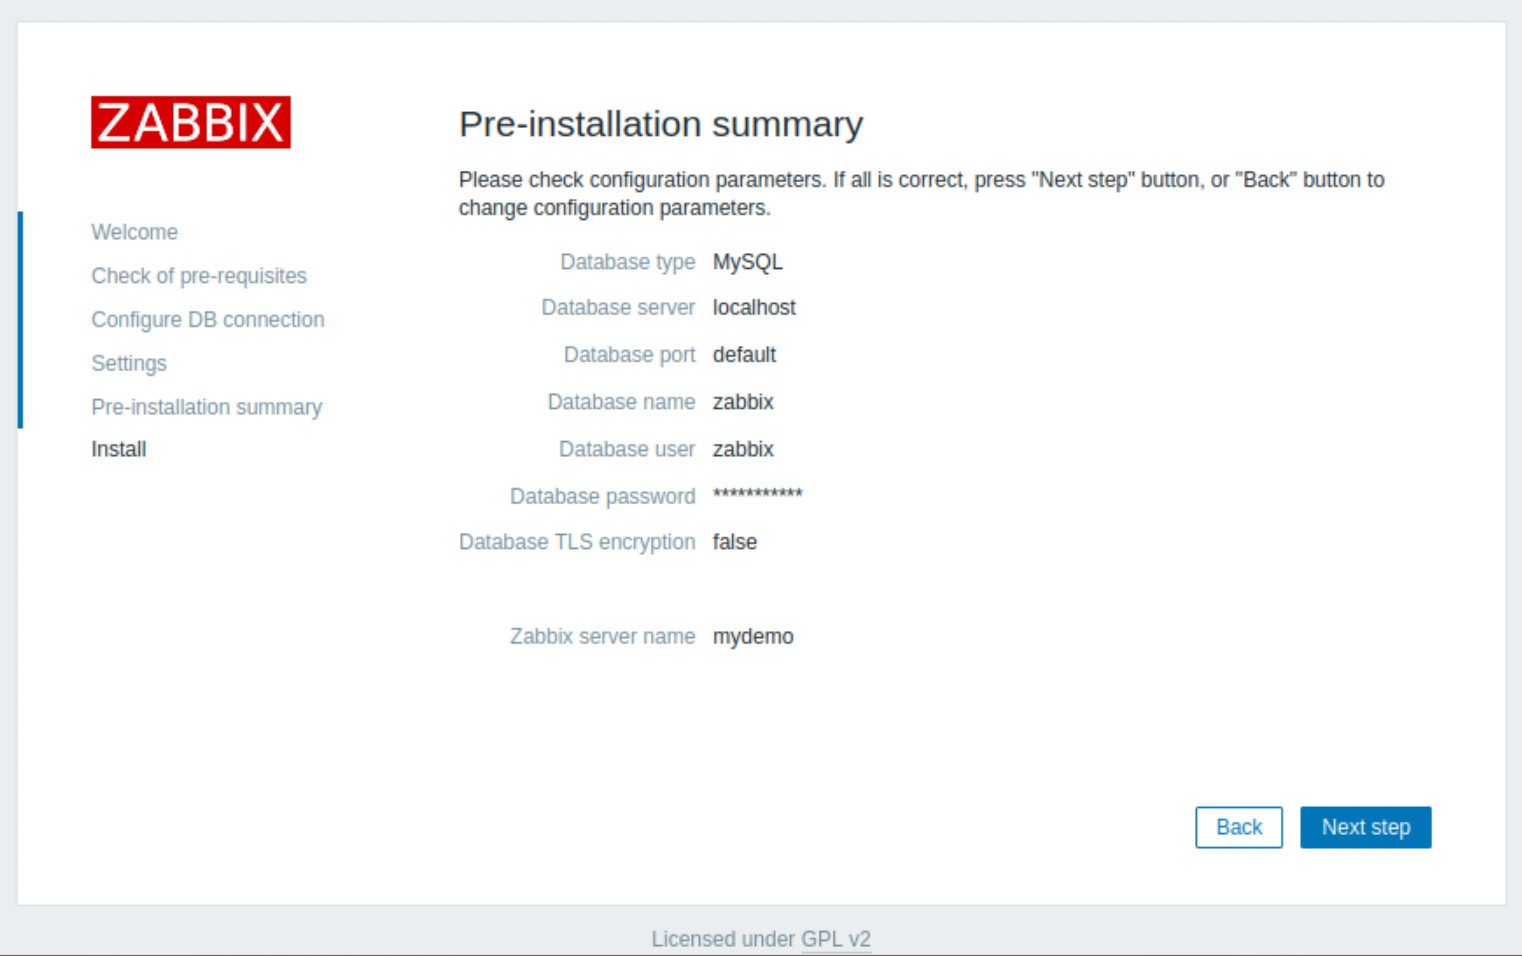
Click Next step.
You will be shown a screen that confirms that the installation has been successfully completed. This screen also informs you that a configuration file was created at /usr/share/zabbix/conf/zabbix.conf.php. You can back up this file to preserve your Zabbix setup.
Finally, Click Finish.
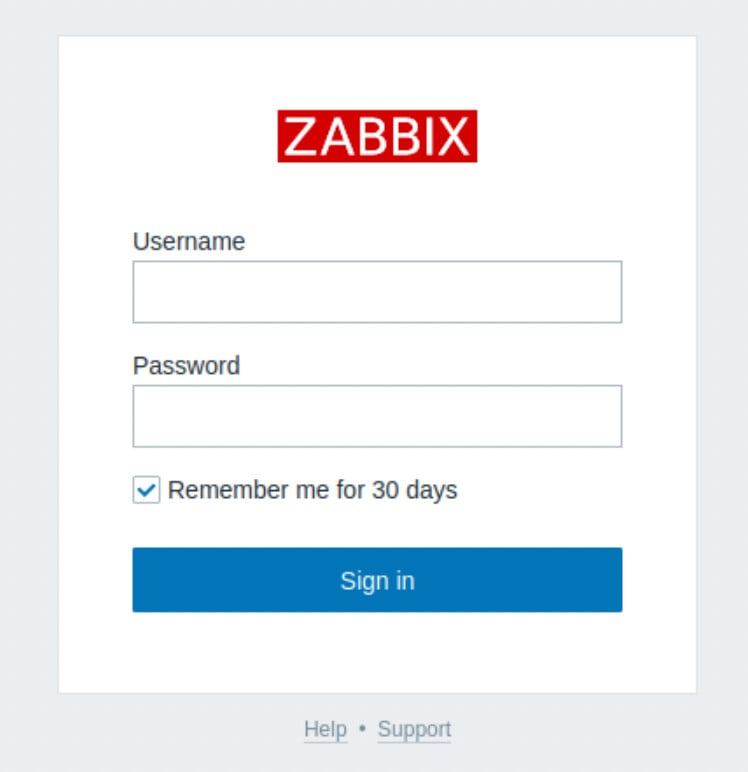
You will be redirected to a login screen. The default username is Admin and the default password is zabbix.
You'll be taken to the Zabbix dashboard:
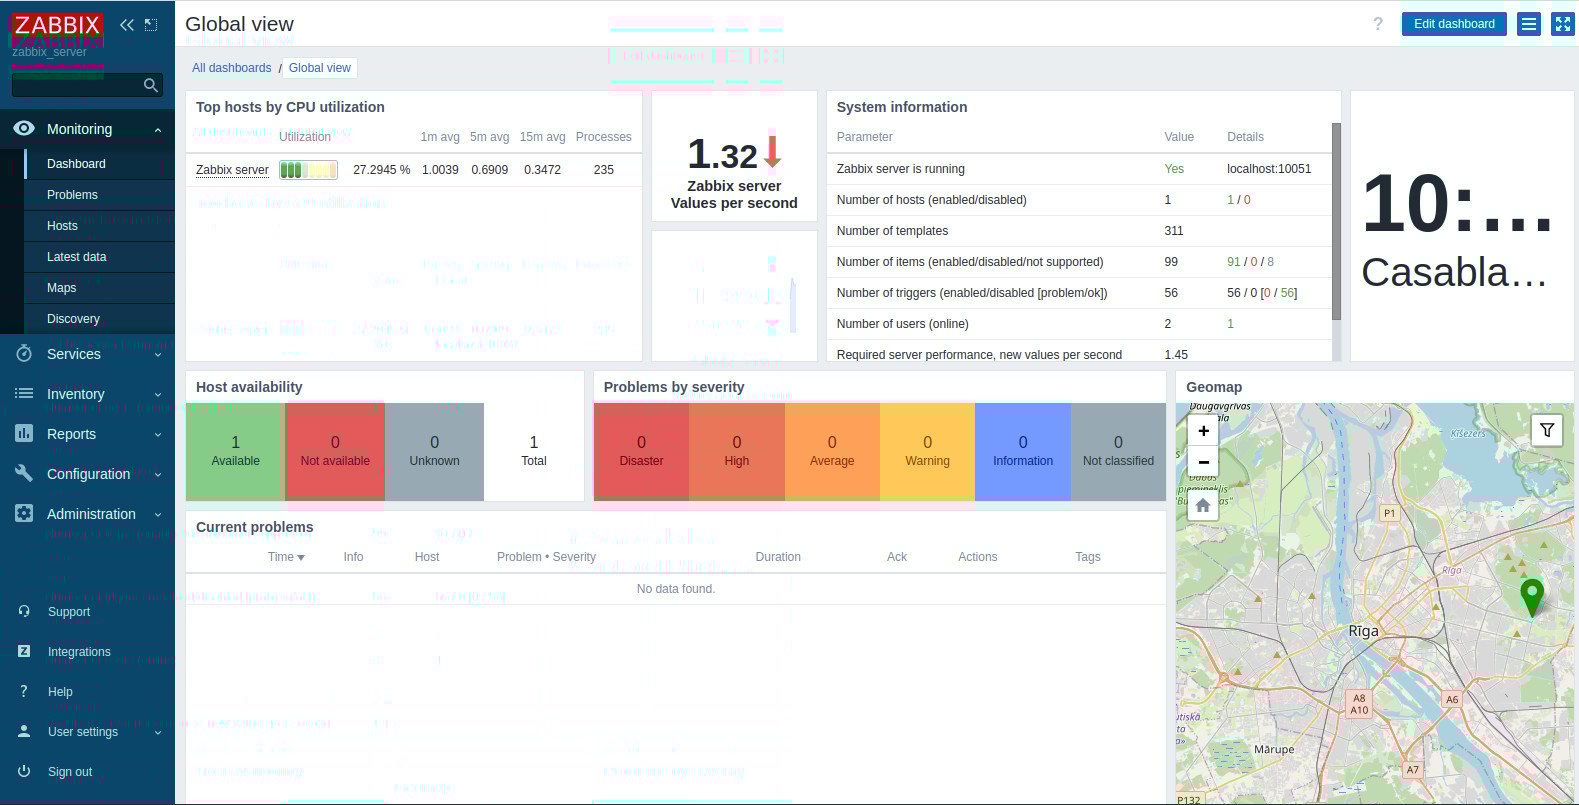
You now have Zabbix installed and you can use it to monitor your servers remotely. Check out the official documentation to learn more about the capabilities of Zabbix.
Reader Alert
If you feel that the technical instructions in this tutorial are time-consuming, or beyond your expertise, you can choose a very convenient and practical solution, ready-made, fully and professionally tested, and developed by SSD Nodes (That is us 😊). Just visit our website, choose the server’s specifications that fit your needs, and while prompted to choose among the operating systems and the 1-Click Applications we have, choose Zabbix from the dropdown menu, complete your checkout, and in a couple of minutes our algorithms will take care of all the technical aspects smoothly and effortlessly, just for you!
FAQ: Frequently Asked Questions on Zabbix
Zabbix vs Checkmk
Zabbix and Checkmk are both powerful monitoring tools. Zabbix excels in scalability and a rich set of features for diverse environments, while Checkmk offers a more user-friendly interface and simpler configuration. The choice depends on your specific needs and technical expertise.
How to Deploy Zabbix with Docker Compose?
To deploy Zabbix with Docker Compose, use the official Zabbix Docker images and create a docker-compose.yml file. This file should define the services required for a Zabbix instance, such as Zabbix Server, Web Interface, and Database.
What is Zabbix's Default Username and Password?
The default username for Zabbix is "Admin" with a capital "A," and the default password is "zabbix." It's recommended to change these credentials after the initial login for security purposes.
Zabbix vs Icinga
Zabbix and Icinga are both open-source monitoring tools. Zabbix is known for its robust and scalable architecture, while Icinga offers better integration with other tools and a flexible configuration. Your choice should be based on your specific monitoring needs and environment.
A note about tutorials: We encourage our users to try out tutorials, but they aren't fully supported by our team—we can't always provide support when things go wrong. Be sure to check which OS and version it was tested with before you proceed.
If you want a fully managed experience, with dedicated support for any application you might want to run, contact us for more information.