
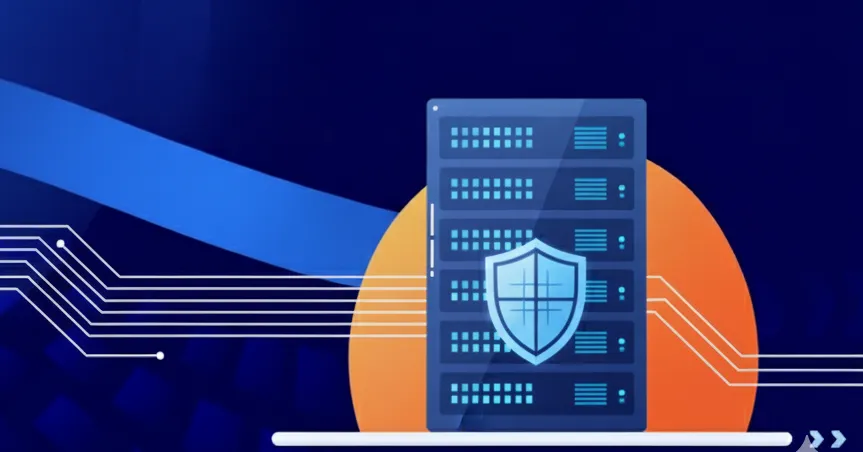
Your VPS server sits in the cloud, but it is always a target.
Every minute, automated bots scan for vulnerabilities.
They probe ports, test passwords, and look for any way inside your system.
I learned this the hard way in 2019 when one of my WordPress sites got compromised. We had all the usual security plugins, but we forgot the most basic protection: a proper firewall.
The attackers found an open port we didn't even know existed and used it to inject malware into every page.
That incident taught me something crucial: firewalls aren't just helpful. They're essential. The stats back this up too. Check Point's 2025 report shows cyber attacks increased 47% globally, with 20.5 million DDoS attacks blocked in Q1 2025 alone.
Here's how a properly configured VPS firewall with SSD Nodes Firewall Groups protects five different types of servers from the most common attacks.
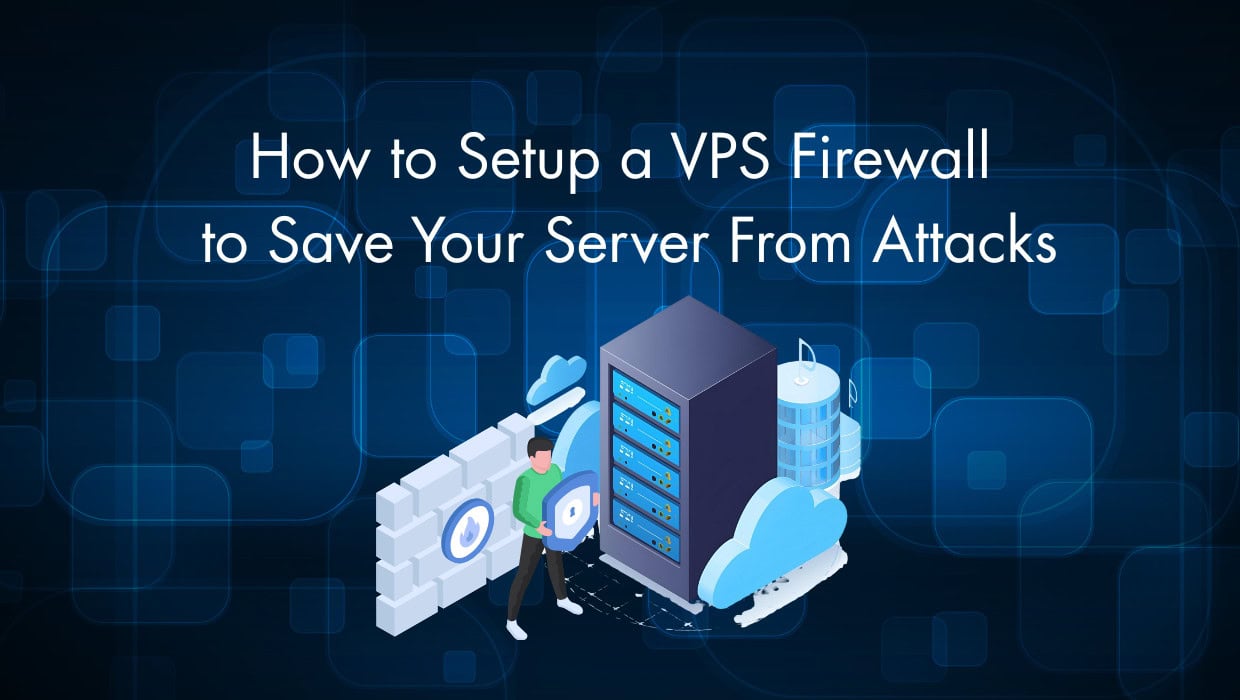
How to Setup a VPS Firewall
This article will walk you through how to setup a VPS firewall and explain why you need a firewall in the first place. As well as going through 5 essiential firewall use cases.
Note: SSD Nodes Advanced Firewall Groups is a paid add-on you can assign to your server during checkout or in your dashboard from the Add-ons tab. For less than half a cup of coffee per month, you get the peace of mind that your servers aren't sitting wide open to attackers.
1. Website Protection: Stopping the Flood Before It Starts
Web servers face the most diverse attacks in 2025. DDoS attacks now reach record-breaking volumes of 11.5 Tbps, while hackers constantly probe for SQL injection points and brute force admin panels.
These attacks happen automatically through botnets that scan every IP address on the internet looking for vulnerable WordPress installations, exposed admin panels, or misconfigured services.
WordPress sites get hit especially hard because of their popularity and plugin ecosystem. Q1 2025 data shows WordPress vulnerabilities increased 24%, with 58.86% requiring no authentication to exploit.
The most dangerous attacks target the wp-options table where malware gets stored, and checkout forms in WooCommerce stores where credit card data flows.
How SSD Nodes Firewall Groups Protect Your Website
With the increasing danger of malicious attacks. Here is a quick step by step guide to protect your website with SSD Nodes Firewall Groups:
Step 1: Create a Web Server Group
- Open your SSD Nodes dashboard and go to Firewall Groups
- Click "Create Group" and name it "Web Server Protection"
- Set direction to "Inbound"
Step 2: Allow Essential Web Traffic
- Click the ⚙️ icon of the "Web Server Protection" group. Then “Create Rule”.
- Create rule 1: Accept TCP port 80 (HTTP) from all sources
- Create rule 2: Accept TCP port 443 (HTTPS) from all sources
- Create rule 3: Accept TCP port 22 (SSH) from your office IP only
Step 3: Block Everything Else
- Create rule 4: Drop all other TCP traffic from all sources
This catches port scans, unusual connection attempts, and unknown protocols
Step 4: Apply to Your Server
- Link the firewall group to your web server
- Click "Apply Rules" to activate protection
For detailed instructions check out our Introducing Firewall Groups article.
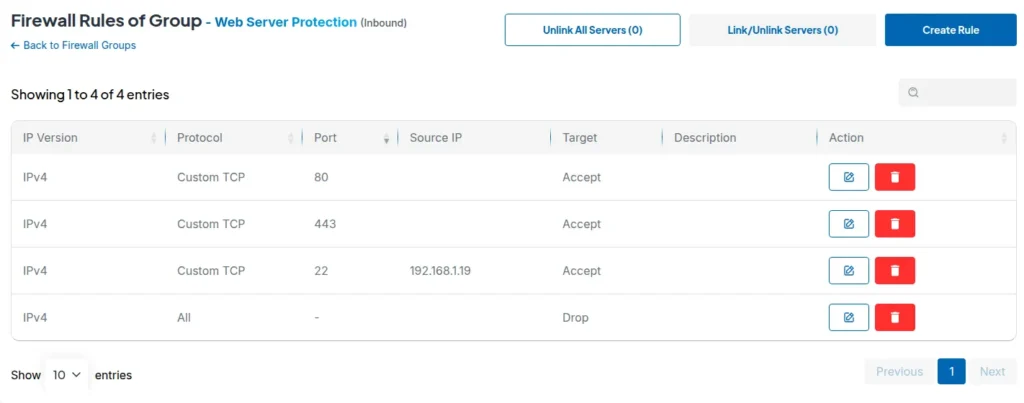
This setup blocks 99% of automated attacks while keeping your site accessible.
The beauty of this configuration lies in its simplicity and effectiveness.
Most web attacks rely on finding open ports that shouldn't be exposed to the internet. By explicitly allowing only the ports your website actually needs and blocking everything else, you eliminate the attack surface that bots constantly probe.
The key security principle here is restricting SSH access to known IP addresses, which alone prevents most brute force attempts since attackers can't even reach the SSH service from unauthorized locations.
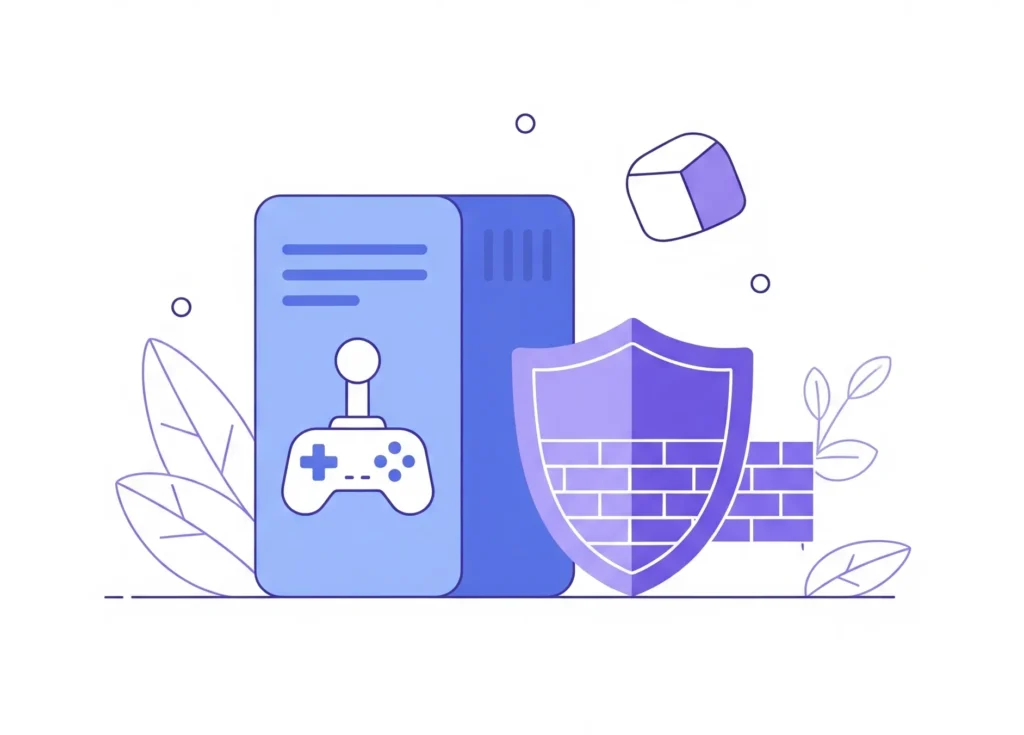
2. Game Server Security: Protecting Your Gaming Community
Gaming servers face massive DDoS attacks that often target both the server infrastructure and individual players.
These attacks aren't random, they're often coordinated efforts by rival gaming communities, cheaters trying to disrupt competitive matches, or extortion attempts against popular servers.
The scale has grown massively with the rise of gaming-as-a-service platforms and the increasing value of rare in-game items.
Counter-Strike 2 patched a vulnerability that exposed player IP addresses, which could lead to targeted DDoS attacks.
Minecraft servers were once vulnerable to a Log4j exploit that enabled remote code execution.
But you can prevent many of these attacks through a good firewall setup.
SSD Nodes Protection for Game Servers
Here how to use SSD Nodes Firewall Groups to protect your game servers:
Step 1: Identify Your Game Ports
- Minecraft Java: TCP/UDP
25565 - Valheim: UDP
2456-2458 - Counter-Strike 2: UDP/TCP
27015 - Rust: UDP
28015
Step 2: Create Game-Specific Rules
- Allow your game's specific ports from all sources (players need access)
- Allow SSH (port 22) from your admin IP only
- Allow RCON or admin ports from trusted IPs only
Step 3: Monitor and Adjust
- Check connection logs weekly
- Add suspicious IP ranges to your block list
- Update rules when your game updates ports

Gaming firewalls need careful balance between security and accessibility. You need protection without blocking legitimate players from around the world.
The challenge though, lies in distinguishing between legit gaming traffic and malicious attacks since both often use similar protocols and patterns
3. Database Server Security: Your Last Line of Defense
Database attacks increased dramatically in 2025 as cybercriminals realized that databases contain the most valuable information.
These vulnerabilities demonstrate how even mature database systems face ongoing security challenges that require both patching and network-level protection.
Database servers should never face the open internet directly, yet many developers expose MySQL port 3306 or PostgreSQL port 5432 for convenience during development or testing. This practice creates massive security holes because database protocols weren't designed for internet exposure.
The Shodan search engine regularly finds thousands of exposed database instances with default credentials or no authentication at all. Even with strong passwords, direct database exposure increases attack surface and creates unnecessary risk.
Database Protection with SSD Nodes
To protect your database, you can follow these steps:
Step 1: Create Database-Only Group
- Name: "Database Server Access"
- Direction: Inbound
- Goal: Block everything except application servers
Step 2: Application Server Access Only
Allow TCP ports 3306 (MySQL) 5432 (PostgreSQL) 6379 (Redis) from your server IPs or localhost only.
Step 3: Admin Access
- Allow SSH (port 22) from your admin workstation IP only
- Never allow database ports from 0.0.0.0/0 (anywhere)
- Use VPN if you need remote database access
Step 4: Backup and Monitoring
- Allow necessary monitoring tools from specific IPs
- Configure backup script access through internal network only
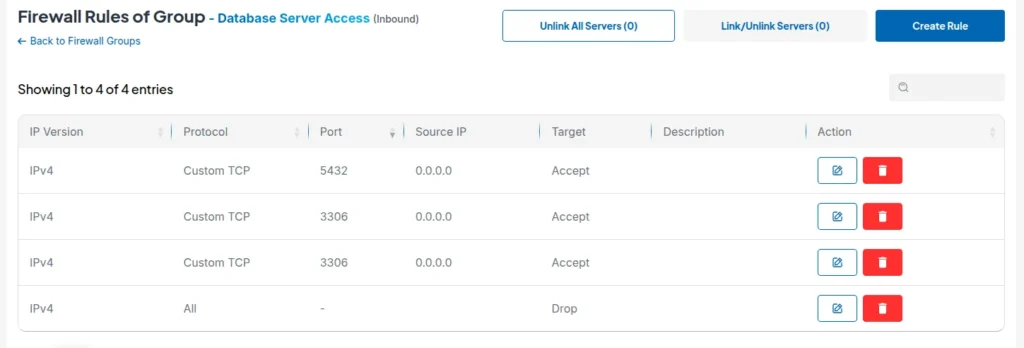
The principle here is simple but critical: databases should only communicate with applications, never directly with the internet.
Every direct database connection from unknown IP addresses should trigger immediate security alerts. This network segmentation approach creates a security perimeter where even if application servers get compromised, the database remains protected behind additional access controls.
Modern cloud architectures support this through VPC networks, security groups, and private subnets that keep database traffic isolated from public internet access.
4. Development Environment Safety: Protecting Your Testing Ground
Development servers often have the worst security practices in any organization. Developers expose ports 3000, 8080, and 8000 for testing convenience, use default passwords because "it's just dev," and skip security updates to avoid breaking their development workflow.
This creates a false sense of security since development environments often contain production data copies, API keys, and source code that attackers find extremely valuable.
Attackers specifically hunt for development servers because they know these environments typically have weaker security controls while containing sensitive information about production systems.
SSD Nodes Dev Environment Protection
To secure your development environment, follow these steps in your SSD Nodes dashboard:
Step 1: Create Development Access Group
- Name: "Dev Environment Access"
- Plan for multiple development ports
- Restrict access to your team only
Step 2: Common Development Ports
To secure access for development teams, a firewall should be configured to allow specific application ports only from authorized IP addresses. For example, allowing TCP port 3000 for React/Node.js development from office IPs, TCP port 8080 for alternative HTTP from team IPs, etc
Step 3: Team Access Management
- Create IP whitelist for all team members
- Update firewall rules when team members change
- Use VPN for remote developers
Step 4: Staging Environment Rules
Always mirror production firewall rules in staging, and make sure to test security configurations before production deployment. And of course, never ever expose staging databases to the internet
Development firewall rules should mirror production security as closely as possible to catch configuration issues before they reach live systems.
This prevents the common problem where applications work perfectly in development but fail in production due to security restrictions.
Testing security configurations in development environments saves time and prevents outages caused by overly restrictive production firewalls that block legitimate application traffic.
5. API Server Security: Protecting Your Digital Interfaces
APIs face the worst attack landscape in 2025 because they've become the main way applications communicate and share data.
The most concerning trend is that 95% of API attacks come from authenticated users rather than external threats.
This is because of credential compromise, insider threats, or session hijacking attacks where legitimate user accounts get used for malicious purposes.
Traditional security fails against these attacks because the traffic appears legitimate from a network perspective.
REST APIs face broken object-level authorization attacks where users can access data they shouldn't see by manipulating object IDs in API calls. GraphQL APIs deal with query complexity attacks where deeply nested queries consume server resources, and introspection abuse where attackers map out the entire API schema to find vulnerabilities.
Both API types require careful rate limiting, input validation, and access control that goes beyond simple network filtering.
Your API Protection Essientials
Step 1: Create API Access Group
- Name: "API Server Protection"
- Secure HTTP and HTTPS traffic
Step 2: Basic API Access Rules
- Allow TCP port 443 (HTTPS)
- Allow TCP port 80 (HTTP)
- Block all non-HTTP protocols
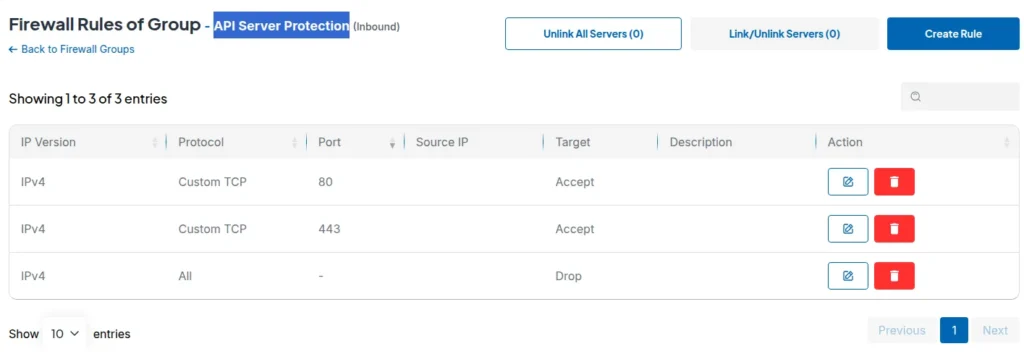
Make sure to also use rate limit to prevent your server from being abused.
API firewalls work best when combined with application-layer protection becasue network-level filtering can only do so much.
Emergency SSH Lockdown: Complete Access Denial
Sometimes you need to completely shut down SSH access to your server. Maybe you detected suspicious login attempts. Maybe you're running maintenance and want zero external connections. Or maybe you just want peace of mind while you're away.
One Reddit user asked exactly this:
"How do you deny all incoming connections to SSH port 22 via cloud firewall? I want to deny all incoming TCP traffic to SSH port to prevent connecting. If I want to connect via SSH again I would simply remove the rule from the dashboard."
This is actually a smart security practice. Complete SSH denial creates an air gap that no attacker can cross.
Complete SSH Lockdown with SSD Nodes
Step 1: Create Emergency Lockdown Group
- Go to your SSD Nodes Firewall Groups dashboard
- Create new group: "Emergency SSH Lockdown"
- Set direction to "Inbound"
Step 2: Create the Lockdown Rule
- Protocol: TCP
- Port: 22
- Source: All
- Action: Drop
- Description: "Emergency SSH lockdown - remove to restore access"
Step 3: Apply the Lockdown
- Link this group to your server
- Click "Apply Rules"
SSH access will now be completely blocked.
Step 4: Restore Access When Needed
- Simply unlink the firewall group from your server
- Or delete the specific SSH drop rule
SSH access should return immediately.
Real-World Firewall Implementation Tips
Setting up firewall rules takes planning. So you must start simple with basic port allow/deny rules, then add complexity as you get comfortable with the system.
Overly complex initial configurations often create security holes or block legitimate traffic.
And please keep your rules current through regular maintenance.
Review firewall logs weekly to spot attack patterns and check for legitimate traffic getting blocked.
Update rules when services change ports or IP addresses, and remove outdated exceptions that just add unnecessary complexity.
Also, plan for emergencies before you need them, and test these emergency procedures regularly and document the steps so your team can use them during actual emergencies.
The Cost of Not Having a Firewall
Unprotected servers don't last long in 2025. Ransomware attacks increased 126% Year over Year in 2025, while the average data breach costs $4.88 million.
Small businesses think they're safe, but automated attacks don't discriminate. Bots scan every IP address on the internet. They probe every port. They test every common password.
Sure, a firewall won't stop every attack, but it does stop the easy ones. And most attacks are easy ones . bots looking for quick wins, not sophisticated hackers targeting your specific business.
Beyond Basic Protection
SSD Nodes' Firewall Groups give you enterprise-level protection through a simple interface. You don't need to memorize iptables commands or worry about locking yourself out of your server.
The key is thinking defensively.
Every open port is a potential entry point. Every service needs justification. Every rule needs a purpose.
Set up your firewall rules today. Your future self will thank you when the next wave of attacks hits. Check out SSD Nodes' Firewall Groups in your dashboard.
A note about tutorials: We encourage our users to try out tutorials, but they aren't fully supported by our team—we can't always provide support when things go wrong. Be sure to check which OS and version it was tested with before you proceed.
If you want a fully managed experience, with dedicated support for any application you might want to run, contact us for more information.