
Looking for a detailed guide on how to install Git on Debian 12 and use it for version control on your server? This is the article you’ve been looking for.
Git and version control is probably the most important part of software development these days, and Debian is one of the most widely used operating systems among developers. No matter your current expertise level in software development, learning to use Git is extremely important for good collaboration and project management.
In this guide, I'll walk you through the process of installing and configuring Git on Debian 12 in a few steps.
Prerequisites
Before you install Git, you need:
- A Debian 12 server. Get your VPS hosting from a reputable and trustworthy provider like SSD Nodes. We offer powerful Debian servers and the best deals. Take a look at our offerings and prepare for your mind to be blown 🤯.
Check out our How to access your server using SSH guide to learn how to access your server and create a sudo user.
Step 1: Updating the System Package List
Start by updating the packages in the package manager cache to the latest available versions using the following command:
sudo apt updateStep 2: Install Git on Debian 12
Debian offers two primary ways to install Git:
- Through the APT package manager, which is simpler and faster.
- Compiling Git from source (which provides more control over the version you install). We'll cover both methods below.
Install Git Using APT
The easiest way to install Git on Debian 12 is by using the APT package manager. This method installs a stable version of Git directly from Debian’s official repositories. Here’s how to do it:
sudo apt install gitOnce the installation is complete, you can verify the version of Git installed by running:
git --versionOutput:
git version 2.39.5At this point, Git should be ready for use. However, if you need a more up-to-date version, you can install Git from source. To do this, follow the instructions outlined in the next section.
Install Git From Source
If you need the latest version of Git or want to customize the installation, you can compile Git from source. This method requires a few additional steps, but it allows for greater flexibility.
First, install the necessary dependencies:
sudo apt install wget dh-autoreconf libcurl4-gnutls-dev libexpat1-dev \
  gettext libz-dev libssl-dev asciidoc xmlto docbook2x install-info build-essential
Next, download the latest Git source code. Visit the Git release page and find the latest version:
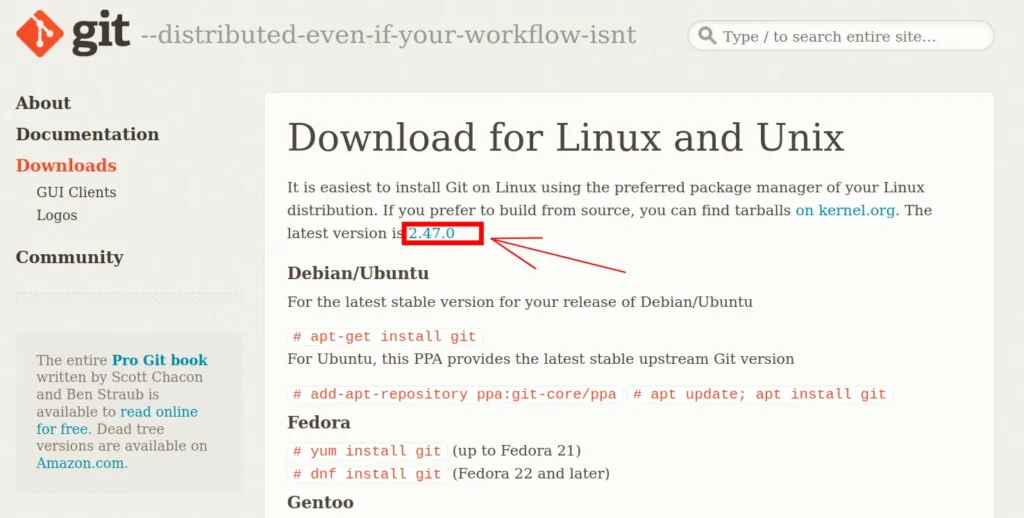
Next, use the following command to download and extract it (replace 2.47.0 with the latest version number):
• wget https://www.kernel.org/pub/software/scm/git/git-2.47.0.tar.gz
tar -zxf git-2.47.0.tar.gz
cd git-2.47.0
Now, generate the configuration script for Git:
make configureOutput:
GIT_VERSION = 2.47.0
    GEN configure
Run this configuration script, specifying that the Git binaries should be installed under the /usr directory:
./configure --prefix=/usrThe output will inform you that the checks are done and the configuration files are created:
configure: creating ./config.status
config.status: creating config.mak.autogen
config.status: executing config.mak.autogen commands
Compile Git and build the documentation:
make all doc infoFinally, install Git, along with its documentation:
sudo make install install-doc install-html install-infoVerify that Git was installed successfully:
git --versionYou should see a version that matches the tarball you’ve downloaded:
git version 2.47.0Step 3: Configuring Git
Once Git is installed on your Debian 12 server, the next step is to configure it. This is important because Git needs to associate your commits with your identity. Run the following commands to set up your name and email address:
git config --global user.name "Your Name"
git config --global user.email "[email protected]"
These settings will be used in every Git commit you make, so make sure they are accurate. You can verify the configuration at any time by running:
git config --listStep 4: Using Git
Now that Git is installed and configured, it’s time to start using it. Below, we’ll cover some of the most common tasks you'll perform with Git, such as cloning and creating repositories, staging and committing changes, and also managing branches.
Cloning an Existing Repository
If you want to work on an existing project, you can clone its repository. Cloning creates a local copy of the remote repository on your machine, similar to downloading a directory with its files from the web.
To clone a repository, use:
git clone https://github.com/user/repo.gitThis command downloads the entire repository, including its history.
Create a New Repository
To demonstrate how to use git in a project, create a new directory and navigate to it:
mkdir myproject
cd myproject
Then, run the following command to mark this myproject directory as a Git repository:
git initThis will create a hidden .git directory, which Git uses to track changes in your project. From here, you can start adding files and making commits.
Git Staging
Before committing changes, you need to stage them. Staging allows you to choose which changes should be part of the next commit.
Changes can be in the form of new files, or modifications to existing files.
For example, let’s add a new file called index.html to your project:
touch index.htmlUse git status to check the status of your Git repository:
git statusThe output will be similar to the following:
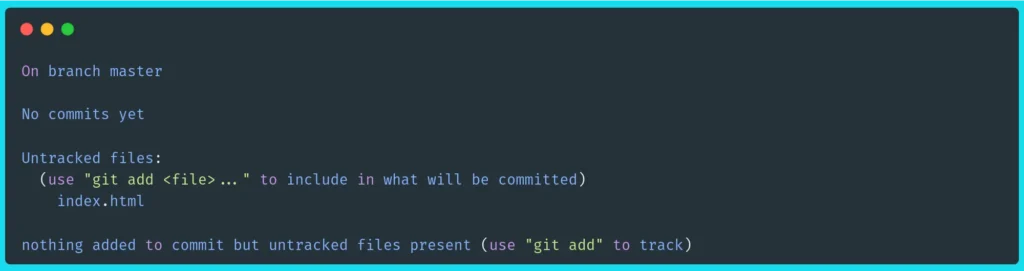
This informs you that there is an untracked file called index.html with a helpful message telling you how to make it trackable.
To add this new index.html to the Git repository and make it trackable, use the git add command:
git add index.htmlThis adds the new file to the staging area, meaning Git is now tracking it and will include it in the next commit.
Check git status again:
On branch master

No commits yet

Changes to be committed:
  (use "git rm --cached <file>..." to unstage)
    new file:   index.html
You can also stage all new files and modifications at once by using:
git add .This command adds all modified and untracked files to staging, preparing them for the next commit.
Committing Changes
Once your changes are staged, the next step is to commit them. Commits are snapshots of your project at a given point in time. To commit your staged changes, run:
git commit -m "Describe your changes here"Make sure your commit message is clear and actually describes what the new code does.
Adding a Github Remote Repository and Pushing Changes
To collaborate on a project hosted on the web, such as projects on GitHub, you first need to add a remote repository after initializing your local Git repository.
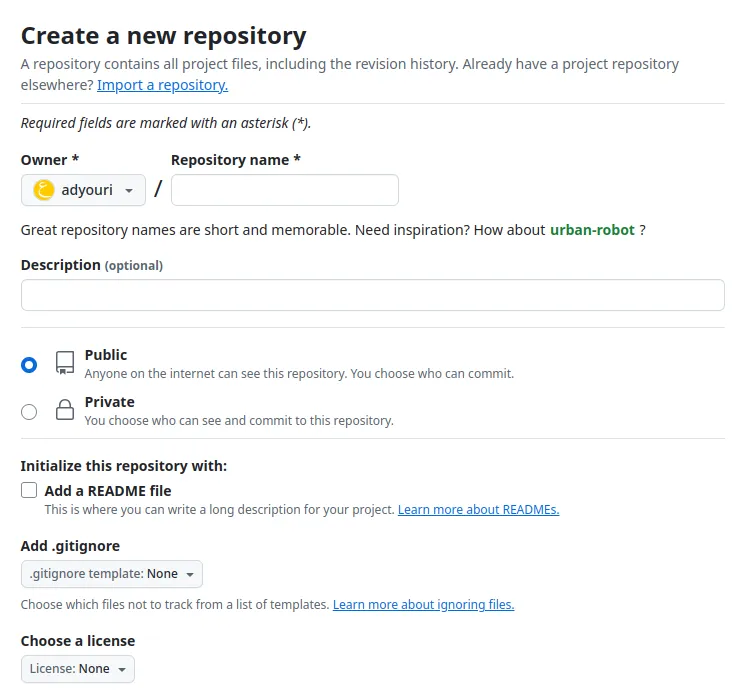
The first step is to create a repository on GitHub. Go to the Create a New Repository page, and create a repository.
Once the repository is created, copy the repository URL and use it to add a remote repository to your local Git repository:
git remote add origin <repository-url>This command sets up the connection between your local repository and the remote one.
You can check if the remote repository was added successfully by running:
git remote -vOnce you've added the remote repository and committed your changes, you can push them to the remote branch using git push:
git push -u origin mainThis command pushes your commits to the main branch of the remote repository. If you're working on a different branch, replace main with the correct branch name, you may need to replace it with master in certain cases.
If you’re using Github, Git will ask for your GitHub username and password. Type in your username and enter your personal access token for the password.
To create a personal token on Github, navigate to the New personal access token page. Select the scopes that you want to control, and then click Generate Token.
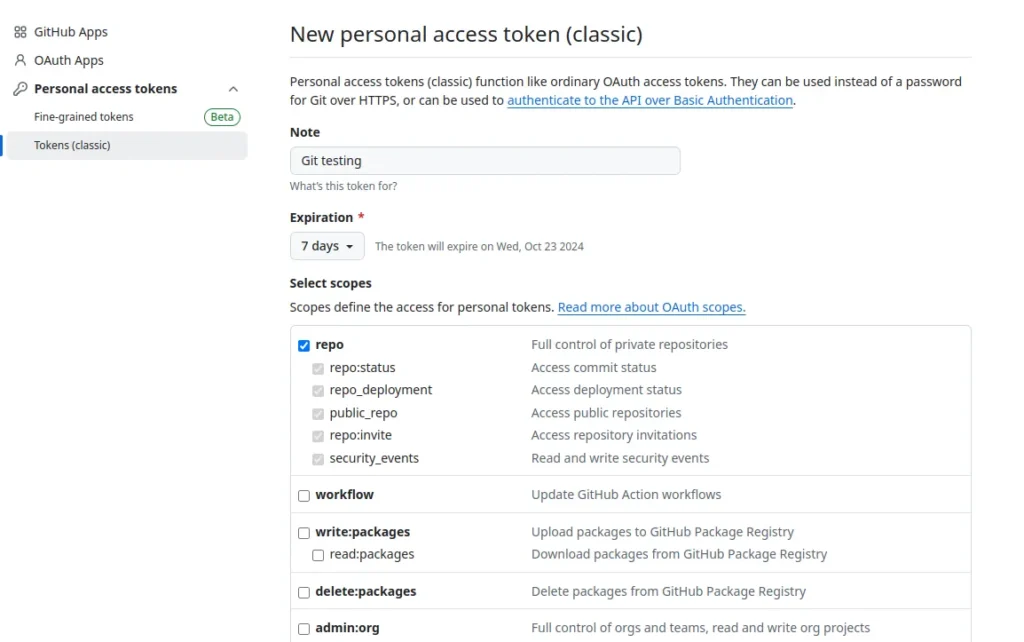
You’ll be redirected to a page with your new token.
For more information, check out Managing your personal access tokens.
After using your personal access token as a password. The git push -u origin main command will give you the following output:
Enumerating objects: 3, done.
Counting objects: 100% (3/3), done.
Writing objects: 100% (3/3), 215 bytes | 215.00 KiB/s, done.
Total 3 (delta 0), reused 0 (delta 0), pack-reused 0
To https://github.com/user/repo
* [new branch] main -> main
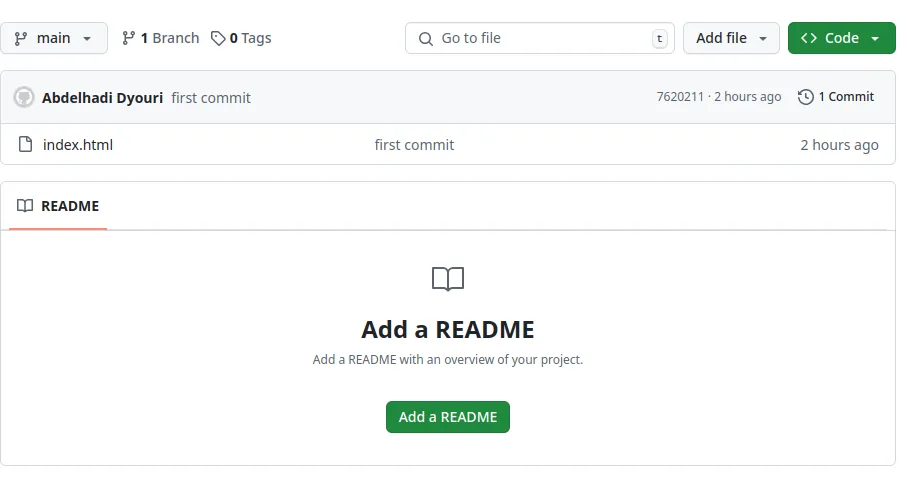
branch 'main' set up to track 'origin/main'.Your Github repository will then host your code:
Git Branching
Git makes it easy to work on different features or fixes in isolation using branches. To create a new branch, run:
git branch <branch-name>Then, switch to that branch with:
git checkout <branch-name>This allows you to work on a separate branch without affecting the main project. Once your changes are ready, you can merge the branch back into the main branch. For more on branches, check out this page.
Undoing Changes
Mistakes happen, but don’t worry! Git gives you great tools to undo errors. If you want to undo changes that haven’t been committed yet, use:
git checkout -- <filename>This will revert the specified file to the last committed state. If you need to undo a commit, you can use:
git reset --soft HEAD^This undoes the last commit but leaves your changes in the staging area, allowing you to re-commit them after making adjustments.
For more on undoing changes with Git, check out: How to Undo Anything with Git
Step 6: Troubleshooting Common Git Issues
Sometimes, you might encounter issues while using Git. Here are some common problems and how to solve them:
- “Command not found” Error: If you receive a “git: command not found” error, it means Git isn’t installed or isn’t in your system’s PATH. Verify the installation and check your environment variables.
- Permission Denied (Public Key): This error often occurs when pushing or pulling from a remote repository like GitHub. It usually means your SSH keys aren’t configured correctly. To fix this, generate a new SSH key using
ssh-keygenand add it to your GitHub account. - Merge Conflicts: Merge conflicts happen when Git can’t automatically merge two branches because of conflicting changes. You’ll need to manually resolve the conflict by editing the files and then marking them as resolved using:
git addAfter resolving the conflict, you can commit the changes.
- Detached HEAD State: If you find yourself in a detached HEAD state, it means you’re not on a branch, but rather on a specific commit. To fix this, switch back to your branch with:
git checkout main
These common issues are easy to fix once you understand the root cause, so don’t be discouraged if you encounter them!
Conclusion
By following this guide, you should now have a fully functional Git setup on your Debian 12 system. You've learned how to install Git, configure it, and perform essential tasks such as creating repositories, cloning, committing changes, and working with branches. We've also covered how to connect your local repository to GitHub for easy collaboration and remote backups.
Git is a powerful tool that can make managing your code much more efficient, whether you're working solo or with a team. Don’t hesitate to explore Git’s vast array of features as you grow more comfortable with it. And if you run into any issues, you now have some troubleshooting steps to guide you.
FAQ
How do I upgrade Git to the latest version on Debian 12?
To upgrade Git to the latest version on Debian 12, first check if a newer version is available through the APT package manager by running sudo apt update and sudo apt upgrade git. If no newer version is available, you can download and compile the latest Git version from source to manually update it as I’ve already explained in this tutorial.
How do I uninstall Git from Debian 12?
To uninstall Git from Debian 12, you can use the following command: sudo apt remove git. This will remove the Git package from your system. If you also want to remove configuration files and dependencies no longer needed, you can run sudo apt autoremove.
How do I configure Git to ignore specific files on Debian 12?
To configure Git to ignore specific files or directories in a repository on Debian 12, create a .gitignore file in the root of your repository. Inside this file, list the names of files or directories you want Git to ignore. For example, you can add *.log to ignore all log files or node_modules/ to ignore the node_modules directory.
A note about tutorials: We encourage our users to try out tutorials, but they aren't fully supported by our team—we can't always provide support when things go wrong. Be sure to check which OS and version it was tested with before you proceed.
If you want a fully managed experience, with dedicated support for any application you might want to run, contact us for more information.