
Are you looking for a detailed, step-by-step guide to install Webmin on Rocky Linux 9? You've come to the right place!
Webmin is a powerful, free, and open-source web server management tool designed to make things easier when it comes to Linux server management. With a user-friendly web interface, Webmin allows you to manage sysadmin configurations such as user accounts, disk quotas, DNS settings, and services. You can also easily handle web servers, databases, and much more.
For those using a LAMP stack on Rocky Linux, Webmin simplifies the management of Apache, MySQL, PHP applications, directly from your browser.
In this tutorial, I’ll guide you through the process of installing Webmin on a Rocky Linux server. We’ll also explore essential system administration tasks such as monitoring system performance, adding users with custom permissions, managing packages, and executing software or commands directly from Webmin’s dashboard.
Prerequisites
- A Rocky Linux 9 server with root access or a
sudouser. If you haven't noticed, we offer extremely powerful Rocky Linux servers at the globe's absolute lowest price. Take a look at our offerings and prepare for your mind to be blown 🤯. - Access your sever via SSH, check out How to access your server using SSH for instructions.
Note
If you want to install Webmin in minutes without the hassle, try our 1-click Webmin application. Just choose a server, click Customize Your Own Server, go to the Apps tab under Select Server Image, and select Webmin—it’s that simple! On the other hand, if you're into DIY, keep reading.
Step 1: Updating Rocky Linux System Packages
Start by checking for updates on your Rocky Linux 9 system:
sudo dnf check-updateIf you see a list of packages that need to be updated, then, it's a good idea to perform a comprehensive update that installs available updates:
sudo dnf upgradeStep 2: Install Webmin on Rocky Linux 9
To install Webmin on Rocky Linux 9, you'll download the Webmin repository setup script, and install a repository that will allow you to manage and update Webmin packages with the dnf package manager. Next, you'll update the package cache, and finally you'll use the dnf install webmin command.
Download and Run the Setup Script
Use Curl to download the setup script:
sudo curl -o setup-repos.sh https://raw.githubusercontent.com/webmin/webmin/master/setup-repos.shRun this script:
sh setup-repos.shYou’ll receive output similar to the following:
 Setting up Webmin repository ..
 .. done
 Webmin package can now be installed using dnf install webmin command.
We can now install Webmin using dnf .
Install Webmin
After the repositories setup, you can now install Webmin:
sudo dnf install webminYou’ll receive output like this:
==========================================================================================================
 Package                         Architecture    Version                     Repository              Size
==========================================================================================================
Installing:
 webmin                          noarch          2.202-1                     webmin-noarch           39 M
Installing dependencies:
 perl-AutoLoader                 noarch          5.74-481.el9                appstream               20 k
 perl-B                          x86_64          1.80-481.el9                appstream              178 k
 perl-Carp                       noarch          1.50-460.el9                appstream               29 k
 perl-Class-Struct               noarch          0.66-481.el9                appstream               21 k
 perl-Data-Dumper                x86_64          2.174-462.el9               appstream               55 k
 perl-Digest                     noarch          1.19-4.el9                  appstream               25 k
 ..
 ..
Transaction Summary
==========================================================================================================
Install  73 Packages

Total download size: 49 M
Installed size: 156 M
Is this ok [y/N]:
Type y and then hit ENTER .
Output:
  ...
  ...
  ...
  perl-overload-1.31-481.el9.noarch                   perl-overloading-0.02-481.el9.noarch
  perl-parent-1:0.238-460.el9.noarch                  perl-podlators-1:4.14-460.el9.noarch
  perl-subs-1.03-481.el9.noarch                       perl-vars-1.05-481.el9.noarch
  rocky-indexhtml-9.0-2.el9.noarch                    shared-mime-info-2.1-5.el9.x86_64
  tar-2:1.34-6.el9_4.1.x86_64                         unzip-6.0-56.el9.x86_64
  webmin-2.202-1.noarch

Complete!
Check that the webmin service is running properly:
sudo systemctl status webmin● webmin.service - Webmin server daemon
Loaded: loaded (/usr/lib/systemd/system/webmin.service; enabled; preset: disabled)
Active: active (running) since Sun 2024-09-29 18:34:52 UTC; 16min ago
Main PID: 15367 (miniserv.pl)
Tasks: 1 (limit: 48896)
Memory: 26.4M
CPU: 10.377s
CGroup: /system.slice/webmin.service
└─15367 /usr/bin/perl /usr/libexec/webmin/miniserv.pl /etc/webmin/miniserv.conf
Sep 29 18:34:52 ssdnodes-test1711422637 systemd[1]: Starting Webmin server daemon...
Sep 29 18:34:52 ssdnodes-test1711422637 systemd[1]: Started Webmin server daemon.If you see Active: active (running) in the output, this means everything went well. If you’re having trouble at this point, make sure to carefully read the previous instructions and make sure your Webmin repository was properly set up.
Note: Webmin is accessible via port 10000. If you have a firewall, you need to allow Webmin's port through the firewall-cmd firewall, you may also need to allow port 80 for resolving a Let’s Encrypt certificate:
sudo firewall-cmd --add-port=10000/tcp --permanent
sudo firewall-cmd --add-port=80/tcp --permanent
Reload the firewall-cmd to apply changes:
sudo firewall-cmd --reloadWarning: You should be extremely careful with your firewall security. It is best to allow only a few trusted IP addresses or IP ranges to access your Webmin control panel.
Access Webmin
With Webmin installed on your Rocky Linux 9 server, use your browser to visit the following URL, replacing your_ip_address_or_domain with your server's IP address or domain name:
https://your_ip_address_or_domain:10000At first, your browser will show a "Not Secure" warning. This is normal, as Webmin uses a self-signed certificate, which browsers don't recognize as trusted. Don’t worry, we’ll fix this in the next step.
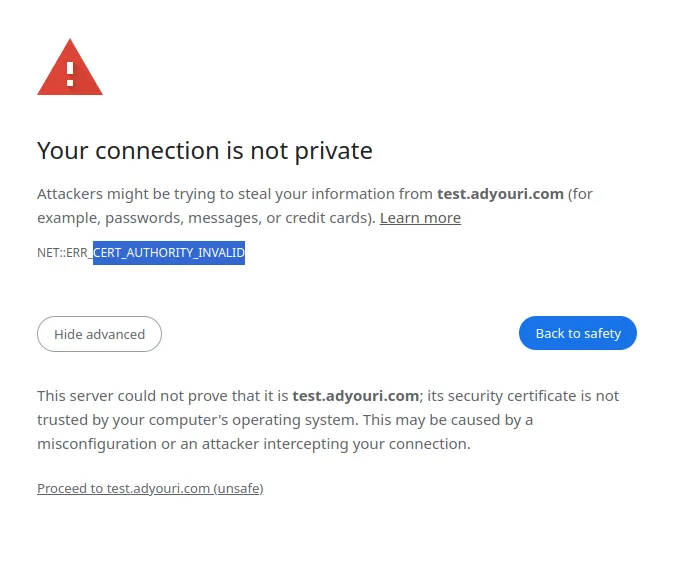
Click the Advanced button or More information depending on the browser, and choose to proceed.
Webmin’s Default Login
The default login credentials of Webmin are the same as your Unix user. You can also use the root account of your server with root as a username and the root’s password. This will allow you to login to your Webmin dashboard.
Webmin Dashboard
You’ll be moved to the dashboard:
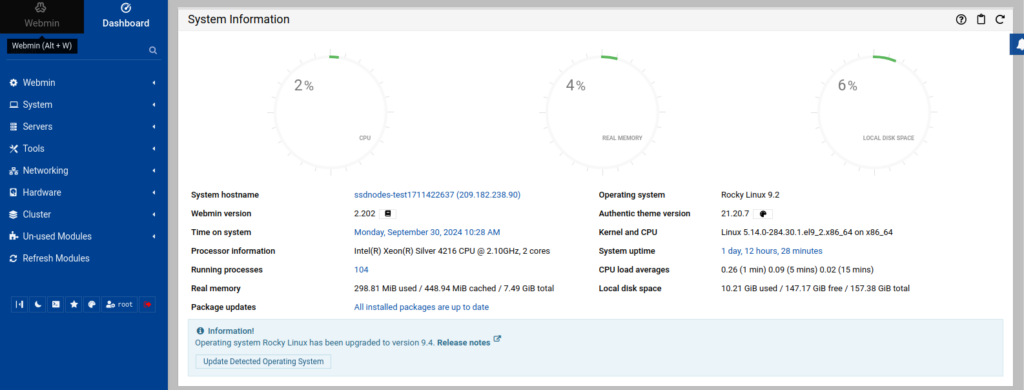
With this, you have Webmin installed on your Rocky Linux 9 server and you are ready to use it for server management! But before that, you need to secure it with HTTPS using a Let’s Encrypt SSL certificate.
Reader Alert: Side Note!
To avoid all these steps and install Webmin in minutes, you can use our tried and tested 1-click Webmin application. Just choose a server, click Customize Your Own Server, under Select Server Image go to the Apps tab, then choose Webmin. This will set up Webmin in minutes!
Step 3: Adding a Let’s Encrypt SSL Certificate to Webmin
Webmin manages sensitive components on your Rocky Linux server, and it is important to secure it using HTTPS. To do this, follow these steps and set up a Let’s Encrypt SSL certificate.
Install Certbot
First you’ll need to install the Certbot Let's Encrypt client application, which manages certificate requests.
If you haven’t already, enable the EPEL repository:
sudo dnf install epel-release -yThen install certbot:
sudo dnf install certbot -yNext, use Certbot to request a new Let's Encrypt certificate. Replace webmin.your_domain.com with your domain and [email protected] with your email address:
sudo certbot certonly --standalone -d webmin.your_domain.com -m [email protected] --agree-tosAfter the certificate is generated, your output should be similar to the following:
Successfully received certificate.
Certificate is saved at: /etc/letsencrypt/live/webmin.your_domain.com/fullchain.pem
Key is saved at:         /etc/letsencrypt/live/webmin.your_domain.com/privkey.pem
This certificate expires on 2025-01-03.
These files will be updated when the certificate renews.
Certbot has set up a scheduled task to automatically renew this certificate in the background.
In this output, you have the following part. This indicates the path of the certificate file and the private key file. Copy these two paths and save them for the next step:
Certificate is saved at: /etc/letsencrypt/live/webmin.your_domain.com/fullchain.pem
Key is saved at:         /etc/letsencrypt/live/webmin.your_domain.com/privkey.pem
Installing the Let's Encrypt Certificate
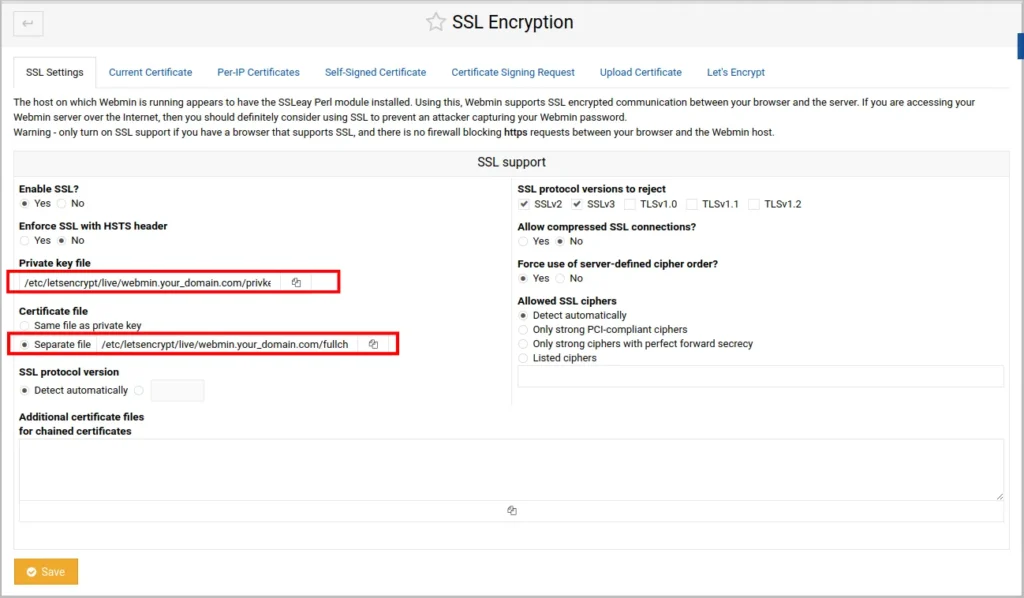
On Webmin, you can install the Let's Encrypt certificate you generated earlier by setting up certificate and private key paths.
- Click Webmin in the left-hand menu, then Webmin Configuration.
- Click on SSL Encryption.
- On the SSL Settings tab set up the Private key file field to the path you copied earlier:
/etc/letsencrypt/live/webmin.your_domain.com/privkey.pem - Select the Certificate file as Separate file, and fill in the field with your certificate file:
/etc/letsencrypt/live/webmin.your_domain.com/fullchain.pem - Click Save
Restart Webmin on your Rocky Linux shell:
sudo systemctl restart webminWait for a few seconds while Webmin reboots, then refresh the page. Let's Encrypt should now be enabled with HTTPS protection.
You can now use Webmin for web server management.
Step 4: Using Webmin to Perform Basic Sysadmin Tasks
Webmin includes various modules for managing your system. In this step, you'll learn how to:
- Use Webmin to view system log messages.
- Change the Webmin Port
- Navigate the file system.
- Monitor server status.
- Install and Update packages.
- Manage Unix users and groups.
- Handle Webmin accounts.
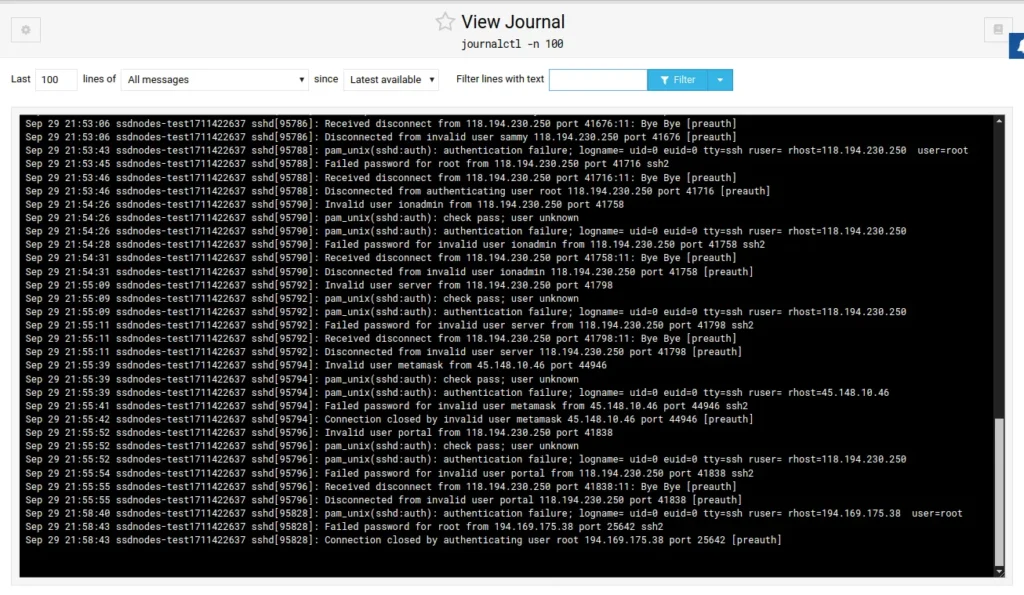
View System Logs
In case you want to investigate and monitor your system, you can view your Rocky Linux server logs directly on the Webmin dashboard.
- On the left-hand Webmin menu click System then System Logs.
- On the toolbar, you can choose how many line you want to show and you can filter basic on specific text.
- You can also choose between types of logs, such as errors, alerts, and debug messages.
Change the Webmin Port
You may want to change the default Webmin 10000 port so you can access your interface directly from a clean URL such as https://webmin.your_domain.com, instead of the default https://webmin.your_domain.com:10000.
To achieve this, go to Webmin on the left-hand menu, then:
- Click Ports and Addresses.
- Under Listen on port, change the
10000default port to443HTTPS port. - Click Save.
- You’ll be redirected to the new URL at
https://your_domain.comorhttps://webmin.your_domain.com.
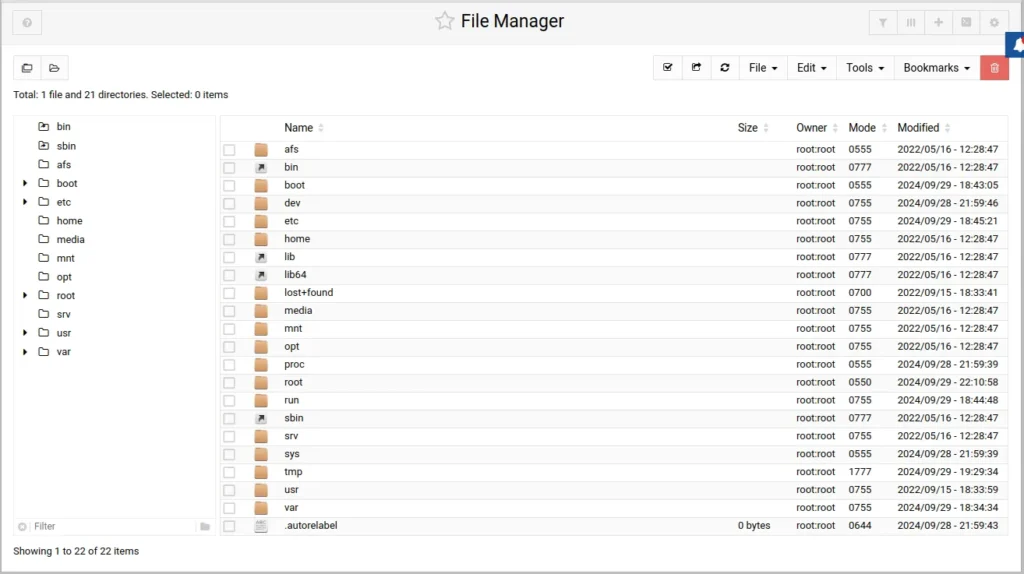
Webmin File Manager
To view your Rocky Linux files directly from the Webmin UI:
- On the left-hand Webmin menu click Tools.
- Click on File Manager.
- On the right menu, you can create new files, directories and even upload and download files from external URLs.
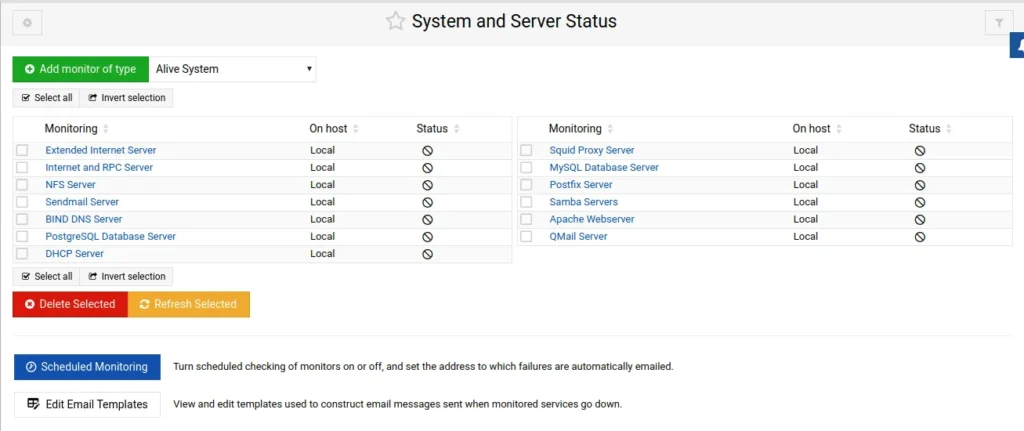
Monitoring Server Status
You can use Webmin to monitor services such as DHCP, PostgreSQL, and Sendmail servers.
Navigate to Tools, then System and Server Status. Here you’ll find all the services you can monitor:
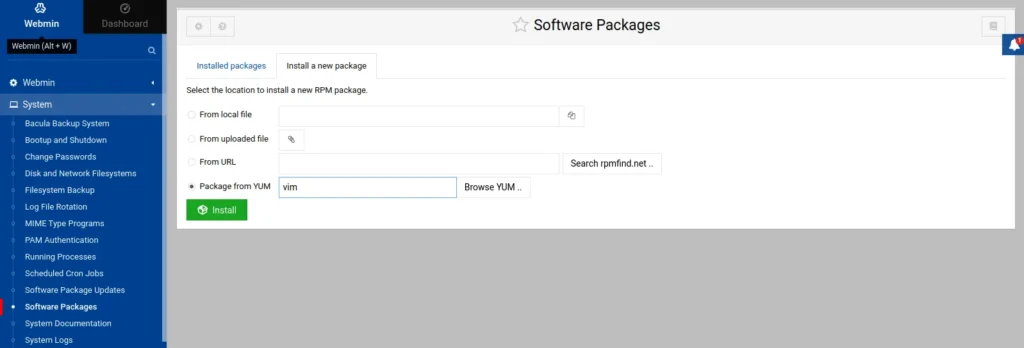
Installing Packages
To install a software package on Rocky Linux using Webmin, follow these steps:
- On the left-hand Webmin menu click System then Software Packages.
- Click Install a new package, then Select the Package from YUM radio button.
- Type in the package name you want to install, for example
vim, then click Install. You'll be taken to a page that asks you to confirm installing the package and it's dependencies. - Click Install Now.
Updating Packages
To update all your packages to the latest version using Webmin, follow these steps:
- Navigate to System then Software Package Updates.
- Check and uncheck packages you want updated.
- To update all packages, make sure they are all checked, then click Update Selected Packages. You'll go to a page listing the packages that will be updated.
- Click Install Now.
The update process will begin, and once it’s complete, you might be prompted to reboot the system. To reboot click on the "Reboot Now" button.
Managing Unix Users and Groups
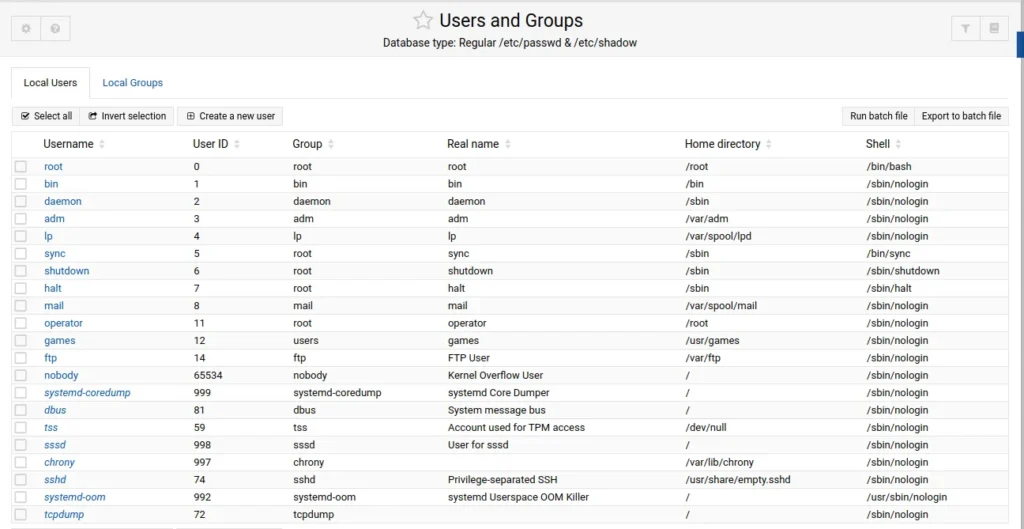
A Unix user is a user that connects to your server via SSH or FTP, owns files, and has a home directory. In this section, we'll create a new user with a home directory and add them to the sudo group for admin rights. We'll use example_user but feel free to choose any other name.
- Click System > Users and Groups.You’ll see a table for all the current system users under Local Users and a table for the current system groups under Local Groups.
- In the Local Users table, click Create a new user.
- Type in
example_userin the Username field. - Select Automatic for the User ID field.
- For Real Name, set it to the full name of the user or add a descriptive name such as Testing User or Network User.
- Select Automatic for the Home Directory field to be created automatically.
- Set Shell to
bin/bash. - Set Password to Normal password and insert a strong password for your user.
- In the Group Membership menu, select New group with same name as user for the Primary group.
- In the Secondary groups, click on sudo in the All groups list then click the right arrow. This adds
sudoto the In groups list. - Click Create.
With this, you now have a new user called example_user on your system with sudo privileges.
Creating a Safe Webmin User
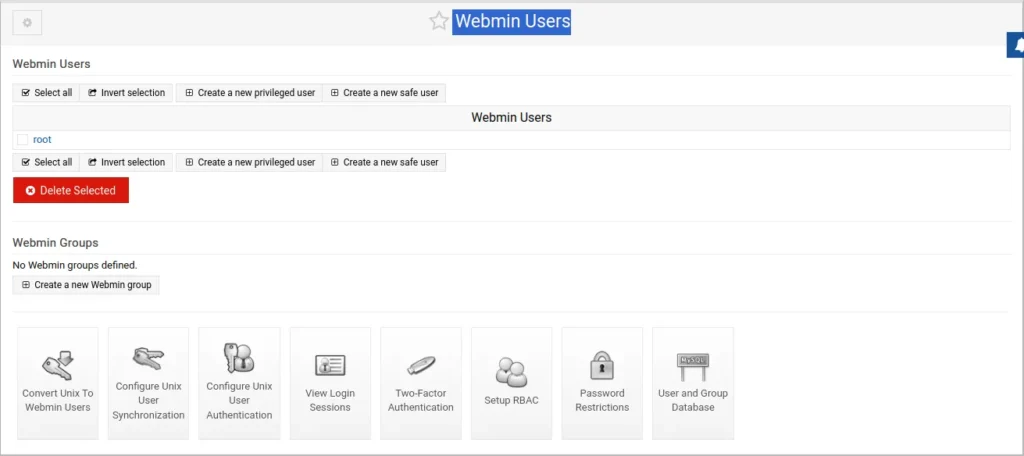
In addition to managing Unix users, Webmin also allows you to create a safe user with access to limited, non-critical modules. This is useful for users who don't need full system control but require access to certain tools, such as viewing or applying software updates.
To create a safe Webmin user:
- Click Webmin in the left menu, then Webmin Users.
- Select Create a new safe user.
- Enter a Username and set a strong password.
- Check Force change at next login to ensure the user sets a new password.
- Assign a Real Name (like "Update Viewer").
- Under Security and limits options, set the Inactivity logout time (e.g., 30 minutes) and Minimum password length.
- In Available Webmin modules, choose only the specific modules the user should access, like System and Server Status.
- Click Create.
The new user will only see the assigned modules when they log in, ensuring restricted access.
Log out from Webmin by clicking the red logout icon at the bottom of the left-hand menu, and log in with the new user.
Creating a Privileged Webmin User
If a user needs full system control, you can create a privileged Webmin account with administrative privileges. This user will have access to all Webmin modules or specific critical ones.
To create a privileged Webmin user:
- Click Webmin in the left menu, then Webmin Users.
- Choose Create a new privileged user.
- Enter a Username and set a strong password.
- Enable Force change at next login.
- Assign a Real Name (like "Admin User").
- Under Security and limits options, set parameters such as Inactivity logout time (e.g., 30 minutes) and Minimum password length (e.g., 15 characters). You can also restrict access by IP or time.
- In Available Webmin modules, select all or choose specific modules based on the user’s role.
- Click Create.
After logging in with this new account, the user will have full or specific system access, based on the selected permissions.
Conclusion
With this, you’ve learned how to install Webmin on Rocky Linux, and used it to perform many sysadmin tasks. For more information on how to use Webmin to manage your Rocky Linux server, check out the official documentation.
FAQ
How do I update Webmin on Rocky Linux?
To update Webmin on Rocky Linux, simply run dnf update webmin or yum update webmin, depending on your package manager. You should also check the Webmin repository for the latest stable version.
Is Webmin secure on Rocky Linux?
Webmin can be secure on Rocky Linux if configured properly. You should enable SSL, use strong passwords, limit access to trusted IPs, and keep it updated regularly. Additionally, you should obviously restrict root login and create dedicated admin users with specific permissions.
How can I troubleshoot Webmin not loading on Rocky Linux?
If Webmin isn’t loading, check the following:
- Ensure Webmin is running with
sudo systemctl status webmin. - Verify that port 10000 is open on the firewall.
- Check Webmin logs located at
/var/webmin/miniserv.logfor any errors. - Restart Webmin with
sudo systemctl restart webmin.
These steps should help diagnose common loading issues.
How can I schedule cron jobs using Webmin on Rocky Linux?
Webmin provides an easy way to schedule cron jobs. Go to System > Scheduled Cron Jobs, where you can view existing jobs or create new ones. You can specify commands, set the frequency (minute, hour, day, etc.), and manage job ownership.
A note about tutorials: We encourage our users to try out tutorials, but they aren't fully supported by our team—we can't always provide support when things go wrong. Be sure to check which OS and version it was tested with before you proceed.
If you want a fully managed experience, with dedicated support for any application you might want to run, contact us for more information.