

Matomo (formerly Piwik) is an open source analytics platform currently used by many individuals, companies, and governments all over the world. In this tutorial, we’ll cover how you install Matomo as a self-hosted alternative on your Ubuntu 16.04 VPS—perfect for those who don’t want to pass on your website’s, or your user’s, data onto a third-party solution like Google Analytics.
Matomo is so feature-rich that it’s hard to list them all, so let’s get right into it.
Prerequisites
- A VPS running Ubuntu 18.04.
- A non-root,
sudo-enableduser. If you only have arootuser, see our SSH tutorial for details on creating new users. - A registered domain name.
- A DNS A record that points to your server’s IP address based on the FQDN you want to use. For example, an A record named
testwould point totest.DOMAIN.TLD.
Notes
- This tutorial requires the use of domain names. Whenever you see either the
SUBDOMAIN,DOMAIN, orTLDvariables, replace them with the details of your domain name. Inexample.ssdnodes.com,exampleis theSUBDOMAIN,ssdnodesis theDOMAIN, and.comis theTLD. - This tutorial requires the use of passwords. Whenever you see the
PASSWORDvariable, then replace it with your own.
Step 1. Install LAMP or LEMP
Matomo is a PHP-based web application, so you need to have either a LAMP (Apache) or LEMP (Nginx) stack installed. If you don’t have one already, follow the proceeding steps; if you do have a LAMP/LEMP stack installed, you can skip ahead to Step 2.
Install Apache or Nginx
You can choose either Apache or Nginx as a web server to host Matomo. If you opt for Apache then install it with the steps described below, otherwise, skip the following steps and proceed with installing Nginx in the subsequent steps.
$ sudo apt-get install apache2
$ sudo systemctl enable apache2.service
$ sudo systemctl start apache2.service
Alternately, you can choose Nginx as a web server. Just issue the following commands to install and enable it during system boot.
$ sudo apt-get install nginx
$ sudo systemctl enable nginx.service
$ sudo systemctl start nginx.service
Once you have done with installing one of the above web servers, visit http://SUBDOMAIN.DOMAIN.TLD to confirm that everything is working smoothly.
Install MariaDB
The next step of configuring a LAMP/LEMP stack is to install MySQL server. Issue the following commands from the terminal to install it, and optionally, you can run mysql_secure_installation to make it secure.
$ sudo apt-get install mariadb-server
$ sudo systemctl enable mariadb.service
$ sudo mysql_secure_installation
The default password for root user is blank. To update the password of the root user, get the MySQL prompt and update the password by issuing the following command from the MySQL shell.
$ mysql -u root -p
MariaDB [mysql]> update user SET PASSWORD=PASSWORD("PASSWORD") WHERE USER='root';
Install PHP
In the final step of configuring LAMP/LEMP server, install PHP and its various extensions needed by Matomo. Use the following apt-get command to install these PHP extensions.
$ sudo apt-get install php7.2 php7.2-common php7.2-mbstring php7.2-xmlrpc php7.2-soap php7.2-mysql php7.2-gd php7.2-xml php7.2-cli php7.2-zip
Apart from above php extensions, Matomo also needs a web server that can process PHP pages. You need to install appropriate PHP modules depending on which web server you picked up earlier. Just follow the steps based on whether you chose Apache or Nginx earlier to enable PHP processing on your web server.
Install PHP modules for Apache
This step is needed if you opted for Apache before. Install the PHP modules for Apache by issuing following command from the terminal and once done, restart Apache.
$ sudo apt-get install libapache2-mod-php7.2
$ sudo systemctl restart apache2
Install php-fpm for Nginx
This step is necessary if you chose Nginx earlier. FPM (FastCGI Process Manager) is needed by Nginx to process PHP pages.
$ sudo apt-get install php7.2-fpm
Make a slight adjustment to the PHP settings by changing cgi.fix_pathinfo value to 0 in your php.ini file. This is needed to make PHP a little more secure.
$ vi /etc/php/7.2/fpm/php.ini
...
...
cgi.fix_pathinfo=0
...
...
Restart the PHP processor by issuing the following command from the terminal.
$ sudo systemctl restart php7.2-fpm
Finally, add the following snippets of code in the server section of Nginx’s default configuration file. This will enable Nginx to process web pages with .php extensions.
$ vi /etc/nginx/sites-available/default
....
....
location ~ \.php$ {
                    include snippets/fastcgi-php.conf;
                    fastcgi_pass unix:/run/php/php7.2-fpm.sock;
    }
....
....
Restart Nginx to apply new settings.
$ sudo systemctl restart nginx
You’re finished configuring your LAMP/LEMP server! To test the installation, create a phpinfo file inside of the web root, which is located at /var/www/html.
$ cd /var/www/html
$ sudo echo "<?php echo phpinfo();?>" > info.php
Point your favorite web browser to http://SUBDOMAIN.DOMAIN.TLD/info.php to confirm successful installation of php.
Step 2. Create the Matomo database
Create a user and a database for Matomo by logging into the MySQL server using the root credentials.
$ mysql -u root -p
MariaDB [(none)]> CREATE DATABASE matomo;
MariaDB [(none)]> GRANT ALL PRIVILEGES ON matomo.* to 'matomo'@'localhost' IDENTIFIED BY 'PASSWORD';
MariaDB [(none)]> FLUSH PRIVILEGES;
MariaDB [(none)]> exit
Step 3. Configure the web server
It’s now time to proceed with creating a virtual host for Matomo. The process is a little different based on whether you picked Apache or Nginx earlier, but the first step—creating a document root for Matomo—is the same for both.
$ cd /var/www/html
$ mkdir matomo
Next, follow one of the steps from below to configure the virtual host either in Apache or Nginx.
Apache
Navigate to the Apache configuration directory and create a virtual host file using vi or any other text editor. Be sure to change the value for DocumentRoot, ServerName, and so on, according to your environment.
$ cd /etc/apache2/sites-available
$ vi matomo.conf
<VirtualHost *:80>
    ServerAdmin [email protected]
    DocumentRoot /var/www/html/matomo
    ServerName SUBDOMAIN.DOMAIN.TLD

  <Directory /var/www/html/matomo/>
     Options FollowSymlinks
     AllowOverride All
     Require all granted
  </Directory>

 ErrorLog ${APACHE_LOG_DIR}/error.log
 CustomLog ${APACHE_LOG_DIR}/access.log combined

</VirtualHost>
Matomo needs rewrite module for Apache. Enable the newly created virtual host using a2ensite and then enable the rewrite module using a2enmod. Restart Apache to apply new configuration settings.
$ sudo a2ensite matomo.conf
$ sudo a2enmod rewrite
$ sudo systemctl restart apache2.service
Nginx
Navigate to the Nginx configuration directory to create a virtual host using vi or any other text editor. Change the value for root, server_name, and so on, according to your environment.
$ cd /etc/nginx/sites-available
$ vi matomo.conf
  server {
                listen 80;
                listen [::]:80;
                server_name SUBDOMAIN.DOMAIN.TLD;
                index index.php;
                root /var/www/html/matomo;

                access_log /var/log/nginx/SUBDOMAIN.DOMAIN.TLD.access_log;
                error_log /var/log/nginx/SUBDOMAIN.DOMAIN.TLD.error_log;

    location / {
                    try_files $uri $uri/ =404;
    }

    location ~ \.php$ {
                        include snippets/fastcgi-php.conf;
                        fastcgi_pass unix:/run/php/php7.2-fpm.sock;
    }

}
To enable the newly created virtual host, navigate to the /etc/nginx/sites-enabled directory and make a symbolic link to the /etc/nginx/sites-available/matomo.conf file.
$ cd /etc/nginx/sites-enabled
$ ln -s ../sites-available/matomo.conf .
Restart Nginx to apply new settings.
$ sudo systemctl restart nginx
At this point, the configuration of the web server for Matomo is complete. In the next step, we will download Matomo and invoke its web-based installer to complete the installation.
Step 4. Install Matomo on your VPS
Download the latest release of Matomo and unzip it. Move all the files from the piwik folder to /var/www/html/matomo, which is webroot for our installation.
$ cd /var/www/html
$ wget https://builds.matomo.org/piwik.zip -O matomo.zip
$ sudo unzip matomo.zip
$ sudo mv piwik/* matomo
$ sudo chown -R www-data:www-data matomo
$ sudo rm -r matomo.zip piwik
Open your favorite web browser and navigate to the URL http://SUBDOMAIN.DOMAIN.TLD. If everything is configured correctly, you should see the Matomo installation welcome screen.
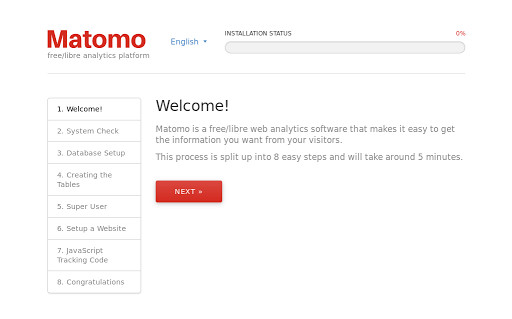
Click Next to continue.
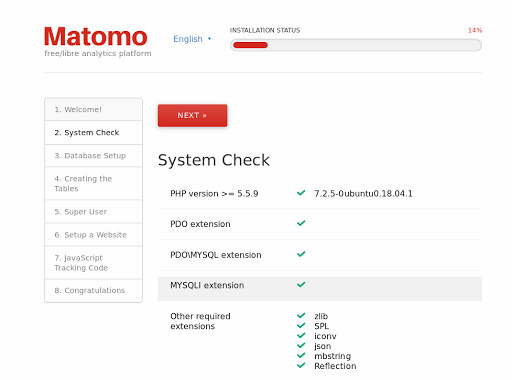
The installer will check if the server meets the requirements. If the system check pass successfully, you can click Next to configure the database.
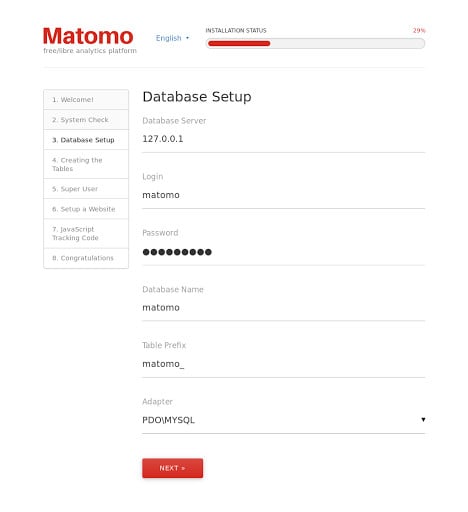
Fill up the database name, user, and password that you created earlier in the create database section and click Next to continue.
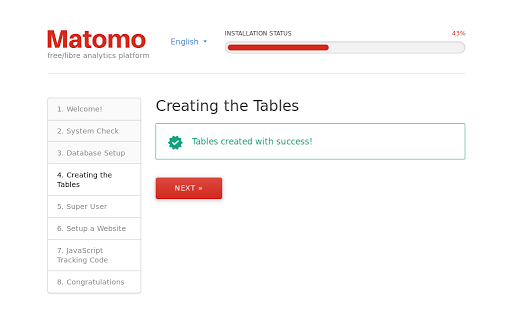
Matomo will add tables to the database. Again, click Next to continue.
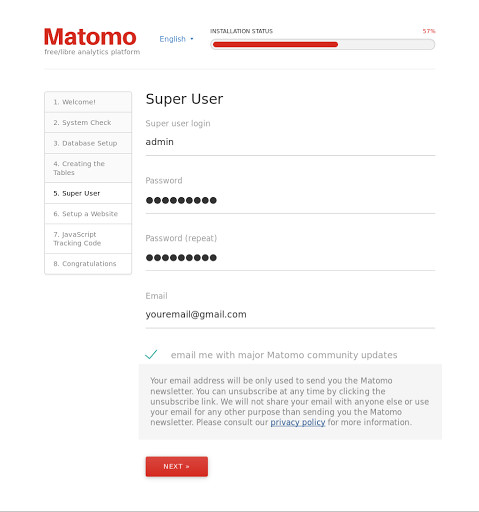
Create a superuser by providing a login, password, and an email. You can log in to Matomo with this admin account at a later stage for adding new websites to monitor, adding users, changing user permissions, and enabling and disabling plugins. Optionally, you can choose to receive upgrade and security alerts, as well as community updates. Click Next to continue.
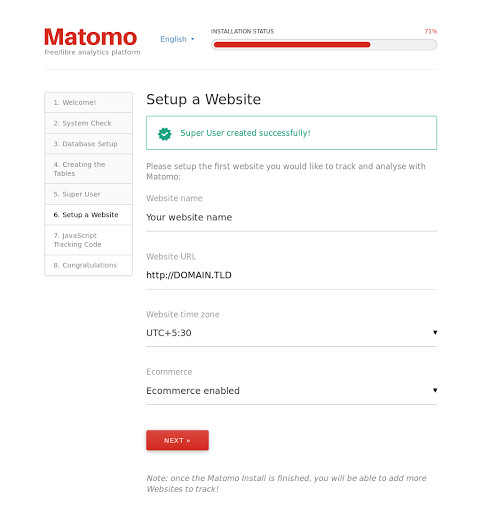
Enter the name and URL of the first website you want to track, along with the website’s timezone. It’s also possible to add more sites once the installation is complete. Optionally, you can select E-commerce enabled if that’s one of the website’s purposes.
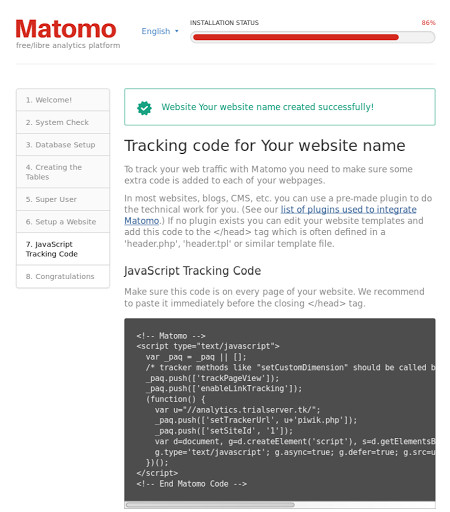
Matomo will provide you with a JavaScript tag, and this code must appear on every page that you want Matomo to analyze. You can manually insert this code in the header section of the website that you want to track. There are also plugins/modules available for inserting this Javascript script code, if your site is built on popular CMS like WordPress, Drupal, or Joomla.
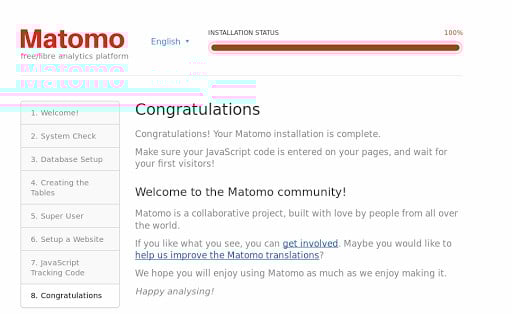
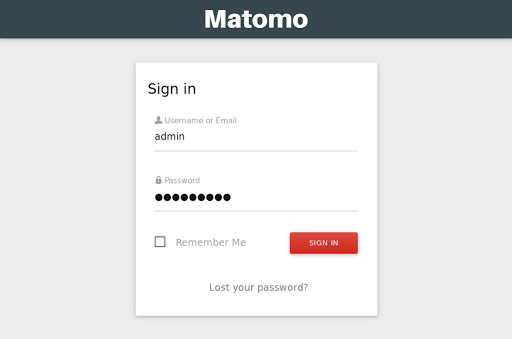
At this point, You should see the congratulation message. Matomo is now ready to track visitors for your website. Click Continue to Matomo to login to the Matomo dashboard!
The installation of Matomo is complete. You are now ready to add the JavaScript code to as many websites as you want and start tracking web traffic using your self-hosted analytics service. Take that, Google!
A note about tutorials: We encourage our users to try out tutorials, but they aren't fully supported by our team—we can't always provide support when things go wrong. Be sure to check which OS and version it was tested with before you proceed.
If you want a fully managed experience, with dedicated support for any application you might want to run, contact us for more information.