
Looking for a self-hosted Slack alternative for your team to securely collaborate and discuss projects? Rocket.Chat is one of the best self-hosted solutions for online communications, allowing you to own your data and control everything.
In this article, you'll learn how to install Rocket.Chat with Docker on a VPS and use it as a Slack alternative.
Installing Rocket.Chat with Docker on Your VPS
To install Rocket.Chat with Docker and use it. You'll first download the official Rocket.Chat docker compose file, set up environment variables, run the container, then secure it with an SSL certificate. This is everything you need to have a fully functional self-hosted communications platform.
Why Use a Self-hosted Slack Alternative?
We originally published this Rocket.Chat tutorial back in 2017 after a highly publicized series of Slack service outages. When your entire team is reliant on an externally-hosted solution, that’s a risk you run.
Additionally, Slack isn’t entirely free, as it requires you to purchase a plan for unlimited message history and other basic features. Rocket.Chat offers this and more, with control and flexibility. By self-hosting a Slack alternative, you avoid depending on third-party services and gain full ownership of your data.
What You Need to Install Rocket.Chat with Docker
- A Docker-ready VPS. If you haven't noticed, we offer the best priced, most reliable VPS servers in the world. Take a look at our offerings and prepare for your mind to be blown 🤯.
- A functioning Docker installation, plus Docker Compose—see our Getting Started tutorial for more details.
- A non-root user account to SSH into. Check out How to access your server using SSH to learn how to access your server and create a
sudouser.
Step 1 - Downloading the Rocket.Chat Docker Compose File
Once you've SSH-ed into your VPS, and you have Docker up and running, you can get started on setting up docker compose to automate the process of deploying your Rocket.Chat app.
First, create a nice space for our docker-compose.yml file. You can place this wherever you'd like, but I think your user's home directory is a good choice.
$ cd ~
$ mkdir rocket.chat && cd rocket.chat
Now that you're in the rocket.chat folder, you can download the official docker-compose.yml file to tell Docker how you want the system configured:
curl -L https://raw.githubusercontent.com/RocketChat/Docker.Official.Image/master/compose.yml -OStep 2 - Configuring Your Rocket.Chat Environment
You'll now set up your Rocket.Chat environment with a .env file. This file will contain environment variables to configure your Rocket.Chat application, such as your domain name, your preferred Rocket.Chat release, and other configurations.
Open a new .env file inside your rocket.chat directory:
nano .env
Add the following configuration to it:
### Rocket.Chat configuration

# Rocket.Chat version
# see:- https://github.com/RocketChat/Rocket.Chat/releases
RELEASE=6.11.0
# MongoDB endpoint (include ?replicaSet= parameter)
#MONGO_URL=
# MongoDB endpoint to the local database
#MONGO_OPLOG_URL=
# IP to bind the process to
#BIND_IP=
# URL used to access your Rocket.Chat instance
ROOT_URL=http://rocket.example.com
# Port Rocket.Chat runs on (in-container)
#PORT=
# Port on the host to bind to
#HOST_PORT=

### MongoDB configuration
# MongoDB version/image tag
#MONGODB_VERSION=
# See:- https://hub.docker.com/r/bitnami/mongodb

### Traefik config (if enabled)
# Traefik version/image tag
#TRAEFIK_RELEASE=
# Domain for https (change ROOT_URL & BIND_IP accordingly)
#DOMAIN=
# Email for certificate notifications
#LETSENCRYPT_EMAIL=
The two uncommented lines are as follows:
RELEASE=6.11.0: The Rocket.Chat latest release as of this article’s current version. Replace6.11.0with your preferred release from the official Rocket.Chat releases page.ROOT_URL=http://rocket.example.com: Changerocket.example.comto your domain name.
Step 3 - Starting Rocket.Chat
Start your docker-compose Rocket.Chat container using the following command:
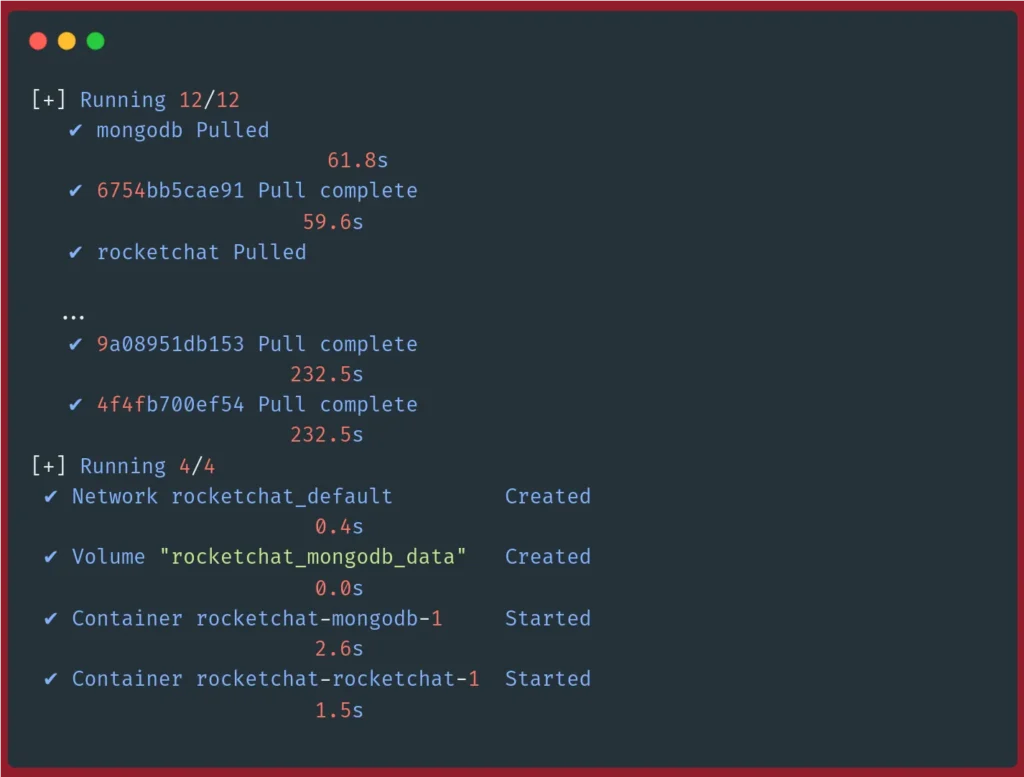
docker compose up -d
This will download and start both the Rocket.Chat service and a MongoDB service to enable live backups.
You should see an output similar to the following:
You can now access your Rocket.Chat interface using your domain and port 3000.
http://rocket.example.com:3000
If you are facing issues with the installation, check the Rocket.Chat container logs using the following command. This will give you detailed information in case of any configuration errors:
docker compose logs -f rocketchat
If properly configured, the logs will show a result similar to the following:
rocketchat-1 | +------------------------------------------------+
rocketchat-1 | | SERVER RUNNING |
rocketchat-1 | +------------------------------------------------+
rocketchat-1 | | |
rocketchat-1 | | Rocket.Chat Version: 6.11.0 |
rocketchat-1 | | NodeJS Version: 14.21.3 - x64 |
rocketchat-1 | | MongoDB Version: 5.0.24 |
rocketchat-1 | | MongoDB Engine: wiredTiger |
rocketchat-1 | | Platform: linux |
rocketchat-1 | | Process Port: 3000 |
rocketchat-1 | | Site URL: http://rocket.example.com |
rocketchat-1 | | ReplicaSet OpLog: Enabled |
rocketchat-1 | | Commit Hash: 640d569eeb |
rocketchat-1 | | Commit Branch: HEAD |
rocketchat-1 | | |
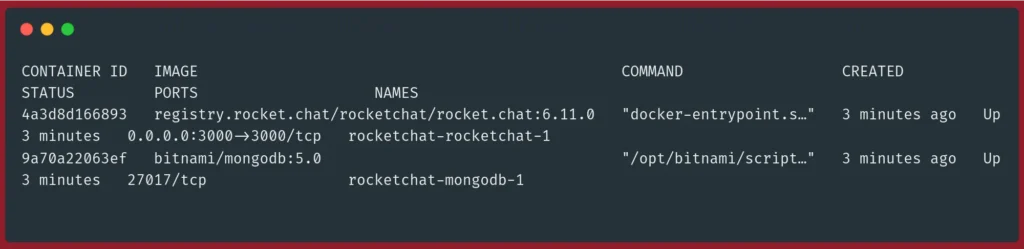
rocketchat-1 | +------------------------------------------------+Once again, check docker ps to make sure Rocket.Chat is running. You should see something similar to the following:
Step 4 - Setting up Let's Encrypt for Rocket.Chat
It is important to secure your Rocket.Chat server with encrypted HTTPS connections. To do this, it is recommended that you use Traefik, an HTTP reverse proxy and load balancer for deploying self-hosted applications.
First, open your .env file:
nano .env
Update the following variables:
ROOT_URL=http://rocket.example.com
#BIND_IP=
#DOMAIN=
#LETSENCRYPT_EMAIL=
Change your root URL from http to https and uncomment the other variables and set them as follows:
ROOT_URL=https://rocket.example.com
BIND_IP=127.0.0.1
DOMAIN=rocket.example.com
LETSENCRYPT_EMAIL=your_email@example.com
Remember to change rocket.example.com with your domain name, and your_email@example.com with your email.
Download the official Traefik template for Rocket.Chat:
curl -LO \
     https://raw.githubusercontent.com/RocketChat/Docker.Official.Image/master/traefik.yml
Force recreate your Rocket.Chat container:
docker compose up -d rocketchat --force-recreate
Finally, start the Traefik container:
docker compose -f traefik.yml up -d
Generating an SSL certificate will take some time. After it is generated, use the https protocol to access your Rocket.Chat server. Note that you don't need to add a :3000 port to the URL:
https://rocket.example.comStep 5 - Getting Started with Rocket.Chat
Now that Rocket.Chat shows that it's running via docker commands, it's time to connect to your Rocket.Chat web interface. Open up your web browser of choice and direct it toward the ROOT_URL you specified earlier.
You'll see the following screen:
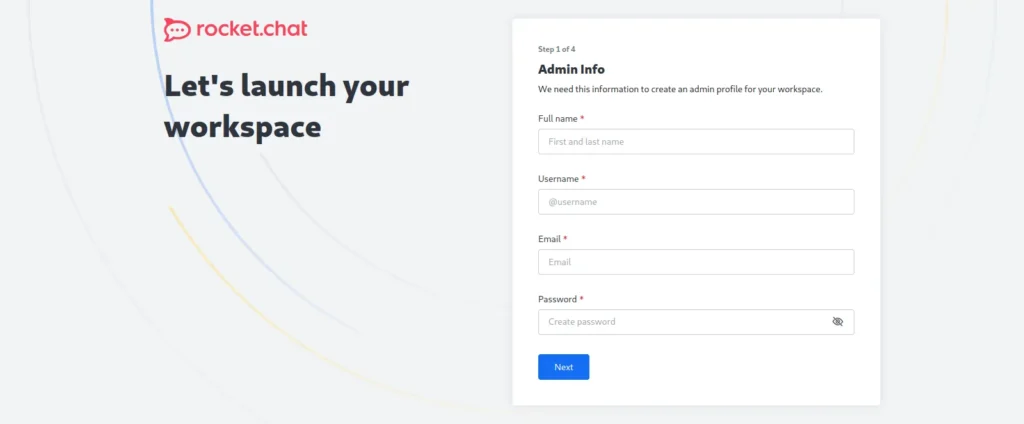
Click on the Register a new account link to create your administrator account.
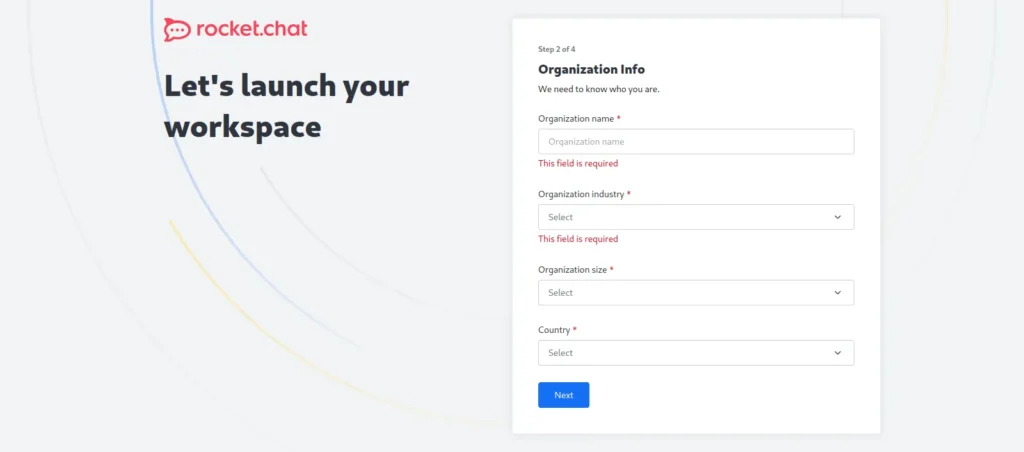
Next, you'll be asked to verify your email:
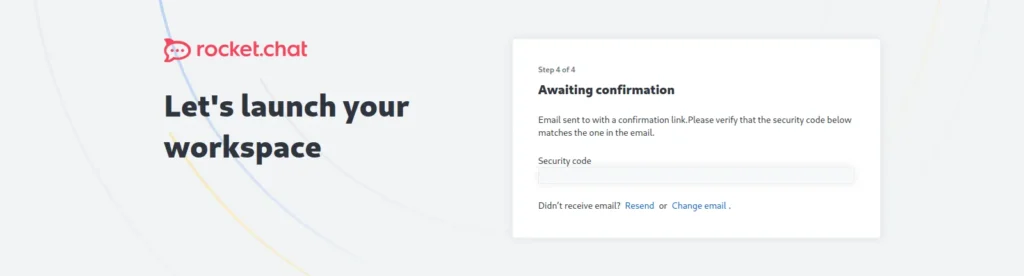
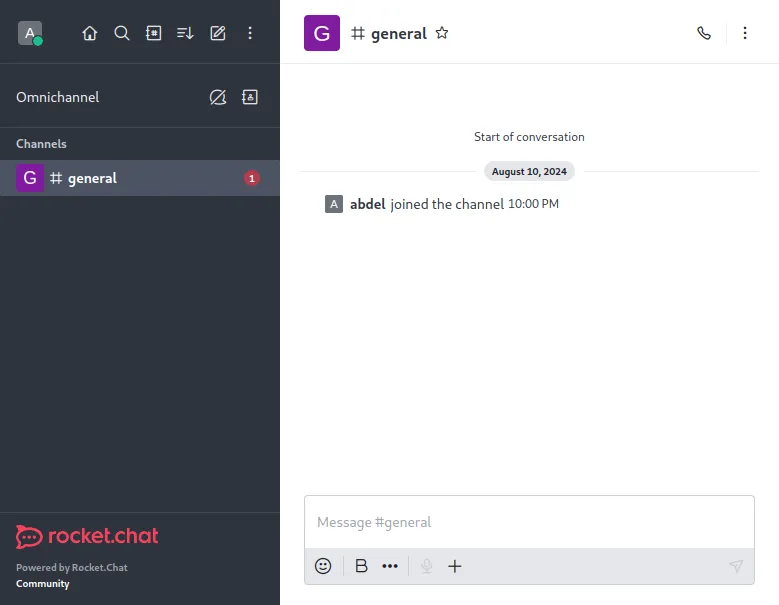
Once you verify your email, you'll be able to log into your Rocket.Chat instance, which will launch you into the primary Rocket.Chat interface:
Troubleshooting
There are not many places for this Rocket.Chat install to go wrong, considering we're only changing one variable within the docker-compose.yml file.
If something isn't working right, be sure to run docker compose logs -f rocketchat to see output from the container. That should give you some insight into what might be going wrong. Most likely, you've set up your
ROOT_URL incorrectly.
If you do have an issue like this, correct your docker-compose.yml file and re-run docker compose up -d rocketchat—Docker will recreate the containers using this new configuration while retaining your data.
Welcome to a Slack-free future!
I hope this tutorial has been useful—both helping you install a Rocket.Chat instance, but also in reducing your reliance on third-party services.
If this tutorial has given you the self-hosting bug, be sure to check out our massive guide of self-hosted alternatives for dozens more opportunities.
That's the beauty of the cloud—you can create your own infrastructure, in exactly the way you want, and have complete control of your data.
Rocket.Chat vs Other Slack Alternatives
In this section, we'll take a look at how Rocket.Chat compares to other self-hosted slack alternatives.
Rocket.Chat vs Mattermost
Rocket.Chat and Mattermost both offer self-hosting options for full data control. Rocket.Chat is generally more customizable with a broader range of integrations, while Mattermost requires more technical expertise for similar flexibility. Both platforms have active communities and offer paid support plans.
Rocket.Chat vs Element
Rocket.Chat and Element both prioritize data privacy, but Element, based on the Matrix protocol, offers default end-to-end encryption and decentralized communication, which can be more secure. Rocket.Chat is easier to set up, especially with its cloud-hosted option, and comes with a rich set of built-in features, while Element is more focused on secure, federated communication.
Rocket.Chat vs Zulip
Rocket.Chat and Zulip differ primarily in how they organize conversations—Zulip uses a unique "topic threading" model that can reduce noise, while Rocket.Chat follows a traditional chat structure with threaded messages within channels. Rocket.Chat offers more integrations and easier setup, making it a better choice for teams needing extensive tool connectivity, though both have active communities.
Rocket.Chat vs Matrix
Rocket.Chat is a centralized platform with the option for self-hosting, making it easier to deploy and manage, while Matrix is a decentralized protocol that allows for cross-server communication and greater data control. Matrix emphasizes end-to-end encryption and decentralization for heightened security, but it can be more complex to set up, whereas Rocket.Chat focuses on ease of use and robust features.
A note about tutorials: We encourage our users to try out tutorials, but they aren't fully supported by our team—we can't always provide support when things go wrong. Be sure to check which OS and version it was tested with before you proceed.
If you want a fully managed experience, with dedicated support for any application you might want to run, contact us for more information.