
In this simple tutorial, I will walk you through how to install LEMP on Ubuntu 24.04 in a few steps. I have tested all the instructions on a brand new Ubuntu 24.04 server to make sure all the commands are working and ensure that the LEMP installation works as expected.
What is LEMP in Linux?
The LEMP (Linux, Nginx, MySQL, PHP) stack in Linux refers to a toolkit comprising of Linux as the operating system, Nginx (pronounced Engine-x) as the web server, MySQL (or MariaDB) as the database system, and PHP (or Perl/Python) as the scripting language. These components are commonly used for creating web applications.
What is a LEMP Stack Used for?
A LEMP stack is used for building and deploying dynamic PHP-based web applications. It combines Linux as the operating system, Nginx as the web server, MySQL for database management, and PHP (or Perl/Python) for server-side scripting. This stack offers a robust and efficient environment for developing scalable and high-performance web applications.
What Does LEMP Stack Stand for?
LEMP stands for "Linux, Nginx, MySQL, and PHP." Together, these software technologies can be used to create a fully-functional web application
- Linux is the most popular, secure and open source operating system used in web servers.
- Apache HTTP Server is a free and open-source web server that delivers web content through the internet.
- MySQL is a relational database engine that allows you to store data and manage it.
- PHP is a widely used open source and general purpose server side scripting language used mainly in web development to create dynamic websites and applications.
NOTE: In this tutorial, we’ll be using MariaDB— a backward compatible, drop-in replacement of the MySQL® Database Server. MariaDB was designed to maintain the same functionality while introducing new features and improvements.

Installing LEMP on Ubuntu 24.04
To install LEMP on Ubuntu 24.04, you'll first update the Ubuntu package index, then install the MariaDB database server and secure it, install Nginx, then install PHP and configure the Nginx web server to handle PHP processing.
Prerequisites for Installing LEMP on Ubuntu 24.04
- Familiarity with the Linux command line.
- An Ubuntu 24.04 server with a non-root user with
sudoprivileges. If you haven't noticed, we offer top-tier Ubuntu servers at the globe's best prices. Check out our offerings and get ready to be amazed 🤯.
Check out our How to access your server using SSH guide to learn how to access your server and create a sudo user.
Note
Want to skip these time-consuming technical steps? Our engineers have created a ready-to-use 1-click LEMP application. Just select one of our servers, choose LAMP from the App menu during checkout, and LEMP will be set up in minutes. However, if you prefer to learn how to do it yourself, keep reading.
Step 1: Update The Package Cache
Start by updating the packages in the package manager cache to the latest available versions using the following command:
sudo apt updateStep 2: Install the MariaDB Database Server
After updating our package cache, we will now install the MariaDB database server. We'll use MariaDB instead of MySQL because it includes more features and supports new storage engines, in addition to its high performance.
To install MariaDB, execute the following command:
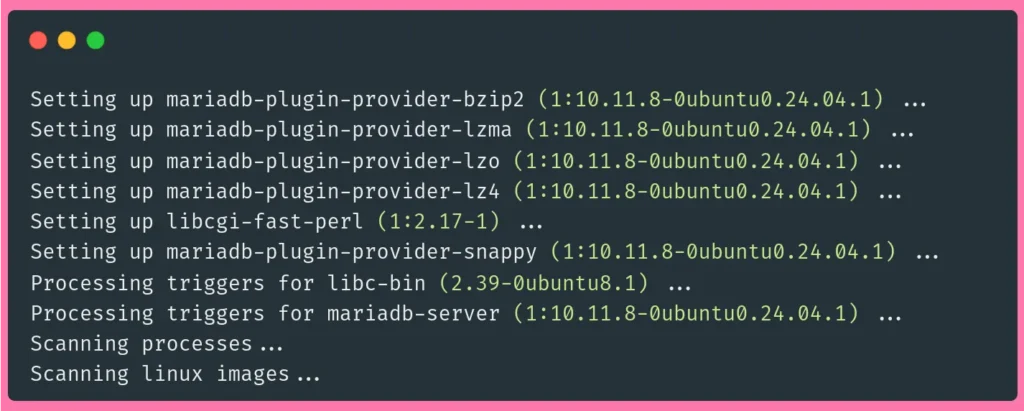
sudo apt install mariadb-server mariadb-clientTap the y key then Enter to continue the installation.
In the preceding command, you install two packages:
mariadb-server: The MariaDB database server which actually stores data.mariadb-client: The MariaDB database client which allows you to interact with and manage the database server via the command line.
Once the installation is finished, verify that the MariaDB database server is running properly by executing the following command to check out the MariaDB service status:
sudo service mariadb statusThe output should show that the service is enabled and running:
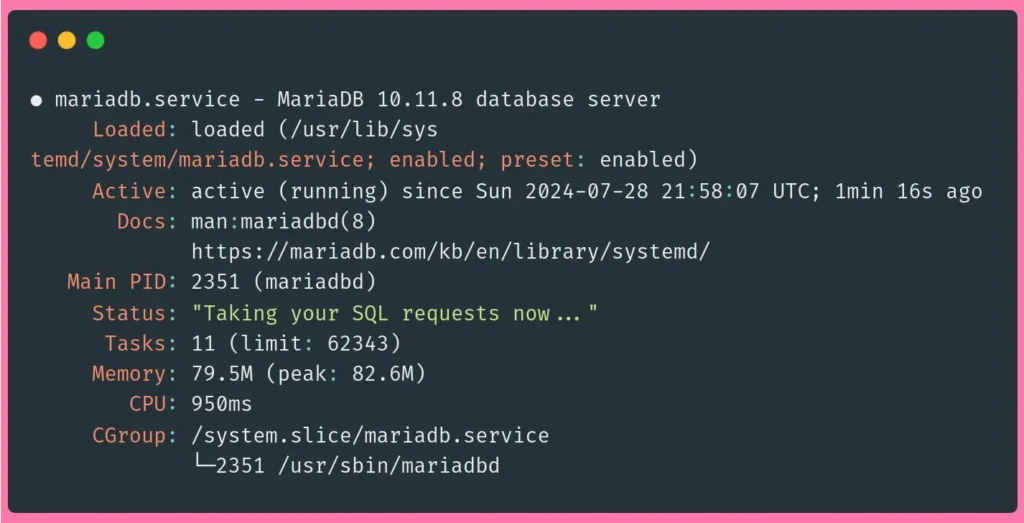
Here, you can see that the service is active and running in the line "Active: active (running) ...".
Ensure That MariaDB Starts at Boot
To make sure that the MariaDB database server starts with the system at boot, use the enable subcommand of the systemctl command. To do so, execute the following command:
sudo systemctl enable mariadb.serviceYou should receive the following output:
Synchronizing state of mariadb.service with SysV service script with /lib/systemd/systemd-sysv-install.
Executing: /lib/systemd/systemd-sysv-install enable mariadb
Securing The MariaDB Database Server
MariaDB comes with some unsafe default settings which may expose your database server to dangerous security vulnerabilities. It's recommended that you run a security script that comes with MariaDB to strengthen your database server and minimize the risk of database intrusions or breaches.
To secure your MariaDB database server, execute the following command, where you will be presented with seven prompts:
First, run the script:
sudo mysql_secure_installationYou’ll be asked for your current root password:
In order to log into MariaDB to secure it, we'll need the current
password for the root user. If you've just installed MariaDB, and
haven't set the root password yet, you should just press enter here.

Enter current password for root (enter for none):
Tap Enter.
Next, you'll be asked whether you want to use the unix_socket authentication method:
OK, successfully used password, moving on...

Setting the root password or using the unix_socket ensures that nobody
can log into the MariaDB root user without the proper authorisation.

Switch to unix_socket authentication [Y/n]
Tap Y to enable unix_socket authentication for better security.
The unix_socket authentication method uses the Unix user's credentials instead of a password to connect to the MariaDB account with the same username, which makes it a passwordless security mechanism, and because it depends on the user's credentials, it cannot be used to grant multiple Unix users access to a single MariaDB user account. With this, access to your MariaDB database server is limited to the Unix user, adding a security layer for your MariaDB account and preventing attackers from brute forcing or taking advantage of an accidental password leak.
The unix_socket authentication method is particularly strong due to the default sturdiness of Unix user security in preventing remote access. However, unskilled administration of your Unix user system may expose dangerous vulnerabilities. So, keep a wide and open eye on potential Unix user security issues such as weak passwords or accidental password exposure, excessive sudo permissions that allow users to execute commands of a different Unix user, scripts of other users executed by your MariaDB Unix user, running unsafe scripts, or weak remote access security.
Next, you'll be asked to change the root password:
Enabled successfully!
Reloading privilege tables..
 ... Success!

Change the root password? [Y/n]
Tap Y to set a new password for root, and re-enter it for validation.
Next, you'll be asked to remove anonymous users:
Change the root password? [Y/n] y
New password:
Re-enter new password:
Password updated successfully!
Reloading privilege tables..
 ... Success!

By default, a MariaDB installation has an anonymous user, allowing anyone
to log into MariaDB without having to have a user account created for
them.  This is intended only for testing, and to make the installation
go a bit smoother.  You should remove them before moving into a
production environment.

Remove anonymous users? [Y/n]
Tap Y to remove the anonymous users that come with your MariaDB installation.
Next, you’ll be asked whether you want to disallow remote root logins:
Remove anonymous users? [Y/n] y
 ... Success!

Normally, root should only be allowed to connect from 'localhost'.  This
ensures that someone cannot guess at the root password from the network.

Disallow root login remotely? [Y/n]
Tap Y to disable remote root login.
Next, you’ll be asked whether you want to remove the test database that comes with your MariaDB installation:
Disallow root login remotely? [Y/n] y
 ... Success!

By default, MariaDB comes with a database named 'test' that anyone can
access.  This is also intended only for testing, and should be removed
before moving into a production environment.

Remove test database and access to it? [Y/n]
Tap Y to remove your MariaDB test database and disable access to it.
In order for the changes you've made to take effect, you’ll be asked to reload your MariaDB privilege tables:
Remove test database and access to it? [Y/n] y
 - Dropping test database...
 ... Success!
 - Removing privileges on test database...
 ... Success!

Reloading the privilege tables will ensure that all changes made so far
will take effect immediately.

Reload privilege tables now? [Y/n]
Tap Y to reload your MariaDB privilege tables. This will ensure that your changes will take effect immediately.
Reload privilege tables now? [Y/n] y
 ... Success!

Cleaning up...

All done!  If you've completed all of the above steps, your MariaDB
installation should now be secure.

Thanks for using MariaDB!
With this, your MariaDB installation is more secure than before, provided that you follow security best practices.
You now have the MariaDB database server installed, and you’re ready to store and manage your data. Next, you’ll need to serve the data you store using an HTTP server, which is the NGINX web server in the LEMP stack.
Step 3: Install NGINX
After installing and securing the MariaDB database server, the next step in our LEMP stack installation is installing the NGINX HTTP server, which serves web content.
Use apt to install the NGINX web server using the following command:
sudo apt install nginxYou’ll be asked to confirm the installation. Tap the y key then Enter to continue.
Once the installation is finished, check NGINX’s version to confirm that it was properly installed using the following command:
sudo nginx -vYou should receive an output that looks as follows:

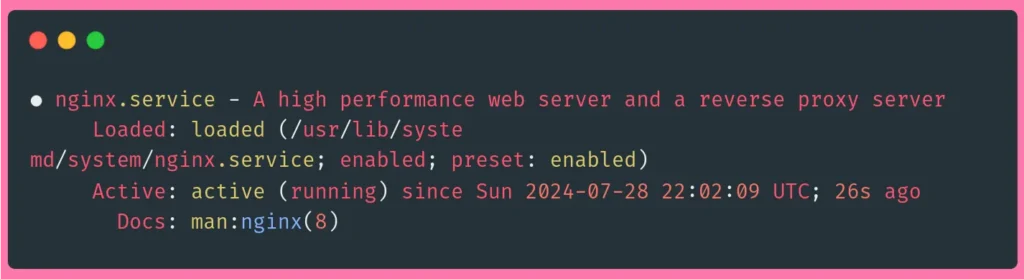
Check NGINX’s status with the following command:
sudo systemctl status nginxThe output should show that the Nginx service is enabled and running:
Ensure That NGINX Starts at Boot
To make sure that the NGINX web server starts with the system at boot, use the enable subcommand of the systemctl command. To do so, execute the following command:
sudo systemctl enable nginx.serviceYou should receive the following output:
Synchronizing state of nginx.service with SysV service script with /lib/systemd/systemd-sysv-install.
Executing: /lib/systemd/systemd-sysv-install enable nginx
You now have NGINX installed. Next, you’ll install the PHP language.
Step 4: Install PHP
With MariaDB you can store and manage data, and the NGINX HTTP server allows you to serve it. You now need to install PHP to dynamically display data, and allow users to interact with your web service via easy-to-use web forms or API calls.
Use the following command to install the main PHP package, along with basic PHP packages that allow you to interact with your database and HTTP server:
sudo apt install php-fpm php-mysql php-xml php-mbstringWhen prompted, tap the y key then Enter to continue the installation.
In the preceding command, you install the following packages:
php-fpm: A package that allows NGINX to handle PHP processes and serve websites written in PHP.php-mysql: A package that allows PHP to communicate with MySQL-based databases such as MariaDB.php-xml: A package that provides a DOM, SimpleXML, WDDX, XML, and XSL module for PHP.php-mbstring: A package that provides the MBSTRING module for PHP, which is used to manage non-ASCII strings.
The main PHP language package will be installed automatically as part of the installation process as a dependency.
To ensure PHP was successfully installed, check its version using the following command:
php -vYou should receive an output similar to the following:
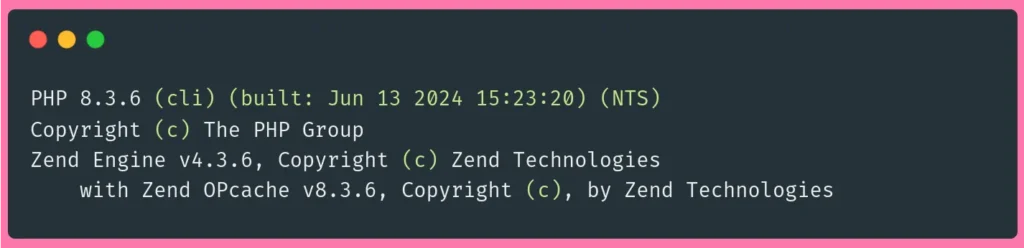
This means that you’ve successfully installed PHP.
Step 5: Configure NGINX to Handle PHP Processing
After we've finished installing all the components of the LEMP stack, we will now configure NGINX so it can serve PHP-based websites.
By default, NGINX is configured to serve files out of a root web directory located at /var/www/html. This default configuration is suitable for small single-site web servers, but hosting multiple sites using this method will quickly become unmanageable and cumbersome. Instead, it is best to create a root web directory for each site you’d like to host on your web server, while leaving the default /var/www/html root web directory to be served when a user requests a site that doesn’t exist.
Create the root web directory for your site as follows, replacing mysite with your site’s name:
sudo mkdir /var/www/mysiteNext, open a new configuration file in NGINX’s sites-available directory, which is a directory that contains configuration for each of your sites. Again, make sure to replace mysite with your site’s name:
sudo nano /etc/nginx/sites-available/mysitePaste into it the following:
server {
    listen 80;
    server_name mysite www.mysite;
    root /var/www/mysite;

    index index.html index.htm index.php;

    location / {
        try_files $uri $uri/ =404;
    }

    location ~ .php$ {
        include snippets/fastcgi-php.conf;
        fastcgi_pass unix:/var/run/php/php8.3-fpm.sock;
     }
}
Note: The preceding NGINX configuration is called a server block.
Remember to replace mysite with your site’s name.
If you don’t have a domain name, you can replace the line server_name mysite www.mysite; with just server_name your_IP_address;, where your_IP_address is your server’s IP address.
Save the file by pressing CTRL+x and then y and Enter to confirm.
In the preceding configuration file, you set up the following:
listen:The port number NGINX will listen on. Here, you set its value to80, which is the port number assigned to HTTP.server_name: The domain names or IP addresses this server block configuration should respond for. Remember to replacemysitewith your site’s name. If you don’t have a domain name, you can replace the lineserver_name mysite www.mysite;with justserver_name your_IP_adress;, whereyour_IP_adressis your server’s IP address.root: The root web directory, also known as the document root, that stores the files served by your website. Here, you set its value to/var/www/mysite, which is the root web directory we created earlier, so make sure to set the proper value in your case.index: The order in which NGINX will prioritize index files for your website. Here, you set the order as follows:index.html index.htm index.php, which means that when requesting the index page, NGINX will initially look for a file calledindex.htmlin your root web directory and serve it, if no file matches that filename, it will look for a file calledindex.htmand serve it instead. Otherwise, it will look for a PHP file calledindex.php.location /: The main location block, which includes atry_filesdirective, and it allows NGINX to route HTTP requests to the correct location within the file system. It looks for files or directories matching a URL request. If no resource matches the HTTP request, NGINX will return a404 Not FoundHTTP error.location ~ .php$: A location block that handles PHP processing. It tells NGINX to handle any HTTP request with a URL that ends with.phpwith the directives included in this location block. This effectively points NGINX to thefastcgi-php.confconfiguration file and thephp8.3-fpm.sockfile, which declares the socket that is associated withphp-fpm.
Activate NGINX Configuration
Now that you’ve set up an NGINX server block configuration for your site, you need to activate it. You can do this by linking your mysite configuration file to the configuration file from NGINX’s sites-enabled directory:
sudo ln -s /etc/nginx/sites-available/mysite /etc/nginx/sites-enabledTo check that your configuration file has been properly linked to NGINX’s sites-enabled directory, run the following command:
sudo ls -l /etc/nginx/sites-enabledYou should receive an output that’s similar to the following:
total 0
lrwxrwxrwx 1 root root 34 Aug  4 09:43 default -> /etc/nginx/sites-available/default
lrwxrwxrwx 1 root root 33 Aug  4 10:07 mysite -> /etc/nginx/sites-available/mysite
Here, you can see that your sites-available/mysite configuration file has been successfully linked.
Next, unlink the default NGINX configuration from the /sites-enabled/ directory. This forces NGINX to use your mysite configuration instead of the default configuration:
sudo unlink /etc/nginx/sites-enabled/defaultTo check that the default NGINX configuration has been properly unlinked from the sites-enabled directory, run the following command:
sudo ls -l /etc/nginx/sites-enabledYou should receive an output that’s similar to the following:
total 0
lrwxrwxrwx 1 root root 33 Aug  4 10:07 mysite -> /etc/nginx/sites-available/mysite
Here, you can see that the default configuration symlink is no longer in the sites-enabled directory, which means that it has been successfully unlinked.
Next, test your configuration’s syntax using the following command:
sudo nginx -tYou should receive an output that’s similar to the following:
nginx: the configuration file /etc/nginx/nginx.conf syntax is ok
nginx: configuration file /etc/nginx/nginx.conf test is successful
This output shows that there are no errors in the configuration file.
If you receive any errors, review your configuration file and make sure you’ve set your directives and values properly.
Next, reload NGINX for the changes you’ve made to take effect by running the following command:
sudo systemctl reload nginxWith this, you can now create an HTML test file to test your setup.
In your /var/www/mysite root web directory, create a new index.html file:
sudo nano /var/www/mysite/index.htmlPaste The following HTML code into it:
<!DOCTYPE html>
<html lang="en">
<head>
    <meta charset="UTF-8">
    <title>My website</title>
</head>
<body>
    <h1>Hello World!</h1>
    <p>This is the landing page of <strong>My Site</strong></p>
</body>
</html>
As you can see, this is straightforward HTML code.
Save the file by pressing CTRL+x and then y and Enter to confirm.
Now, open your browser and navigate to your server’s domain name or IP address:
http://your_server_domain_or_IP_addressYou should see that the index.html file you created earlier is properly served.
Note: What we’ve done in this article is suitable for testing purposes and personal use, whereas if you want to publish your site to production, and securely process your online transactions, we do suggest you check our How To Install Let’s Encrypt on Ubuntu 24.04 article, that explains in detail how to secure your site with SSL certificates.
Reader Alert!
If you feel that the technical instructions in this tutorial are time-consuming, or beyond your expertise, you can choose a very convenient and practical solution, ready-made, fully and professionally tested, and developed by SSD Nodes (That is us 😊). Just visit our website, choose the server’s specifications that fit your needs, and while prompted to choose among the operating systems and the 1-Click Applications we have, choose LEMP from the Apps dropdown menu, complete your checkout, and in a couple of minutes our algorithms will take care of all the technical aspects smoothly and effortlessly, just for you!
Bonus: All our 1-Click applications are now installed with an active HTTPS self-signed certificate!
Conclusion
For the next steps to go live, it is important to secure your web server connections by serving requests with HTTPS instead of HTTP. You can accomplish this using a CA certificate, which is the more convenient solution when going public; check out our How To Install Let’s Encrypt on Ubuntu guide.


One Response to Simple Guide – How to Install LEMP on Ubuntu 24.04
Riccardo
Thanks