

In this article, I’ll walk you through how to install Webmin on Ubuntu 24.04, and how to manage your server through a web browser in a few simple steps.
Webmin is an open-source web-based server management tool that gives you control over your Linux server without much hassle. Instead of using the command line for every task, Webmin provides a friendly web interface that lets you handle everything from user accounts and disk quotas to DNS settings, services, and much more. All from your trusty web browser.
One of Webmin’s best features is its modular design, where you can add more tools as you need more control.
If your app is running behind a LAMP stack or you’re using WordPress with LEMP, then Webmin lets you manage Apache, MySQL, and PHP, and much more.

Prerequisites
- An Ubuntu 24.04 server with root access or a
sudouser. If you haven't noticed, we offer extremely reliable Ubuntu servers at the globe's absolute lowest price. Take a look at our offerings and prepare for your mind to be blown 🤯. - Access your sever via SSH, check out How to access your server using SSH for instructions.
Note
If you want to install Webmin in minutes without the hassle, try our 1-click Webmin application. Just choose one of our server, click Customize Your Own Server, go to the Apps tab under Select Server Image, and select Webmin—it’s that simple! On the other hand, if you want to do things yourself, keep reading.
Step 1: Update the Package Cache and Install the Required Packages
Before installing Webmin, update your Ubuntu 24.04 package list:
sudo apt updateNext, install curl and gnupg2:
sudo apt install gnupg2 curl -yCurl will be used to download the Webmin repository script, and gnupg2 is used to verify Webmin signatures.
Step 2: Install Webmin on Ubuntu 24.04
In short, to install Webmin on Ubuntu 24.04, you'll first add the Webmin repository that will enable you to install the Webmin packages and update them with apt. Then you'll update the package cache, and finally you'll use the apt install webmin command.
Download the Webmin Repository Setup Script
First, download the setup script and run it:
curl -o setup-repos.sh https://raw.githubusercontent.com/webmin/webmin/master/setup-repos.sh

sh setup-repos.sh
You’ll receive an output similar to this:
  Downloading Webmin key ..
  .. done
  Installing Webmin key ..
  .. done
  Setting up Webmin repository ..
  .. done
  Cleaning repository metadata ..
  .. done
  Downloading repository metadata ..
  .. done
Webmin package can now be installed using apt-get install --install-recommends webmin command.
Next, perform an update:
sudo apt updateYou can now install Webmin using apt .
Install Webmin
First, run the following command:
sudo apt install webmin --install-recommendsThis installs both Webmin and additional recommended packages.
Once the installation finishes, check that the webmin service status is active:
sudo systemctl status webminYou should see an output similar to the following:
● webmin.service - Webmin server daemon
     Loaded: loaded (/usr/lib/syst
emd/system/webmin.service; enabled; preset: enabled)
     Active: active (running) since Tue 2024-10-01 22:56:09 UTC; 2min 0s ago
    Process: 14327 ExecStart=/usr/share/webmin/miniserv.pl /etc/webmin/miniserv.conf (code=exited, status=
0/SUCCESS)
   Main PID: 14328 (miniserv.pl)
      Tasks: 1 (limit: 9445)
     Memory: 126.1M (peak: 203.4M)
        CPU: 5.517s
     CGroup: /system.slice/webmin.service
             └─14328 /usr/bin/perl /usr/share/webmin/miniserv.pl /etc/webmin/miniserv.conf
Note: Webmin is accessible via port 10000. You might need to allow this port through your firewall if it is not already enabled:
sudo ufw allow 10000/tcpWarning: You should be extremely careful with your security practices. It is best to allow only a few trusted IP addresses or IP ranges to access your Webmin control panel.
With Webmin installed, use your browser to visit port 10000 on your domain or IP address:
https://ip_address_or_domain:10000Initially, your SSL certificate will be self-signed. Your browser will show a "Not Secure" or "Connection is not private" error, because the connection to your server isn't recognized as secure, and the certificate is not from a trusted source such as Let’s Encrypt:
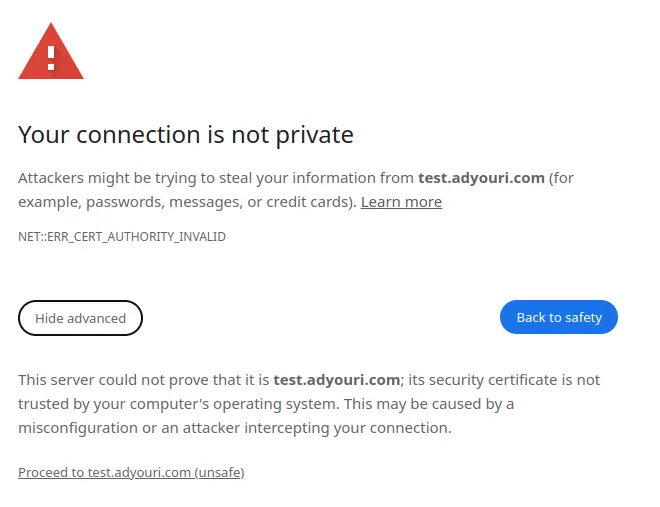
Don’t worry, we’ll fix this later and install a Let’s Encrypt certificate to secure Webmin.
For now, just click the Advanced button or More information on your browser, and choose to proceed.
You’ll be moved to the Webmin Login page:
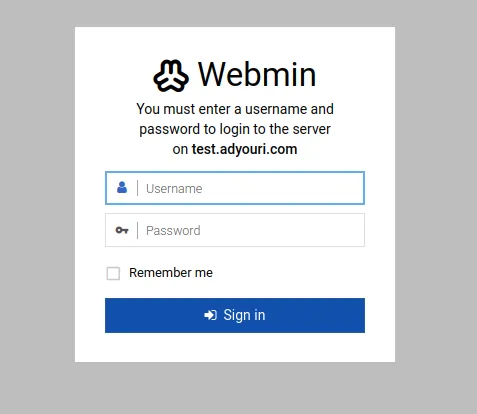
Webmin’s Default Password
The default password of Webmin is the same as your Unix username’s password. You can also use the root account of your server with root as a username with the root’s password. Once you enter your credentials, you’ll be moved to the dashboard.
Webmin Dashboard
Here is the Webmin dashboard:
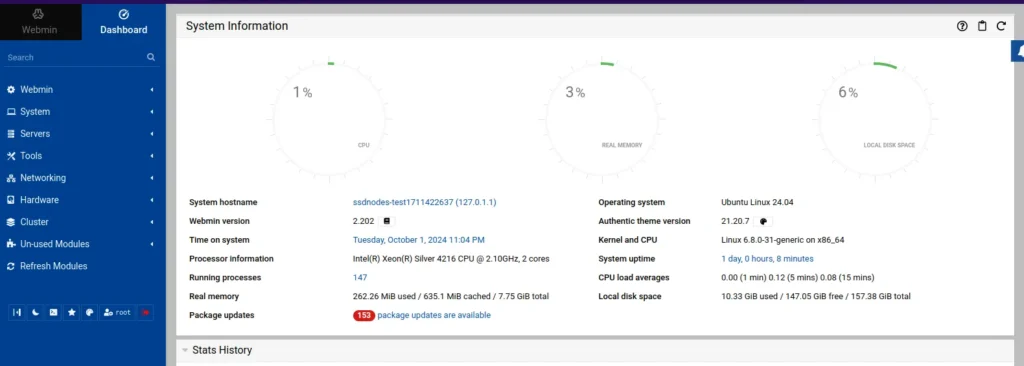
In the navigation bar on the left, you have the following items:
- Webmin: The home page or dashboard of the Webmin interface.
- System: Options for managing core system settings, users, and services.
- Servers: Provides access to configuration and management of various server applications.
- Tools: Utility functions like a file manager, terminal, and system monitoring tools.
- Networking: Options for configuring network interfaces, firewalls, and other network-related settings.
- Hardware: Gives you options to manage hardware components, drivers, and related configurations.
- Cluster: Tools for managing multiple servers in a clustered environment.
- Unused-Modules: Modules that are available but not currently active or configured in your Webmin installation.
With this, you have Webmin installed on your Ubuntu 24.04 server and ready to be used.
Reader Alert!
To avoid all these steps and install Webmin in minutes, you can use our tried and tested 1-click Webmin application. Just choose a server, click Customize Your Own Server, under Select Server Image go to the Apps tab, then choose Webmin. This will set up Webmin in minutes!
Step 3: Securing Webmin with an SSL Certificate from Let’s Encrypt
Webmin manages sensitive infrastructure on your Ubuntu server, and it is important to secure it using HTTPS. To do this, follow these steps to set up a Let’s Encrypt SSL certificate.
Set up a Domain Name
- On the left-hand menu, click Networking, then Network Configuration.
- Click on Hostname and DNS Client.
- Fill in the Hostname field with your domain name, such as
example.comorwww.example.com. - Click Save
Install Let's Encrypt on Webmin using Certbot
With your domain setup done, connect to your Ubuntu 24.04 server via SSH:
ssh you_user@your_ip_or_domainOpen port 80 for Let’s Encrypt validation:
sudo ufw allow 80/tcpNext, install the Certbot Let’s Encrypt client for requesting SSL certificates:
sudo apt install certbotOnce installed, use Certbot to generate a Let’s Encrypt certificate:
sudo certbot certonly --standalone -d webmin.your_domain.com -m [email protected] --agree-tosReplace webmin.your_domain.com with your domain and [email protected] with your email address.
In the output, you’ll have two paths. One for the certificate file and one for the private key. Copy them and save them for the next step:
Certificate is saved at: /etc/letsencrypt/live/webmin.your_domain.com/fullchain.pem
Key is saved at:         /etc/letsencrypt/live/webmin.your_domain.com/privkey.pem
Now, merge the two files into one .pem file to make managing this certificate easier:
sudo cat /etc/letsencrypt/live/webmin.example.com/fullchain.pem /etc/letsencrypt/live/webmin.example.com/privkey.pem | sudo tee /etc/webmin/letsencrypt.pem > /dev/null
Here, we’ve merged both the certificate file and the private key into one letsencrypt.pem file.
Move this certificate file to the Webmin configuration directory:
sudo mv letsencrypt.pem /etc/webmin/Install nano if you haven’t already:
sudo apt install nanoOpen the Webmin server configuration file:
sudo nano /etc/webmin/miniserv.confReplace the following line:
keyfile=/etc/webmin/miniserv.pemWith this:
keyfile=/etc/webmin/letsencrypt.pemSave and close the file.
Restart Webmin:
sudo systemctl restart webminWait for a few seconds while Webmin reboots, then refresh the page. You'll see that the Let's Encrypt certificate is enabled and your connection is secured through HTTPS.
Step 4: Web Server Management with Webmin
In this step you’ll learn how to manage your server with Webmin.
How to Change the Webmin Port
In Webmin, to change the default 10000 port, go to Webmin on the left-hand menu, then:
- Click Ports and Addresses.
- Under Listen on port, change the
10000default port to443HTTPS port. - Click Save.
- You’ll be redirected to the new URL at
https:/your_domain.com.
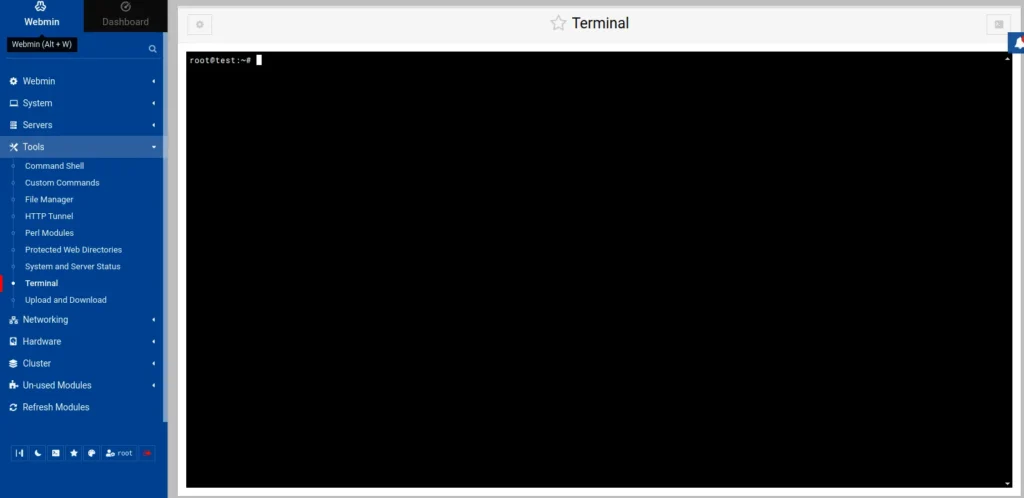
Access the Terminal from Webmin
To access the Terminal directly from Webmin:
- Go to Tools on the left-hand menu.
- Click Terminal.
- You’ll have access to a terminal emulator directly from your browser.
Install Packages on Ubuntu with Webmin
To use Webmin for installing packages on Ubuntu:
- Click System then Software Packages.
- Click the Install a new package tab, then choose the Package from APT radio button.
- Type in the package name you want to install, then click Install.
The package dependencies will be displayed in a table.
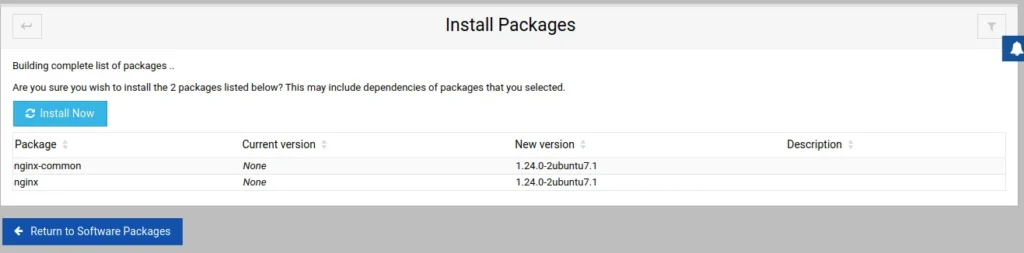
Verify the dependencies list, then click Install Now.
Your package should be installed after a few minutes:

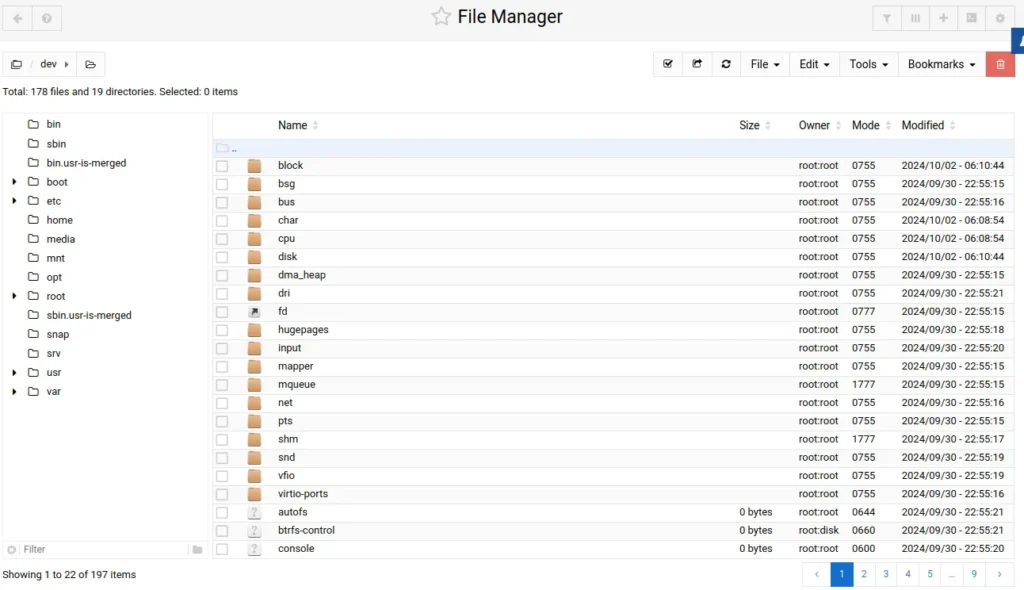
Access the File Manager
To manage files on your Ubuntu server using Webmin, follow these steps:
- Click Tools on the left-hand menu.
- Click on File Manager.
You’ll be moved to a full-fledged file management UI where you can create, edit, and delete files and directories. Additionally, you can use the Bookmarks button to bookmark a folder.
Update Software Packages on Webmin
It is important to always keep your Ubuntu 24.04 packages up-to-date. To do this on Webmin:
- Click System on the sidebar.
- Click Software Package Updates.
- You’ll get a list of all the packages with available updates. Check and uncheck packages to be updated or select everything to be updated at once by clicking Select all.
- Click Update Selected Packages.
- You’ll see a list off all selected packages, click Install Now to perform the update.
Managing Unix Users and Groups with Webmin
A Unix user is a standard user on your server who:
- Connects via SSH or FTP.
- Owns specific files and folders.
- Has a personal home directory.
In this section, we’ll create a new user with a dedicated home directory. Additionally, we’ll grant this user administrative privileges by adding them to the sudo group. We’ll refer to the user as example_user, but feel free to choose any username.
- Open Webmin's User Management Module
- On the left-hand menu, click on System.
- Then, select Users and Groups.Here, you can see a list of existing system users under Local Users and system groups under Local Groups.
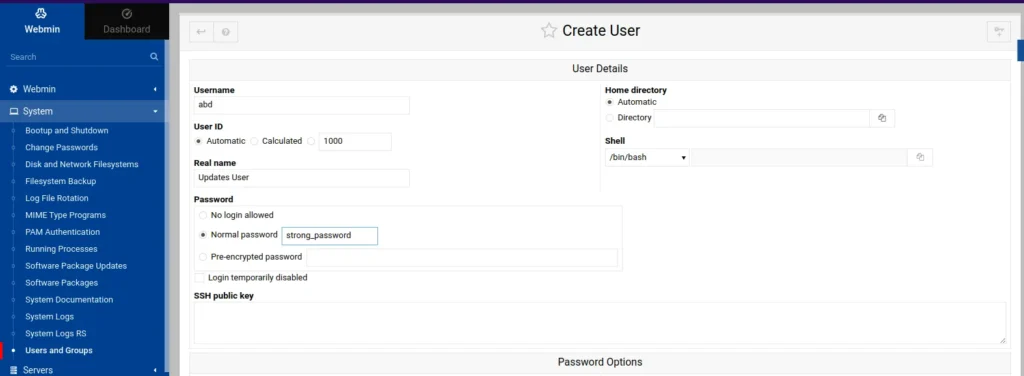
- Create a New User
- In the Local Users table, click Create a new user to access the Create User page.
- Fill in User Details
- Username: Enter
example_user(or your preferred username). - User ID: Select Automatic.
- Real Name: Provide the full name or a descriptive title, like Testing User or Admin User.
- Home Directory: Set to Automatic.
- Shell: Choose
/bin/bash. - Password: Select Normal password and enter a strong password for this user.
- Username: Enter
- Set User Groups in the Group Membership section
- Primary Group: Choose New group with same name as user.
- Secondary Groups: Click on sudo in the All groups list and use the right arrow to move it to the In groups list. This grants the user
sudoprivileges.
Finally, click Create to finish setting up the new user.
With this, a new user called example_user with administrative (sudo) privileges has been created on your Ubuntu server.
With managing Unix users out of the way, we can now move onto managing Webmin users.
Manage Webmin Users
In addition to creating Unix users, Webmin allows you to create dedicated Webmin user accounts. With Webmin user accounts, you can give others limited access to specific features of your server through the Webmin interface. Meaning you can control what each user can do.
For example, you can allow a user to access only the Software Package Updates module. Permissions can also be fine-tuned within modules, such as allowing a user to view the list of available updates but not apply them.
Webmin offers two main types of users:
- Safe Users:These users can only access non-critical modules, limiting their ability to make significant changes to the system.
- Privileged Users:Privileged users are granted broader access, including system-critical modules and full control over the server. You can customize the level of access and control for each user.
How to Create a Safe Webmin User Account
Follow these steps to set up a new safe Webmin account and configure it according to your needs.
- Click Webmin in the left menu, then Webmin Users.
- Select Create a new safe user.
- Enter a Username and set a strong password.
- Check Force change at next login to ensure the user sets a new password.
- Assign a Real Name (like "Update Viewer").
- Under Security and limits options, set the Inactivity logout time (e.g., 30 minutes) and Minimum password length.
- In Available Webmin modules, choose only the specific modules the user should access, like System and Server Status.
- Click Create.
The new user will only see the assigned modules when they log in, ensuring restricted access.

Creating a Privileged Webmin User
To create a new privileged user with custom access:
- Go to Webmin Users
- Click Create a new privileged user.
- Enter User Information
- Username: Choose a unique username.
- Password: Set a strong password.
- Force Password Change: Enable the option Force change at next login for added security.
- Real Name: Set a descriptive name like "Monitoring User" or "Backup Admin" for easy identification.
- Set Security and Access Restrictions
- Open the Security and limits options section.
- Inactivity Logout Time: Set to 30 minutes to automatically log out inactive users (modify this as necessary).
- Minimum Password Length: Set to 15 characters to enforce strong password policies.
- Restrict Access by IP/Time (optional): Restrict access to specific IP addresses or time periods if you want.
- Assign Webmin Modules
- In the Available Webmin Modules section, select the modules the user should have access to. You can select all or pick specific modules based on the user’s role. For example, you can give a system admin full access, or maybe restrict an intern to non-critical modules like monitoring.
- Click Create.
Once the account is created, click the red Logout icon at the bottom of the left-hand menu. Then log in with the new user and check their privileges.
Manage SSH Access
To manage SSH access on Webmin, navigate to Servers then click SSH Server.

Here you can manage SSH configuration such as passwords, SSH keys, and access control.
For example, to control the users that can connect to the server via SSH and restrict others, open Access Control.
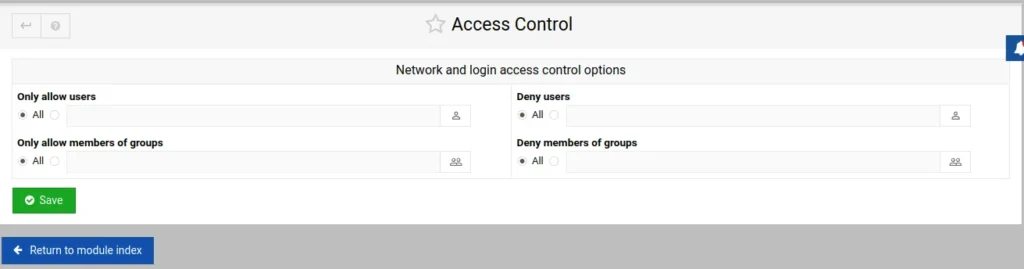
In this page, you can allow or deny SSH access for certain users or members of groups as you like.
Step 5: Uninstall Webmin
To uninstall Webmin, run sudo apt remove --purge webmin to remove the package and its configuration files. Then, use sudo apt autoremove to clean up any unnecessary dependencies.
If you want to delete remaining Webmin files, manually remove the Webmin directory with sudo rm -rf /etc/webmin. This will fully uninstall Webmin from your system.
Conclusion
You now have Webmin installed on your Ubuntu 24.04 server secured with HTTPS through Let’s Encrypt SSL certificates. You’ve also learned how to use Webmin for web server management and sysadmin tasks.
You can manage your server files, users, and networks directly from your browser. Webmin’s modular design also allows you to install other tools and add them to your web management toolkit. For more on how to use Webmin to manage your Ubuntu server, check out the official documentation.
FAQ
Can I use Webmin on Windows?
Webmin is actually designed for Unix-based systems like Linux, but you can use it on Windows through a virtual machine or WSL (Windows Subsystem for Linux). Direct installation isn’t supported natively on Windows, so using Linux in a virtualized environment is the way to go.
Webmin vs cPanel?
Webmin is free and open-source with a modular design and good server management tools in mind. cPanel on the other hand, is a paid control panel, and is mostly used by web hosting providers.
What’s a good alternative to Webmin?
Some great alternatives to Webmin are ISPConfig, Ajenti, and Cockpit. These tools also offer web-based interfaces for managing servers, each with its unique features. Depending on your needs.
Where can I find Webmin logs?
Webmin logs are located in /var/webmin/miniserv.log. This log file contains details about Webmin actions, user activity, and system errors. If you're troubleshooting or want to monitor activity, this is a key file to check!
How does Webmin compare to cPanel and Plesk?
Webmin, cPanel, and Plesk all serve as server control panels, but differ in focus. Webmin is free and flexible, great for advanced users. cPanel is paid, but somewhat user-friendly and popular for web hosting. Plesk combines ease of use with strong multi-platform support, making it great for web developers.
A note about tutorials: We encourage our users to try out tutorials, but they aren't fully supported by our team—we can't always provide support when things go wrong. Be sure to check which OS and version it was tested with before you proceed.
If you want a fully managed experience, with dedicated support for any application you might want to run, contact us for more information.