
In this guide, I’ll walk you through how to install Webmin on an AlmaLinux 9 server, secure it with Let’s Encrypt, and use it to manage your server remotely through a browser interface.
Being a developer, I know managing servers is not an easy task. You have to have a powerful yet user-friendly control panel. Webmin, fortunately, solves this problem. It is a popular web-based system administration tool that makes managing your AlmaLinux VPS server easy and enjoyable.
Webmin can be used for adjusting user accounts, installing and updating software, or even monitoring system logs and setting up the firewall. It gives you an intuitive interface to get it all done.
Let’s now install Webmin on AlmaLinux 9, secure it with Let’s Encrypt, and then take a look at how to use it for essential sysadmin tasks.

Prerequisites
- An AlmaLinux 9 server with root access or a
sudouser. If you haven't noticed, we offer AlmaLinux servers with high reliability and availability baked in. Take a look at our offerings and prepare for your mind to be blown 🤯. - Access your sever via SSH, check out How to access your server using SSH for instructions.
Note
To avoid the hassle, you can install Webmin in seconds with our 1-click Webmin application. Just choose a server, click Customize Your Own Server, go to the Apps tab under Select Server Image, and select Webmin!
Step 1: Updating Your System Packages
Start by checking for updates on your AlmaLinux 9 system:
sudo dnf check-updateIf you see a list of packages that need to be updated, then, it's a good idea to perform a comprehensive update that installs available updates:
sudo dnf upgradeStep 2: Install Webmin on AlmaLinux 9
To install Webmin on AlmaLinux 9, you'll install wget , then download the Webmin repository configuration script and use it to add the official Webmin repository. Finally, you'll use the dnf install command to install Webmin and all its necessary packages.
Setting up the Webmin Repository
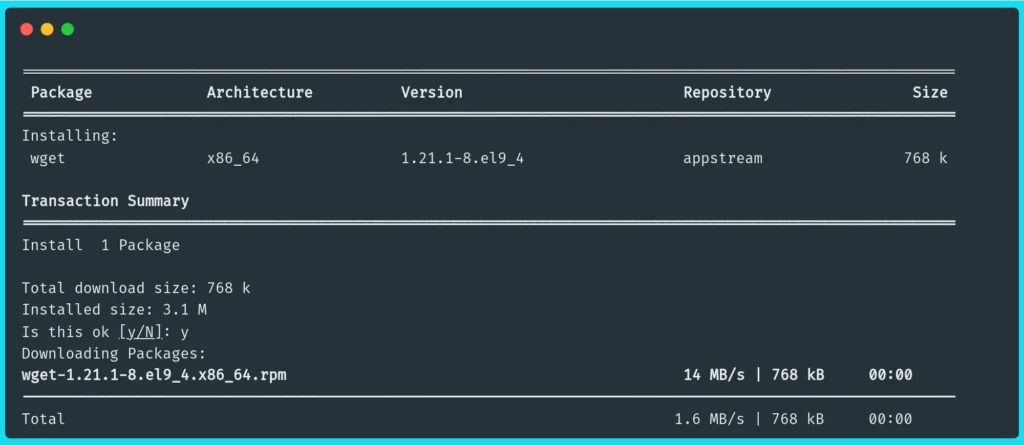
Install wget :
sudo dnf install wgetOutput:
Download the repository configuration script:
sudo wget https://raw.githubusercontent.com/webmin/webmin/master/setup-repos.shRun this script:
sudo sh setup-repos.shYou’ll receive output similar to the following:
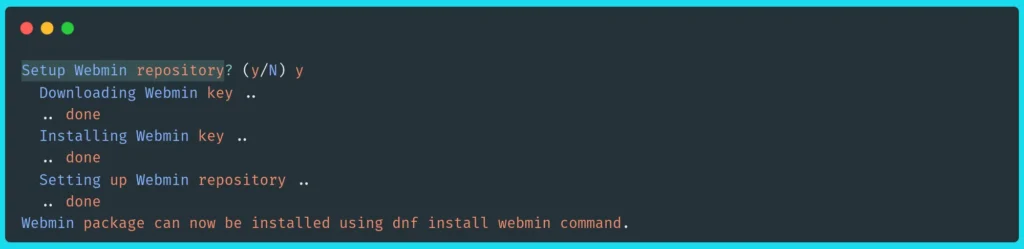
We can now install Webmin using the dnf package manager.
Install Webmin
After the repositories setup, you can now install Webmin:
sudo dnf install webminYou’ll receive output like this:
  perl-lib-0.65-481.el9.x86_64                        perl-libnet-3.13-4.el9.noarch
  perl-libs-4:5.32.1-481.el9.x86_64                   perl-mro-1.23-481.el9.x86_64
  perl-open-1.12-481.el9.noarch                       perl-overload-1.31-481.el9.noarch
  perl-overloading-0.02-481.el9.noarch                perl-parent-1:0.238-460.el9.noarch
  perl-podlators-1:4.14-460.el9.noarch                perl-subs-1.03-481.el9.noarch
  perl-vars-1.05-481.el9.noarch                       shared-mime-info-2.1-5.el9.x86_64
  tar-2:1.34-6.el9_4.1.x86_64                         unzip-6.0-56.el9.x86_64
  webmin-2.202-1.noarch

Complete!
After you see that sweet Complete! message. Check Webmin’s status using systemctl:
sudo systemctl status webmin● webmin.service - Webmin server daemon
Loaded: loaded (/usr/lib/systemd/system/webmin.service; enabled; preset: disabled)
Active: active (running) since Thu 2024-10-17 15:15:39 UTC; 1min 17s ago
Process: 15357 ExecStart=/usr/libexec/webmin/miniserv.pl /etc/webmin/miniserv.conf (code=exited, stat>
Main PID: 15358 (miniserv.pl)
Tasks: 1 (limit: 48897)
Memory: 27.2M
CPU: 5.215s
CGroup: /system.slice/webmin.service
└─15358 /usr/bin/perl /usr/libexec/webmin/miniserv.pl /etc/webmin/miniserv.confThese are the most important points in this status report:
- Loaded: The service is loaded from the file
/usr/lib/systemd/system/webmin.serviceand is enabled (it starts automatically on boot). - Active: The service is currently running and has been active for 1 minute and 17 seconds since it started.
- Process: The main process running is
miniserv.pl(Webmin's web server) with the PID15358. - Tasks: The service is running with 1 active task.
This confirms that Webmin is running correctly on your system.
Setting up the Firewall
With Webmin installed, you’ll need to configure the firewall.
First, check whether firewall-cmd is active:
$ sudo firewall-cmdOutput:
State: running

No options specified
usage: 'firewall-cmd --help' for usage information or see firewall-cmd(1) man page
Webmin is available on the port 10000 by default. To allow this port, run the following command:
sudo firewall-cmd --add-port=10000/tcp --permanentOutput:
successWhile you’re at it, you should also allow port 80. This is the default HTTP port, and you’ll later use it to get a Let’s Encrypt certificate.
sudo firewall-cmd --add-port=80/tcp --permanentReload the firewall-cmd to apply changes:
sudo firewall-cmd --reloadCheck the firewall status:
sudo firewall-cmd --list-allOutput:
public (active)
  target: default
  icmp-block-inversion: no
  interfaces: enp3s0
  sources:
  services: cockpit dhcpv6-client ssh
  ports: 10000/tcp 80/tcp
  protocols:
  forward: yes
  masquerade: no
  forward-ports:
  source-ports:
  icmp-blocks:
  rich rules:
The line ports: 10000/tcp 80/tcp indicates that port 10000 and 80 are now fully activated.
Warning: Obviously, you must be extremely cautious with your firewall security. Allow only a few trusted IP addresses or IP ranges to access Webmin.
Access Webmin
With Webmin installed on your AlmaLinux 9 server, use your browser to visit the following URL:
https://your_ip_address_or_domain:10000At first, your browser will show a "Not Secure" warning, as the default HTTPS connection is relying on a self-signed Webmin certificate. Don’t worry, we’ll fix this later in the article.
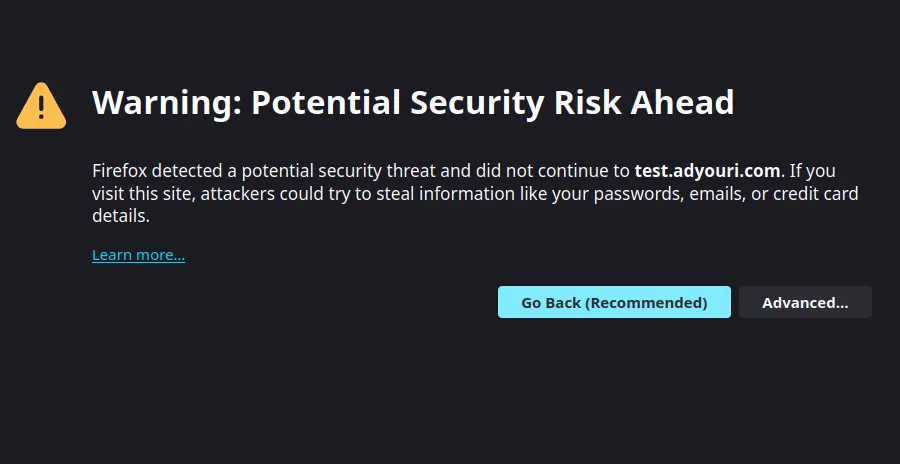
Click the Advanced button or More information depending on the browser, and choose to proceed.
Webmin’s Default Login on AlmaLinux
The default login credentials of Webmin are the same as your Unix users. You can also use the root account of your server with root as a username and the root’s password.
Webmin Dashboard
After you login, you’ll be moved to the dashboard:
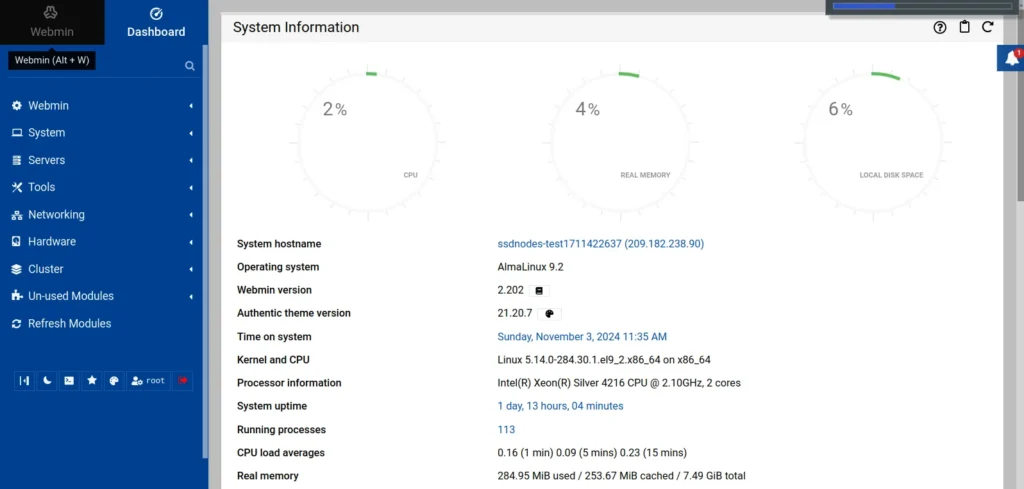
Webmin is now installed on your AlmaLinux 9 server and ready for use. Next, you’ll need to secure it with HTTPS by installing a Let’s Encrypt SSL certificate.
Reader Alert: Side Note!
To avoid all these steps and install Webmin in minutes, you can use our tried and tested 1-click Webmin application. Just choose a server, click Customize Your Own Server, under Select Server Image go to the Apps tab, then choose Webmin. This will set up Webmin in minutes!
Step 3: Securing Webmin with Let’s Encrypt
As I’ve already mentioned, Webmin has access to highly sensitive aspects of your server, and it is very important to secure it. To do this, you first need to set up a Let’s Encrypt SSL certificate to secure connections via HTTPS.
Using Certbot to Get a Let’s Encrypt Certificate
To install a Let’s Encrypt certificate for your Webmin server, you’ll first install the Certbot Let's Encrypt client.
If you haven’t already, enable the EPEL repository:
sudo dnf install epel-release -yOutput:
Verifying : epel-release-9-5.el9.noarch 1/1
Installed:
epel-release-9-5.el9.noarch
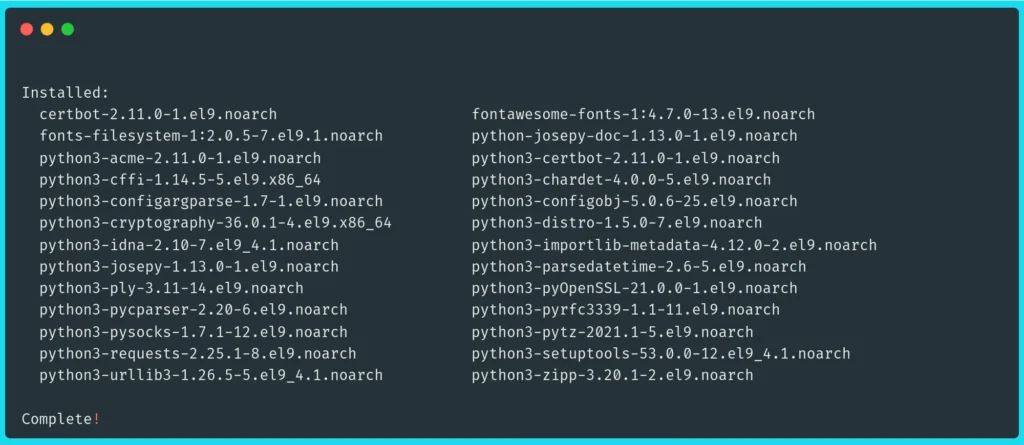
Complete!Install the certbot client:
sudo dnf install certbot -yOutput:
Request a new Let's Encrypt certificate using Certbot:
sudo certbot certonly --standalone -d webmin.your_domain.com -m [email protected] --agree-tosReplace webmin.your_domain.com and [email protected] with your information.
You’ll be prompted on whether you want to share your email address with the Electronic Frontier Foundation, type N and continue.
Output:
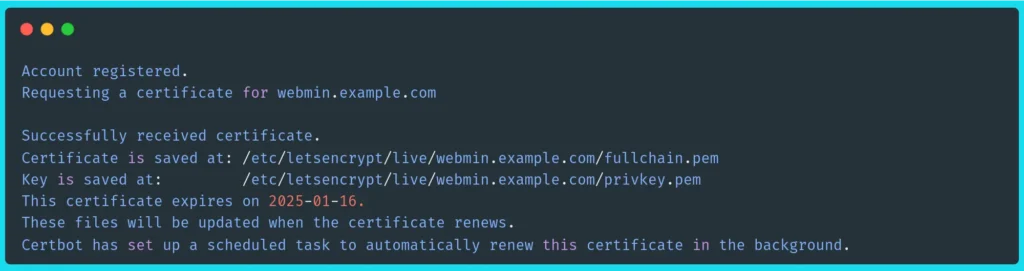
In this output, you have the following parts:
- Let’s Encrypt Certificate file:
/etc/letsencrypt/live/webmin.example.com/fullchain.pem - Let’s Encrypt Private key:
/etc/letsencrypt/live/webmin.example.com/privkey.pem
To install this certificate merge the two files into one cert.pem file inside the /etc/webmin directory:
sudo cat /etc/letsencrypt/live/webmin.example.com/fullchain.pem /etc/letsencrypt/live/webmin.example.com/privkey.pem | sudo tee /etc/webmin/cert.pem > /dev/nullThis command works as follows:
catreads the files withsudoprivileges.teewithsudowrites the output to/etc/webmin/cert.pem.> /dev/nulldiscards the output ofteeto avoid printing it to the console.
Open the Webmin server configuration using vi or nano:
sudo vi /etc/webmin/miniserv.confIn the key file configuration:
keyfile=/etc/webmin/miniserv.pemReplace the keyfile value with /etc/webmin/cert.pem :
keyfile=/etc/webmin/cert.pemRestart the Webmin service:
sudo systemctl restart webminAfter a few minutes, Let's Encrypt will be enabled on your Webmin server with HTTPS protection.
Step 4: Using Webmin to Manage your AlmaLinux Server
You now have Webmin fully installed and ready to be used for server management. In this section, I’ll walk you through how to harden your server security and restrict Webmin access, manage files, backup your file system, and use the terminal directly in your Webmin UI.
Restrict Webmin Access
To harden your Webmin security, you must restrict who can access it. To do this, use the following steps:
- Log into Webmin.
- Click Webmin then go to Webmin Configuration in the left-hand sidebar.
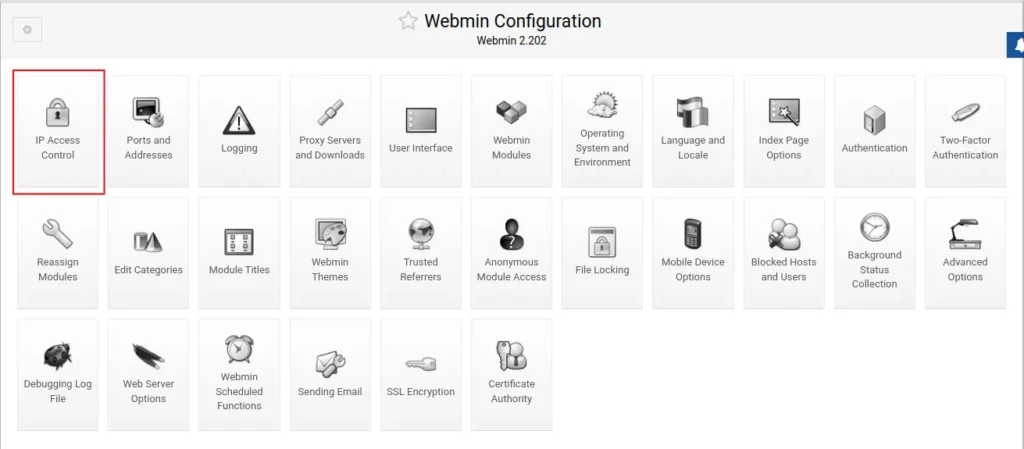
- Click IP Access Control.
- Select Only allow from listed addresses, then enter the IP addresses you want to allow, one on each line.
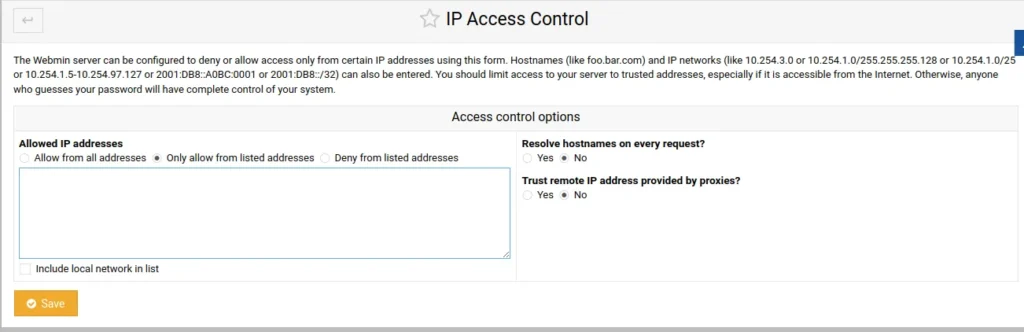
- Click Save to apply the changes.
Creating a Webmin User with Limited Permissions
Think of managing server access like giving keys to your house. You wouldn’t hand out a master key to everyone, or would you?
By creating Webmin users with limited permissions, you make it clear that each person only has access to what they need.
Now, let’s walk through how to set up a user with just the right amount of access to keep your system secure.
- Go **to Webmin then Webmin Users**
- Click on Create a new privileged user.
- Enter your User Information
- Username: Choose a unique and easy-to-remember username.
- Password: Set a strong password to protect the account.
- Force Password Change: For more security, check the Force change at next login option.
- Real Name: Add a descriptive name like "Logs User" or "Database Admin" to make it clear what the user’s role is.
- Set Security and Access Restrictions
- Open the Security and limits options section.
- Restrict Access by IP/Time: Limit access by specific IP addresses or restrict login to certain times for more control.
- Assign Webmin Modules
- In the Available Webmin Modules section, carefully select the modules the user should access. Limit access to only necessary modules. Never give more power than necessary. For example, a user that is responsible for monitoring logs could have access to system logs and monitoring tools, while more critical modules are kept off-limits.
- Click Create to finalize the new user.
By limiting access to only the necessary modules, you reduce the risk of accidental changes or unauthorized actions, which helps keep your system secure.
Uploading and Downloading Files in Webmin
Transferring files between your computer and server is a breeze with Webmin’s built-in File Manager. Let’s walk through the quick steps for both uploading and downloading files.
First, navigate to Tools > File Manager.
Here, you can navigate through the file system and read and modify files directly on your web browser.
To upload a file click File on the navigation menu.
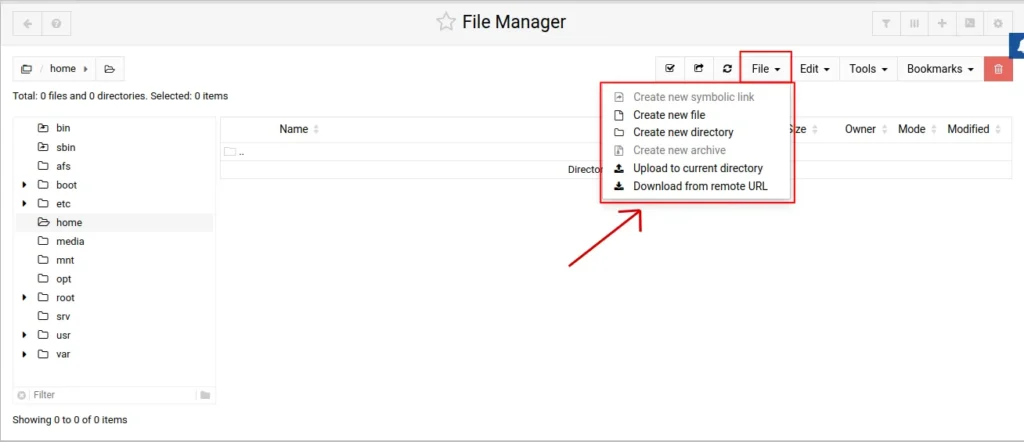
Here you both upload files and download them to your file system from a remote URL.
Backing up Your File System with Webmin Backup
To create a Webmin backup for your file system, follow these steps:
- In the Webmin dashboard, navigate to System > Filesystem Backup.
- Create a New Backup
- Type in the directory you want to back up in the Add a new backup of directory box.
- Select in TAR file if you want to compress the backup.
- Click Add a new backup of directory button.
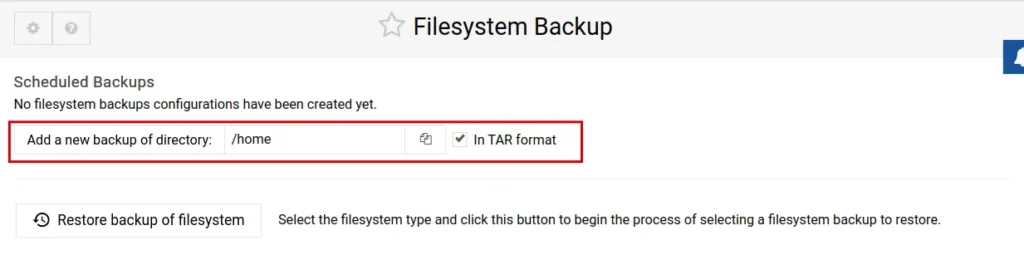
After you select the directory to back up. You can configure your backup settings:
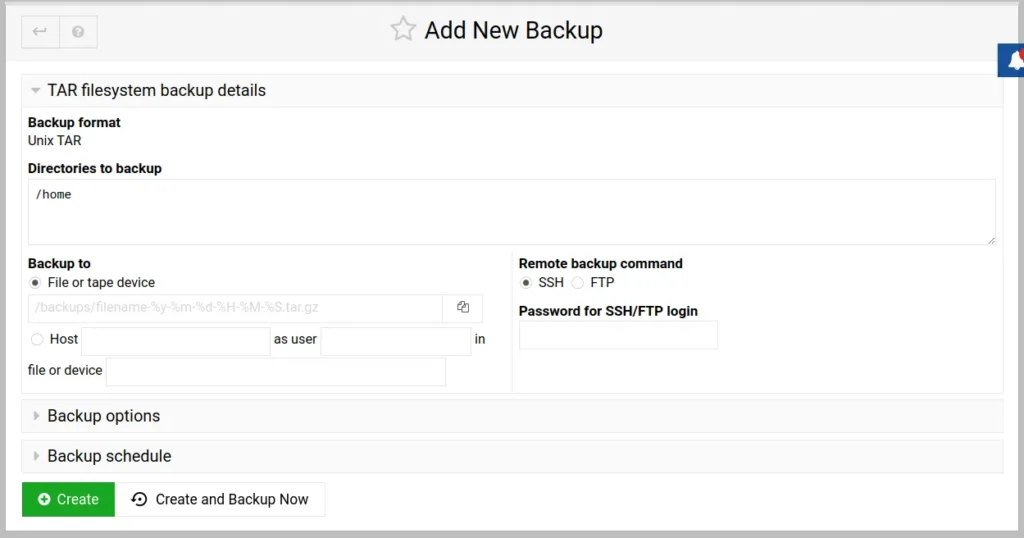
- Configure Your Webmin Backup Settings
- Choose a backup destination (local file or remote server).
- Set the backup schedule by clicking Backup schedule if you want it to run automatically.
- Run the Backup
- Click Create and Backup Now to start the process immediately or save the settings for scheduled backups.
Solve “The Perl module IO::Pty is missing”
If you try to access the terminal in Tools > Terminal.
You’ll likely see this error:
The Perl module IO::Pty is missing, but can be installed automatically using Webmin's Perl Modules module. It is recommended to have EPEL repository enabled first.
This is because there are some Perl modules that are not installed on AlmaLinux by default.
To solve this problem, first enable the CBR repository on your AlmaLinux server:
sudo dnf config-manager --set-enabled crbNext, install the perl-IO-Tty module:
sudo dnf install perl-IO-Tty -yOutput:
Running transaction check
Transaction check succeeded.
Running transaction test
Transaction test succeeded.
Running transaction
  Preparing        :                                                                                  1/1
  Installing       : perl-IO-Tty-1.16-4.el9.x86_64                                                    1/1
  Running scriptlet: perl-IO-Tty-1.16-4.el9.x86_64                                                    1/1
  Verifying        : perl-IO-Tty-1.16-4.el9.x86_64                                                    1/1

Installed:
  perl-IO-Tty-1.16-4.el9.x86_64

Complete!
Now if you navigate to to Tools > Terminal on your Webmin Dashboard, you’ll see a terminal window as follows:

That’s it! You are now connecting to your SSD Nodes VPS through a web-based terminal with Webmin.
Step 5: Uninstall Webmin on AlmaLinux
To uninstall Webmin on AlamaLinux, run sudo systemctl stop webmin to stop it. Then sudo dnf remove webmin to remove the Webmin package.
If you want to delete all the Webmin files and configuration, you can use the rm command to remove the Webmin directory with sudo rm -rf /etc/webmin.
Conclusion
You’ve successfully set up, secured, and used Webmin on your AlmaLinux 9 server. From server management to backups and secure access, Webmin offers a powerful, user-friendly interface for handling your server tasks. For more, check out the official Webmin documentation.
FAQ
How is Webmin different from Virtualmin?
Webmin is a general-purpose web-based system administration tool, while Virtualmin is a module specifically for managing virtual hosts and domains within Webmin. If your focus is on server-wide management, Webmin alone is sufficient, but if you need dedicated hosting management, Virtualmin can enhance Webmin’s functionality.
Webmin vs. Cockpit: Which is better for AlmaLinux?
Both Webmin and Cockpit provide web-based interfaces for managing Linux servers, but Webmin offers more comprehensive system administration features, while Cockpit focuses on system health monitoring and real-time performance tracking. For AlmaLinux, Webmin is typically preferred for detailed server configuration, while Cockpit is ideal for quick monitoring tasks.
Can I use Webmin and phpMyAdmin together?
Yes, Webmin and phpMyAdmin can be used together. Webmin handles broader system tasks, including database management, while phpMyAdmin provides a dedicated interface for managing MySQL or MariaDB databases. Using both allows for complete system and database control on AlmaLinux.
What’s the difference between Webmin and cPanel?
Webmin is an open-source tool focusing on system administration across various tasks, whereas cPanel is a paid, specialized web hosting control panel. If you’re managing a server without hosting multiple sites, Webmin on AlmaLinux is cost-effective and flexible, while cPanel is better suited for commercial hosting.
A note about tutorials: We encourage our users to try out tutorials, but they aren't fully supported by our team—we can't always provide support when things go wrong. Be sure to check which OS and version it was tested with before you proceed.
If you want a fully managed experience, with dedicated support for any application you might want to run, contact us for more information.