
Are you looking for a detailed tutorial on how to install Webmin on Ubuntu 22.04? You're in the right place!
Webmin is a free and open-source web-based control panel that allows you to manage your Linux server from the browser. The web interface Webmin provides is a flexible modern dashboard with dozens of options to manage the internal configurations of your Linux server, such as user accounts, disk quotas, DNS, package settings, services, web servers, and much more. If you use a LAMP stack on your server, you can use Webmin to configure your Apache web server, MySQL server, PHP applications, as well as other technologies such as PostgreSQL database servers and Python. Webmin can be used to manage your server remotely from any browser.
In this tutorial, we'll install Webmin on an Ubuntu 22.04 server, and use it to perform basic system administration tasks such as monitoring the system, adding new users with different permissions, installing, updating and upgrading packages, as well as running software on your server, in addition to executing commands.
Note: This tutorial is for Ubuntu 22.04, if you are working with Ubuntu 24.04, please check out our How to Install Webmin on Ubuntu 24.04 guide.
Prerequisites for Installing Webmin on Ubuntu
- An Ubuntu 22.04 server with root access or a
sudouser. If you haven't noticed, we offer extremely powerful Linux servers at the globe's absolute lowest price. Take a look at our offerings and prepare for your mind to be blown 🤯. - Access your sever via SSH, check out How to access your server using SSH for instructions.
Note: If you want to skip all the technical steps of setting up Webmin and have it installed in minutes, you can use our tried and tested 1-click Webmin application. Just choose a server, click Customize Your Own Server, under Select Server Image go to the Apps tab, then choose Webmin. This will set up Webmin in minutes!
Step 1: Update the Package Cache
Start by updating the packages in the package manager cache to the latest available versions using the following command:
sudo apt updateStep 2: Install Webmin on Ubuntu 22.04
To install the Webmin control panel on Ubuntu 22.04, you'll need to add the Webmin repository that will enable you to install the Webmin packages and update them with apt. To make sure this new repository is trusted and that it is indeed the one Webmin developers provide, you'll download a PGP signature—a digital signature that is used to verify packages that are downloaded from the Internet.
Use the following command to get the PGP key provided by the Webmin developers to verify the package's authenticity, and then use the gpg command line tool to convert it to a file that apt can use:
wget -qO- https://download.webmin.com/jcameron-key.asc | sudo gpg --dearmor -o /usr/share/keyrings/webmin.gpgHere, you use the wget tool to get Webmin’s PGP key, and then you pass the output to the gpg command line tool to unpack the input and save it to the /usr/share/keyrings/ path.
You can now add the Webmin repository with this key. Open the /etc/apt/sources.list file:
sudo nano /etc/apt/sources.listAdd the Webmin repository at the end of the file:
deb [signed-by=/usr/share/keyrings/webmin.gpg] http://download.webmin.com/download/repository sarge contribExit the file with CTRL+X, then press Y and ENTER to save the changes.
Update your package index with the newly added Webmin repository:
sudo apt updateOnce the update finishes, you can install Webmin using the following command:
sudo apt install webminOnce the installation finishes, check that the webmin service is running properly using the following command:
sudo systemctl status webminYou should receive an output similar to the following:
● webmin.service - Webmin server daemon
     Loaded: loaded (/lib/systemd/system/webmin.service; enabled; vendor preset: enabled)
     Active: active (running) since Sun 2025-01-28 17:23:29 UTC; 53s ago
    Process: 7432 ExecStart=/usr/share/webmin/miniserv.pl /etc/webmin/miniserv.conf (code=ex>
   Main PID: 7433 (miniserv.pl)
      Tasks: 1 (limit: 19072)
     Memory: 28.8M
        CPU: 638ms
     CGroup: /system.slice/webmin.service
             └─7433 /usr/bin/perl /usr/share/webmin/miniserv.pl /etc/webmin/miniserv.conf

Aug 28 17:23:27 lamptest systemd[1]: Starting Webmin server daemon...
Aug 28 17:23:27 lamptest perl[7432]: pam_unix(webmin:auth): authentication failure; logname=>
Aug 28 17:23:29 lamptest webmin[7432]: Webmin starting
Aug 28 17:23:29 lamptest systemd[1]: Started Webmin server daemon.
Note: Webmin is accessible via TCP port 10000. If you have a firewall enabled on your system, you need to allow Webmin's port through the firewall, so that it can be accessed remotely:
sudo ufw allow 10000Warning: You should be extremely careful with your security practices. It is best to allow only a few trusted IP addresses or IP ranges to access your Webmin control panel. Additionally, make sure to always assign strong passwords for your Unix users, and restrict their permissions. Webmin is a powerful tool, and anyone who gains access to it will have total control over your system.
Step 3: Access Webmin
With the Webmin package installed, use your browser to visit the following URL, replacing your_ip_address_or_domain with your server's IP address or domain name:
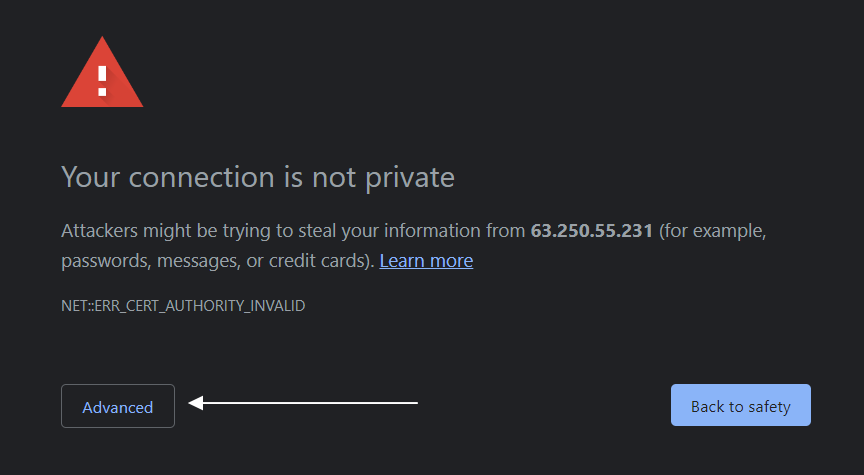
https://your_ip_address_or_domain:10000If you haven't set up an SSL certificate from a Certificate Authority like Let's Encrypt, you will receive a "Not Secure" or "Connection is not private" error depending on your browser. This informs you that the connection to your server is not secure. This error message is normal because Webmin is encrypted and secured with a self-signed certificate, and the browser does not recognize it since your server is not one of its known certificate authorities.
Click the Advanced button or More information depending on the browser, and choose to proceed. The following is an example of the error in the Google Chrome browser:
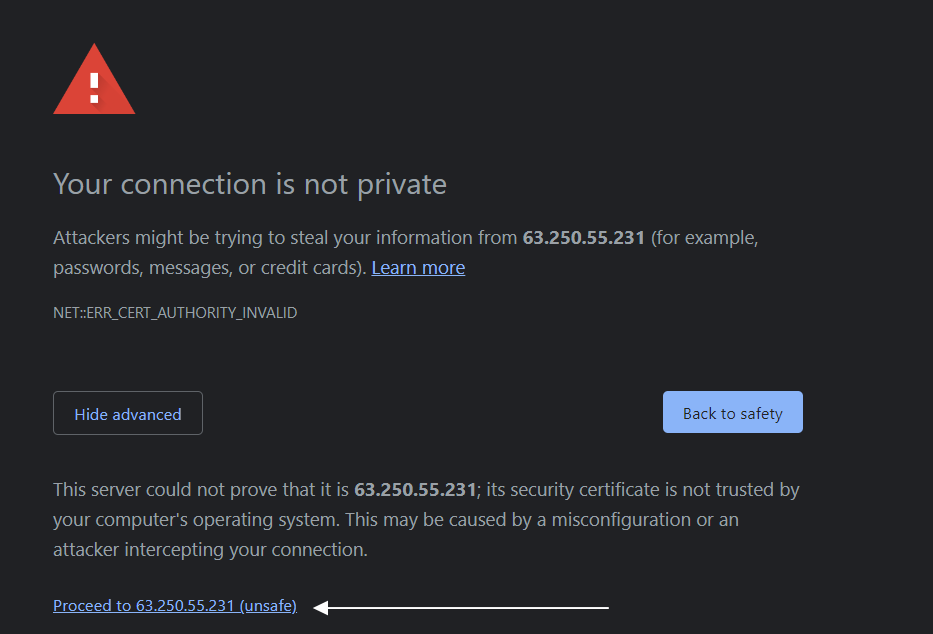
Once you proceed, you'll receive a login page similar to the following:
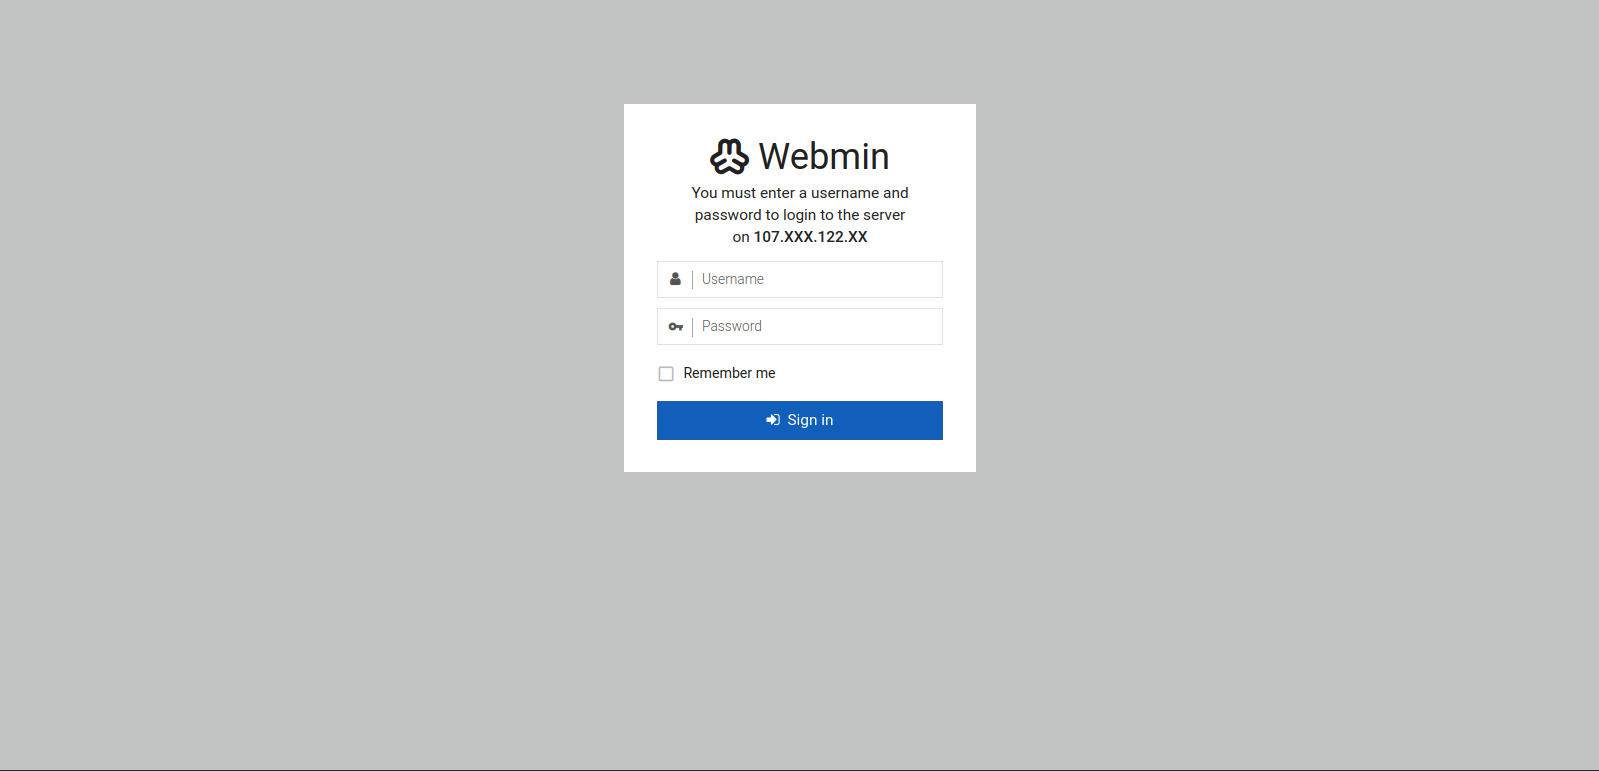
Login using the Unix username and password you've set up on the server. Or you can use your server's root account.
You'll be taken to the Webmin dashboard, which looks like so:
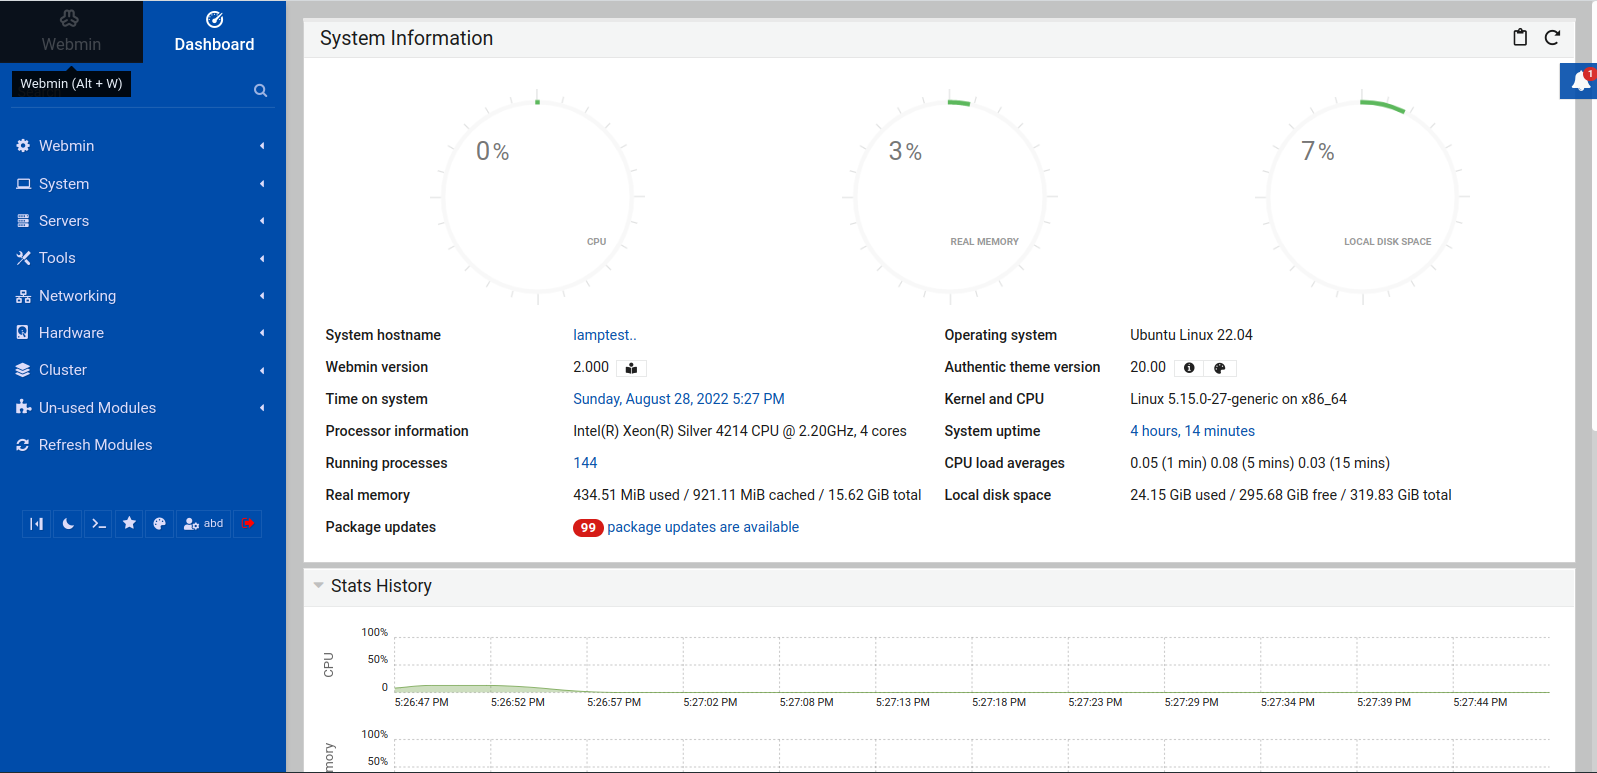
In this dashboard, you have system information, such as CPU, memory, and disk usage. Additionally, you have a menu with a list of options on the left side of the screen, which you can use to control your system's functionalities, such as system tools, networking, hardware, etc.
Step 4: Using Webmin to Perform Basic Sysadmin Tasks
Webmin has many modules you can use to control and configure your system. In this step you'll learn about a few of these modules and how to use them. You'll use Webmin to install and update packages, manage system users and groups, and manage Webmin users.
Installing Packages
To install a software package using Webmin, follow these steps:
- On the left-hand Webmin menu click System then Software Packages.
- Select the Package from APT radio button.
- Type in the package name you want to install, for example
nginx, then click Install. You'll be taken to a page that asks you to confirm installing the package and it's dependencies, which will be listed in a table. - Click Install Now.
Webmin will download the package and install it on your system. You'll get detailed information on the installation process, and below it you'll see an install complete text informing you that the package was successfully installed.
Updating Packages
To update all your packages to the latest version using Webmin, follow these steps:
- On the left-hand menu click System then Software Package Updates. This page lists all the packages that need to be updated. You can check and uncheck packages to decide which ones you want to be updated.
- To update all packages, make sure they are all checked, then click Update Selected Packages. You'll be taken to a page with the complete list of the packages that will be updated.
- Click Install Now.
The update will start, and once it finishes, you may be asked to reboot the system if any of the updated packages requires a system reboot. You can reboot your server with Webmin by clicking Reboot Now.
Managing Unix Users and Groups
A Unix user is your typical user that connects to your server with SSH or FTP, they own files and folders on your system, and they have their own home directory. In this section we will use Webmin to create a user on your server with a dedicated home directory, and we will also add them to the sudo group, so they can have sudo privileges. We'll call our user example_user, but feel free to choose another name.
To create a system user on your server using Webmin, follow these steps:
- On the left-hand menu, click on System then Users and Groups. You'll be taken to the Users and Groups Webmin module, where you have a table for all the current system users under Local Users and a table for the current system groups under Local Groups.
- In the Local Users table, click Create a new user. This will take you to the Create User page.
- Type in
example_userin the Username field. - Select Automatic for the User ID field.
- Set the Real Name to the full name of the user or use a descriptive name such as Monitoring User or Updates User.
- Select Automatic for the Home Directory field.
- Set Shell to
bin/bash. - Set Password to Normal password and type in a strong password for your user.
- In the Group Membership menu, select New group with same name as user for the Primary group.
- For the Secondary groups, click on sudo in the All groups list. It should be added automatically to the In groups list.
- Click Create.
With this, you now have a new user called example_user on your system with sudo privileges.
Managing Webmin Users
In addition to creating a Unix user on your system, you can also grant other people access to Webmin by creating a Webmin user account for them. To restrict what the user can do with their account, you can select which Webmin modules the user can use. For example, you can create a user account with access to the Software Package Updates as the only module they can use. Moreover, you can restrict what each user can do within each module. For example, you can create a user that can only see the list of packages that need to be updated, or a user that can see the list of packages and be able to update them.
To create a Webmin account, click Webmin on the left-hand menu, then click Webmin Users. You'll see that root is the only Webmin user in the Webmin Users table. This default root user can use every module and has total control over the system.
Webmin allows you to create two different kinds of users, a safe user, and a privileged user. A safe user can have access to only safe modules, and a privileged user can be granted all privileges on the system.
Before creating a Webmin user, you need to enable a function that prompts users with expired passwords to enter a new one. To do so, open the Webmin lefthand menu, then go to Webmin Configuration, click Authentication. In the Password expiry policy, select Prompt users with expired passwords to enter a new one then click Save.
To create a Webmin account for a privileged user, follow these steps:
- Go to the Webmin menu on the left, then click on the Webmin Users module, click Create a new privileged user. You'll be taken to a page titled Create Webmin User.
- Set a username in the Username input field, and set a strong password of your choice for the Webmin user you are creating.
- Check the Force change at next login box. So that the user changes their password when logging in for the first time.
- Set the Real Name to the full name of the user or use a descriptive name such as Monitoring User or Updates User.
- For extra security, open the Security and limits options section, and set Inactivity logout time to 30 minutes to logout users after 30 minutes of inactivity, and set the Minimum password length to 15 letters. It is recommended to also select the Only allow from listed addresses option and enter a list of IP addresses to restrict access and allow only the IP address(es) of your Webmin user. You can also restrict access to certain days of the week and times of the day.
- In the Available Webmin modules, you can either click select all to allow the user to use all Webmin modules, or select only a few modules that you would like your Webmin user to use.
- Click Create. You'll be taken to the Webmin Users page where you can find a list of the current Webmin users.
Sign out from Webmin by clicking the red logout icon at the bottom of the left-hand menu, then login using your new Webmin user account. You'll be prompted to change your password, so change it and login again. You'll be redirected to your Webmin dashboard.
If you’ve limited access to your new user, you'll see that the options in the left-hand menu are limited to the modules you've checked when creating your Webmin user.
Creating a Safe Webmin User Based on a Unix User
To create a Webmin account for a safe user, make sure you have a Linux user on your server, such as the example_user we've created earlier. Open the Webmin left-hand menu, then go to the Webmin Users module, and then click on Create a new safe user.
Follow the same steps required for creating a privileged user, with the exception that the username should be the same as a user you already have on your system such as the user example_user. In the Available Webmin modules, you'll notice that the modules you can select are limited.
Select the Webmin modules you'd like your safe Webmin user to have access to, and click Create. This should create a new safe Webmin user.
Warning: You must be very careful when granting access to Webmin users, you may accidentally allow a user to edit an arbitrary configuration file that grants them root privileges.
Step 5: Adding a Valid CA SSL Certificate with Let’s Encrypt
Webmin uses SSL encryption and the HTTPS protocol by default, but the certificate it uses to validate the server's identity is self-signed and untrusted by browsers. To solve this issue using Webmin, you can install a valid SSL certificate issued by Let’s Encrypt, a nonprofit Certificate Authority that provides free of charge, valid SSL certificates that are trusted by browsers.
Note: Let's Encrypt does not issue certificates for IP addresses, so you need to have a Fully-Qualified Domain Name (FQDN), with a DNS A record pointing to your server's IP address. In this section, we will use example.com as an example domain name, but you must use your own domain name.
To install a Let's Encrypt certificate with Webmin you first need to set up your domain name using the following steps:
- On the left-hand menu, click Networking, then Network Configuration.
- Click on Hostname and DNS Client.
- Fill in the Hostname field with your domain, such as
example.comorwww.example.com. - Click Save
After setting up your domain name, install a Let's Encrypt certificate by following these steps:
- Click Webmin in the left-hand menu, then Webmin Configuration.
- Click on SSL Encryption.
- Go to the Let’s Encrypt tab.
- Type in your domain name in the Hostnames for certificate field.
- In the Website root directory for validation file field, select Apache virtual host matching hostname if you are using Apache, or select Other directory and type in your web root directory. This root directory is typically located at
/var/www/example.com. Withexample.comrepresenting your domain name. It can also be located at/var/www/html, which is a typical default path for web root directories. - To automate the Let's Encrypt certificate renewal process, deselect the Only renew manually and select the radio button next to it, then type in
1in the field to its right. This automatically attempts to renew the Let's Encrypt certificate each month. - Click Request Certificate. You'll be moved to a page that displays information on the certificate request and configuration process.
Once the certificate request and configuration process finishes, click Return to Webmin configuration. You'll be redirected back to the Webmin Configuration module. Scroll down to the bottom of the page, then click on the Restart Webmin button and wait for a few seconds while Webmin reboots, then refresh the page, and you'll see that the Let's Encrypt certificate is enabled, and the URL bar of the browser now has a secured padlock on its left. If you click on the padlock icon, you'll receive a Connection is secure pop-up.
With this you now have a valid SSL certificate issued by Let's Encrypt.
(Optional) Step 6: Setting up Your SSL Certificate and Using it With Nginx and Apache
Note: This section will be a brief description of how to use your SSL certificate with Nginx and Apache, and it assumes you have a basic understanding of how SSL certificates work and that you know how to modify your web server's configuration.
To configure your web server to use your Let's Encrypt certificate. You first need to locate the private key file for your SSL certificate and the certificate file. These two files were configured by Webmin. To do so, follow these steps:
- Click Webmin in the left-hand menu, then Webmin Configuration.
- Click on SSL Encryption.
You should see information on your SSL certificate, including the path of your private key file and the path of your certificate file, as highlighted in the following image:
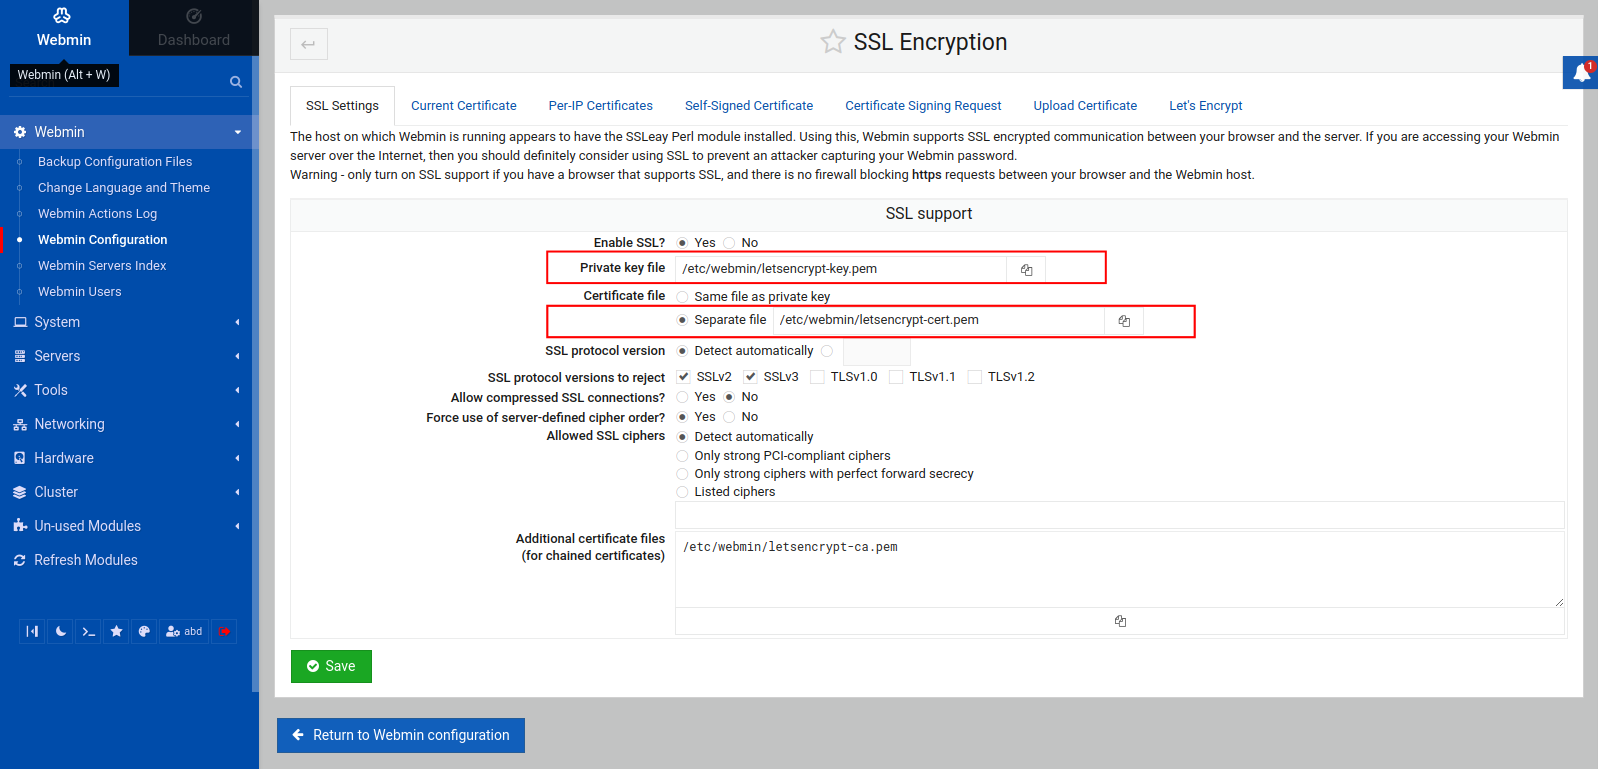
Here, you have the following paths:
- The private key file's path: Under Private key file, in this case, the path is
/etc/webmin/letsencrypt-key.pem. - The certificate file's path: Under Certificate file, in this case, the path is
/etc/webmin/letsencrypt-cert.pem.
Note: In the following instructions, make sure to set your paths properly in your web server's configuration.
Configuring Nginx to Use the Let's Encrypt Certificate
First, open your Nginx configuration file in your /etc/nginx/sites-enabled directory, this could be the default configuration file, in which case you can open it using the following command:
sudo nano /etc/nginx/sites-available/defaultOtherwise, if you have disabled the default configuration and configured Nginx for your domain, the following command should be used instead. Remember to replace your_domain with your domain name:
sudo nano /etc/nginx/sites-available/your_domainChange the values of the ssl_certificate and ssl_certificate_key directives, by setting ssl_certificate to the path of your certificate file, and ssl_certificate_key to the path of your private key file, like so:
server {
   listen 80;
   listen [::]:80;
   server_name your_domain;
   access_log off;
   location / {
         rewrite ^ https://$host$request_uri? permanent;
   }
}

server {
    listen 443 ssl;
    listen [::]:443 ssl;
    server_name your_domain;
    root /var/www/your_domain;
    index index.php index.html index.htm index.nginx-debian.html;
    autoindex off;
    ssl_certificate /etc/webmin/letsencrypt-cert.pem;
    ssl_certificate_key /etc/webmin/letsencrypt-key.pem;
    ssl_protocols TLSv1 TLSv1.1 TLSv1.2;
    ssl_ciphers HIGH:!aNULL:!MD5;

    location ~ \.php$ {
         include snippets/fastcgi-php.conf;
         fastcgi_pass unix:/var/run/php/php-fpm.sock;
         fastcgi_param SCRIPT_FILENAME $document_root$fastcgi_script_name;
         include fastcgi_params;
    }
}
Save and close the file.
In addition to setting the ssl_certificate and ssl_certificate_key directives. Remember to also change your_domain in the preceding configuration with your domain name, and make sure to set the value of the root directive to your web root directory.
If you are using a custom configuration file, link it to the configuration file from NGINX’s sites-enabled directory, if you haven't already:
sudo ln -s /etc/nginx/sites-available/your_domain /etc/nginx/sites-enabledTo check that your configuration file has been properly linked to NGINX’s sites-enabled directory, run the following command:
sudo ls -l /etc/nginx/sites-enabledYou should have a line similar to the following as part of the output:
lrwxrwxrwx 1 root root 33 Aug 4 10:07 your_domain -> /etc/nginx/sites-available/your_domainNext, check for syntax errors in your configuration files using the following command:
sudo nginx -tThe output should let you know that the configuration file test is successful.
Now, restart NGINX:
sudo systemctl restart nginxNow visit your website’s domain name or IP address using https:// at the beginning:
https://your_domain_nameReload your browser and you will notice a secured padlock with a valid certificate.
Configuring Apache to Use the Let's Encrypt Certificate
To configure Apache to use the Let's Encrypt certificate you obtained using Webmin, first open your Apache configuration file, which is located by default at /etc/apache2/sites-enabled/000-default.conf:
sudo nano /etc/apache2/sites-available/000-default.confOtherwise, you might have set up an Apache configuration file for your site at /etc/apache2/sites-available/your_domain.conf, with your_domain representing your domain name as usual, in which case you may use the following command:
sudo nano /etc/apache2/sites-available/your_domain.confChange the values of the SSLCertificateFile and SSLCertificateKeyFile directives, by setting SSLCertificateFile to the path of your certificate file, and SSLCertificateKeyFile to the path of your private key file, like so:
<VirtualHost *:80>
        Define servername your_domain
        ServerName ${SERVERNAME}
        RewriteEngine on
        RewriteRule ^/.*$ https://\${SERVERNAME}%{SCRIPT_FILENAME}?%{QUERY_STRING} [R=301]
        ErrorLog ${APACHE_LOG_DIR}/error.log
        CustomLog ${APACHE_LOG_DIR}/access.log combined
</VirtualHost>
<VirtualHost *:443>
        SSLEngine On
        SSLCertificateFile /etc/webmin/letsencrypt-cert.pem
        SSLCertificateKeyFile /etc/webmin/letsencrypt-key.pem
        ServerName ${SERVERNAME}
        DocumentRoot /var/www/your_domain
        ErrorLog ${APACHE_LOG_DIR}/error.log
        CustomLog ${APACHE_LOG_DIR}/access.log combined
</VirtualHost>
Again, make sure to replace your_domain with your domain name.
Save and close the file.
If you haven't already, you should enable your your_domain.conf file using the a2ensite command:
sudo a2ensite your_domain.confYou might also want to disable the default site in 000-default.conf:
sudo a2dissite 000-default.confNext, test for configuration errors:
sudo apache2ctl configtestYou should receive an output that contains the text Syntax OK, which means you can safely reload Apache, otherwise, you will get a very specific description pointing out the error you have to fix.
Next, restart Apache:
sudo systemctl restart apache2Now, reload your website in the browser. You will notice a secured padlock with a message that informs you that your SSL certificate is valid.
With this, you now have HTTPS enabled in your Apache web server using the Let's Encrypt certificate you obtained using Webmin.
Congrats!
At this point in the article, you should be proud of yourself! You have learned how to install Webmin on Ubuntu 22.04, and used it to perform many sysadmin tasks, such as installing and updating packages, managing Unix users and groups, and managing Webmin users. You've also used Webmin to add a Valid SSL Certificate with Let’s Encrypt, and learned how to use it with Nginx and Apache.
Webmin allows you to have total control over your system and give others the ability to manage your server. Check out Official Webmin wiki for more on how to use Webmin to perform your sysadmin tasks.
A note about tutorials: We encourage our users to try out tutorials, but they aren't fully supported by our team—we can't always provide support when things go wrong. Be sure to check which OS and version it was tested with before you proceed.
If you want a fully managed experience, with dedicated support for any application you might want to run, contact us for more information.