

We are excited to announce a brand new feature here at SSD Nodes.
A new advanced firewall for your servers that you can control directly from your dashboard.
Here is a word from our CTO:
Hi everyone! I'm Marc, the CTO at SSD Nodes. Our engineering team just shipped something I'm really excited about: Advanced Firewall Groups.
Look, managing server security shouldn't be rocket science. Too many hosting providers give you bare-bones tools and expect you to figure out nftables on your own. Which is ridiculous.
We built Firewall Groups because our customers told us they wanted better security controls without the headache.
Now, you get enterprise-level network security right from your dashboard. No SSH required.

The Problem We Solved
Here's what was broken: you'd spin up a VPS, and then you had two choices. Leave it wide open to the internet (bad idea), or spend hours learning command-line firewall syntax (also bad).
Even experienced developers waste time on this stuff. You just want to say "allow port 80, block everything else" without memorizing arcane iptables commands. I've watched talented engineers spend entire afternoons fighting with firewall rules that should take five minutes to set up.
The traditional approach is painful. SSH into your server, write nftables rules, hope you didn't lock yourself out, test everything manually. Miss one detail and you either have a security hole or broken connectivity. Make a typo and you're locked out of your own server.
Our team spent months building something better. Point, click, done.
Note: Advanced Firewall Groups is a paid add-on you can assign to your server during checkout or in your dashboard from the Add-ons tab. It is priced at $2 per month. Or only $10 per year when you choose our 3-year plan. For less than half a cup of coffee per month, you get the peace of mind that your servers aren't sitting wide open to attackers.
How Firewalls Actually Work
Before I explain our specific implementation, let's talk about what firewalls do at a basic level. This stuff isn't black magic, but the traditional tools make it seem way more complicated than it needs to be.
A firewall sits between your server and the internet. Every packet of network traffic gets checked against a list of rules. If a packet matches a rule that says "allow", it goes through. If it matches a rule that says "block", it gets dropped. If it doesn't match any rules, the firewall follows a default policy.
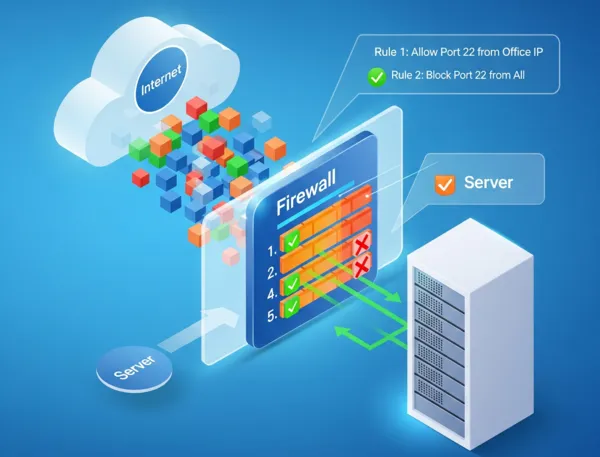
The key concept is order matters. Firewalls process rules from top to bottom. The first matching rule wins. This is why you typically put specific rules first and general rules last.
For example, if you want to allow SSH access from your office but block SSH from everywhere else, you'd set up:
- Allow port 22 from your office IP
- Block port 22 from everywhere else
Swap those rules and nobody can SSH to your server, including you.
Most servers need both inbound and outbound rules. Inbound controls what can connect to your server. Outbound controls what your server can connect to. A web server might accept HTTP connections (inbound) but also needs to make database queries (outbound).
How Our System Works
We kept it simple. With only three concepts:
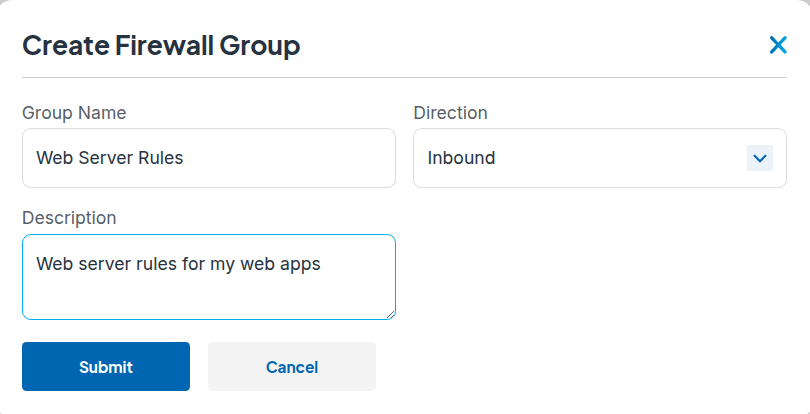
Groups hold your rules. You make separate groups for traffic coming in (inbound) and traffic going out (outbound). Each group gets a descriptive name like "Web Server Rules" or "Database Access".
Rules decide what happens to traffic. Allow it or drop it based on whatever criteria you set. You can match on IP addresses, port numbers, protocols, or combinations of all three.
Servers get one inbound group and one outbound group max. No conflicts, no confusion. This prevents you from accidentally creating contradictory rules that break connectivity.
The architecture enforces clean separation. You can't assign multiple inbound groups to the same server because that would create ambiguous rule conflicts. Instead, you put all your inbound rules in one group and all your outbound rules in another.
Building Your First Firewall
Let's say you're running a basic web server and you want to accept only HTTP requests for port 80. Here's the whole process:
- Go to your Firewall Dashboard.
- Click Create Group and Create a new inbound group called "Web Server Rules". Then click Submit. The interface walks you through each step.
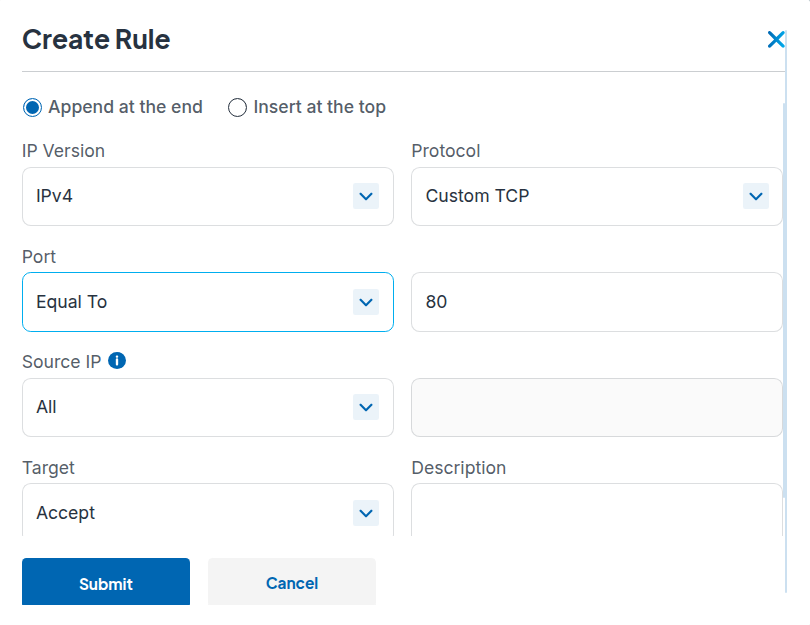
- Click on the ⚙️ button, then “Create Rule”, then add your first rule to allow TCP port 80 from anywhere. Set the IP version to IPv4, protocol to "Custom TCP", port to 80, source to "All", and target to "Accept".
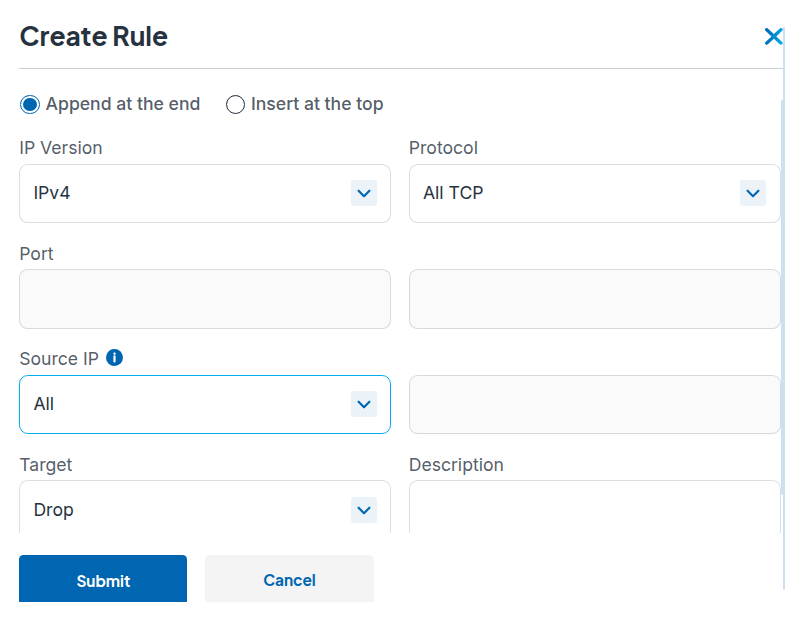
- Add your second rule: drop all other TCP traffic. This blocks everything except what you explicitly allowed. Set IP version to IPv4, protocol to "All TCP", source to "All", and target to "Drop".
- Apply the group to your server. Click the Link/Unlink Servers button, select the server you want to protect, and then click the green "Apply Rules" button.
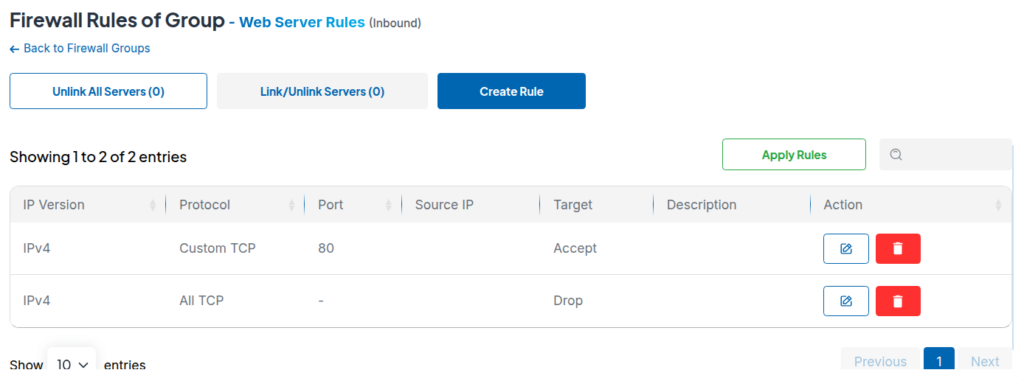
Your web server now accepts HTTP requests and blocks everything else. The whole thing takes maybe 90 seconds.
Note: This is just a basic example - as you might expect, this setup would block HTTPS traffic since there's no rule allowing port 443. You'd want to add that for a real website.
But here's where it gets interesting. Rules are processed in order, so your "allow port 80" rule gets checked first.
If incoming traffic is HTTP, it matches that rule and gets accepted. If it's anything else TCP-related, it skips the first rule and matches the second rule, which drops it.
Understanding Rule Logic
The rule processing logic is crucial to understand. Let's walk through a more complex example.
Say you're running a web application that needs HTTP (port 80), HTTPS (port 443), and SSH access, but only from your office network.
Your rules might look like:
- Allow TCP port 22 from your office IP (Accept SSH from office)
- Allow TCP port 80 from anywhere (Accept HTTP from everyone)
- Allow TCP port 443 from anywhere (Accept HTTPS from everyone)
- Drop all other TCP traffic (Block everything else)
Now when traffic hits your server:
- SSH from your office: matches rule 1, allowed through
- SSH from anywhere else: skips rule 1, 2, and 3, matches rule 4, gets dropped
- HTTP from anywhere: skips rule 1, matches rule 2, allowed through
- Random port scan: skips rules 1, 2, and 3, matches rule 4, gets dropped
The system is predictable once you understand the flow.
What You Can Control
The rule builder gives you all the options you actually need:
IP Version: IPv4, IPv6, or both. Most people stick with IPv4 unless they specifically need IPv6 support.
Protocol: All traffic, just TCP, just UDP, or ICMP. You can also use "Custom TCP" or "Custom UDP" when you want to specify exact port numbers.
Ports: Specific numbers for custom setups. Web servers use 80 and 443. SSH uses 22. Databases often use 3306 (MySQL) or 5432 (PostgreSQL).
Source IPs: Everyone, specific addresses, or block certain ranges. You can whitelist your office network or blacklist known bad actors.
Action: Accept or drop. Accept lets the traffic through. Drop silently discards it.
You can get as specific or as broad as your setup requires. A simple website might need just a few rules. A complex application with multiple services might need dozens.
Advanced Use Cases

Once you understand the basics, you can handle more sophisticated scenarios.
Gaming Servers: Allow your game port (maybe UDP 27015 for Source games) and SSH for management. Block everything else.
API Servers: Allow HTTPS (443) for API calls and SSH for management. Maybe allow HTTP (80) that redirects to HTTPS.
Database Servers: Only allow connections from your application servers. Block direct internet access entirely.
Development Servers: Allow common development ports like 3000, 8000, 8080. Maybe allow broader access since you're testing different things.
Load Balancers: Allow HTTP and HTTPS from anywhere, but restrict management interfaces to your admin network.
The flexibility is there when you need it, but you can start simple and add complexity gradually.
Why This Matters for Your Business
Network security used to mean choosing between "easy" and "secure". Not anymore.
You save time because you don't need to learn nftables. A developer can set up proper firewall rules in minutes instead of hours. That time adds up fast when you're managing multiple servers.
You save money because you don't need a dedicated security person for basic firewall management. Small teams can handle their own network security without hiring specialists.
You sleep better because your servers aren't sitting there wide open. Every port that doesn't need to be accessible gets blocked automatically.
Plus you can reuse the same firewall groups across multiple servers. Build your security policy once, apply it everywhere. When you need to update the rules, change them in one place and they update across your entire infrastructure.
Real Talk About Performance

Adding firewall rules doesn't slow down your server. We process everything at the network level before it hits your VPS. Your applications run exactly the same speed whether you have zero rules or fifty rules.
The filtering happens in hardware and specialized network equipment. It's designed to handle millions of packets per second without breaking a sweat. Your web application will never notice the firewall is there.
This is a premium add-on feature available for a small monthly fee. We priced it to be accessible for everyone while covering the development and infrastructure costs.
So all in all, you get enterprise-grade security tools at a fraction of what other providers charge for similar functionality.
Common Mistakes to Avoid
There a few patterns that might trip people up. Please keep them in mind:
Rule Order: Remember that specific rules go first, general rules go last. "Allow port 80" should come before "block all TCP". Get this backwards and nothing works.
Protocol Confusion: TCP and UDP are different. Web traffic is TCP. DNS is usually UDP. Game servers often use UDP. Make sure you're filtering the right protocol.
Source IP Restrictions: If you limit SSH to your office IP, what happens when you're working from home? Plan for remote access scenarios.
Testing: Apply rules to a test server first if possible. Verify everything works before rolling out to production.
Most of these issues are easy to fix once you know to watch for them.
Getting Started Right Now
Firewall Groups are live in your dashboard today. Here's my advice for new users:
Start with something simple. Maybe just allow SSH and HTTP, block everything else. Test that your apps still work properly. Then add more specific rules as you figure out what you need.
Don't overthink it. Most web applications need maybe 3-4 rules total. You're not building a corporate firewall on day one.
Use descriptive names for your groups and rules. "Web Server Access" is better than "Group 1". Future you will thank present you for good documentation.
Test changes on non-critical servers first. Once you're comfortable with how the system works, apply the same patterns to your production infrastructure.
What's Coming Next
Our team is already working on the next batch of features. Pre-built templates for common setups like WordPress or game servers. Detailed logging so you can see what traffic you're blocking. API access for the DevOps crowd who want to automate everything.
But honestly, what we shipped today solves the core problem. You can secure your servers without becoming a networking expert.
Why We Built This
At SSD Nodes, we don't believe in artificial limitations. Our customers get enterprise-grade hardware at budget prices. Same philosophy applies to security tools.
Other providers charge hundreds extra for basic firewall management or make you use their complicated interfaces. Some don't offer managed firewalls at all. We think that's wrong.
You're already managing your VPS hosting. Security controls should be included, and they should be easy to use. Every business deserves professional-grade network security regardless of their technical background or budget.
This feature represents the same engineering philosophy that drives everything we do. Take complex enterprise technology and make it accessible to everyone. No artificial restrictions, no premium tiers, no gotchas.
Try It Out
Log into your SSD Nodes account and look for "Firewall Groups" in the menu. Create your first group and see how simple it is.
Start with a basic web server configuration. Allow the ports your application needs, block everything else. Apply it to a test server and verify connectivity works as expected.
If you run into any issues, our support team knows the feature inside and out. They can help you set up whatever configuration you need, or troubleshoot if something isn't working right.
Building secure infrastructure shouldn't be complicated. Now it isn't.


2 Responses to Introducing Firewall Groups for Simpler Server Security
A C
This article fails to mention that you need to enable paid Firewall management add on for your server
Marc Chartouny
Hi,
Thanks for pointing that out! We’ve updated the article to clearly mention the add-on pricing.