
sudo systemctl stop nginxIf you’re reading this article, there’s a big chance you’ve chosen one of our 1 Click Applications (aka 1-CAs), with an awesome application ready to be used as soon as your server is up and running. This article is your guide to understand how to use your 1-Click app, set up a domain name, and secure it.
Table of Contents
- Step 1: Understanding 1-Click Applications
- Step 2: Understanding Built-in Self-signed Certificates
- Step 3: Adding a Domain Name to Your Server
- Step 4: Upgrading Your Self-signed Certificate to a Valid Let's Encrypt Certificate
- Step 5 (Grafana-specific): Setting up Let's Encrypt for Grafana
Step 1: Understanding 1-Click Applications
What Are 1-Click Applications?
SSD Nodes' 1-Click Applications (1-CAs) are pre-configured software packages that come ready to use on your server. Each application comes with:
- Latest stable version
- Pre-configured security settings
- Built-in self-signed SSL certificate
- Optimized server configurations
- An active HTTPS self-signed certificate.
Available Applications
- WordPress
- Zabbix
- phpMyAdmin
- Webmin
- Nextcloud
- LAMP Stack
- LEMP Stack
- Grafana
- And more...
Step 2: Understanding Built-in Self-signed Certificates
All our 1-Click applications come with a FREE built-in self-signed TLS/SSL certificate.
Now, you might be thinking: Wait.. A self-signed what? Don't worry, I'll explain everything, I promise.
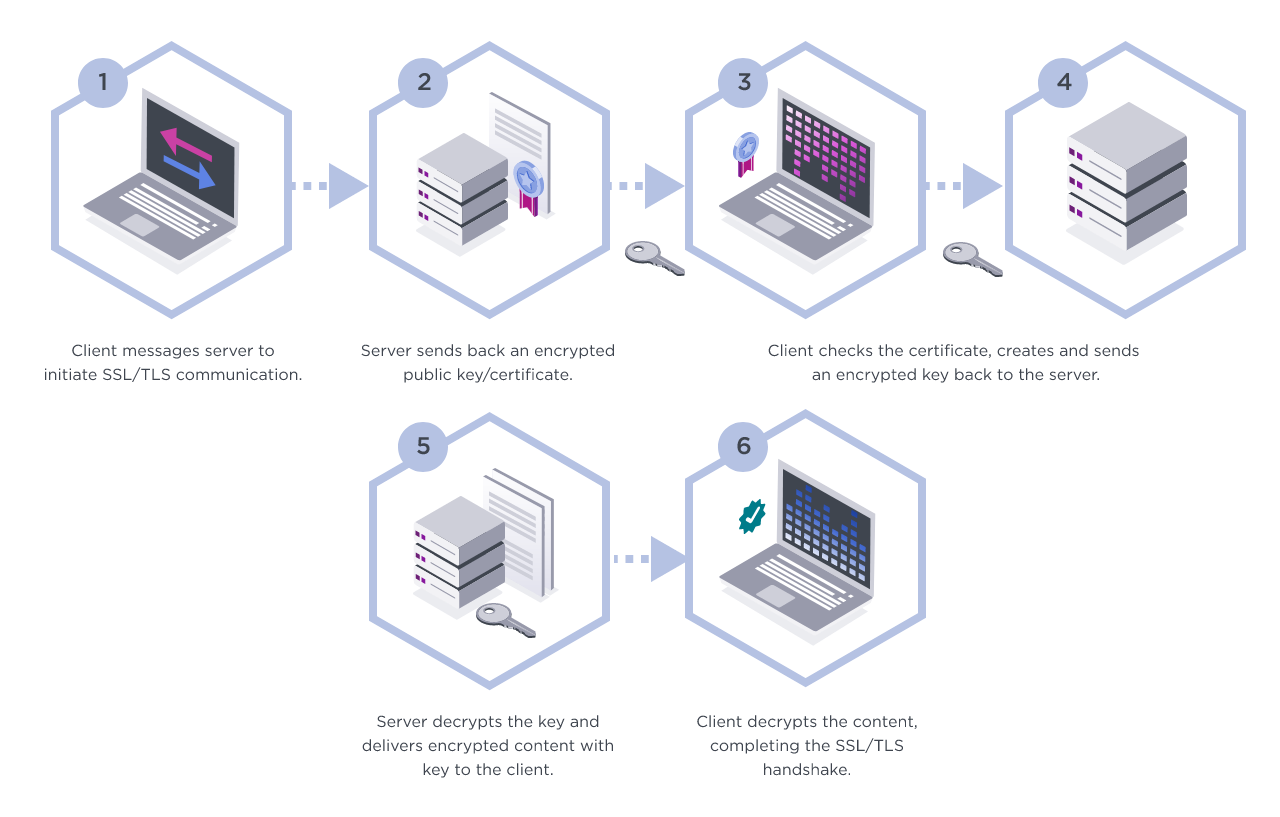
A self-signed certificate is a security certificate that's generated and signed by your server rather than a trusted certificate authority. While it provides the same encryption as commercial certificates, browsers don't automatically trust it. Here is how these certificates work:
When you first access your site, add https:// before your server's IP address or domain, like this:
https://your-server-ipYou’ll likely encounter a security warning in your browser, which is expected when using self-signed certificates. In browsers like Google Chrome and Firefox, click "Advanced" or "More information," then select "Proceed to [your-site]." This allows your site to load securely.
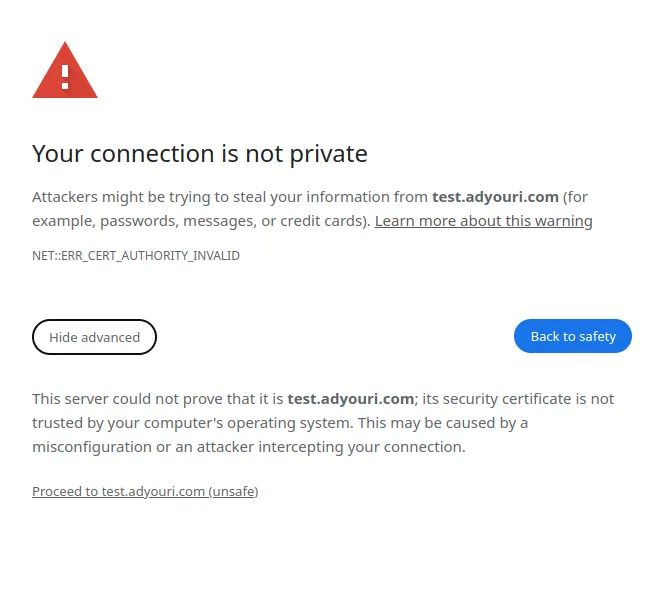
What the Warning Means
Don't worry, this security warning isn't a big deal. It indicates that your connection is encrypted, and the certificate is valid, but it’s not issued by an authority that browsers trust. This is actually safe for development and testing purposes, but not good for production applications. After accepting the certificate, you may notice a "Not secure" icon in the browser’s address bar, even though the connection remains encrypted.
Recommended Next Steps
For development and testing, continue using the self-signed certificate and ensure team members document the security warning in your development guides.
For production sites, it is important to upgrade to a trusted SSL certificate, such as Let's Encrypt certificate, which we’ll cover in this article.
For more:
Step 3: Adding a Domain Name to Your Server
Before You Begin
- Purchase a domain name from a registrar (SSD Nodes, GoDaddy, Namecheap, etc.)
- Add an A record pointing to your server IP
- Access your SSD Nodes server via SSH
1-Click App Servers
Our 1-click apps use either Apache or Nginx to serve web requests:
| Application | Server |
|---|---|
| WordPress | Nginx |
| Zabbix | Apache |
| phpMyAdmin | Nginx |
| Webmin | Built-in Webmin server (default port 10000) |
| Nextcloud | Nginx |
| LAMP Stack | Apache |
| LEMP Stack | Nginx |
| Grafana | Built-in server (default port 3000) |
The following sections will walk you through setting up your domain name and HTTPS with Let's Encrypt for each server.
Adding a Domain Name for Your Apache-based App

Edit Apache’s default configuration file:
sudo nano /etc/apache2/sites-enabled/000-default.conf
For the moment, you will see that the “servername” attribute is the IP address automatically assigned to you. As an example:
<VirtualHost *:80>
        Define servername 192.0.0.1
        ServerName ${SERVERNAME}
        RewriteEngine on
        RewriteRule ^/.*$ https://\${SERVERNAME}%{SCRIPT_FILENAME}?%{QUERY_STRING} [R=301]
        ErrorLog ${APACHE_LOG_DIR}/error.log
        CustomLog ${APACHE_LOG_DIR}/access.log combined
</VirtualHost>
<VirtualHost *:443>
        SSLEngine On
        SSLCertificateFile /etc/ssl/certs/apache-selfsigned.pem
        SSLCertificateKeyFile /etc/ssl/private/apache-selfsigned.key
        ServerName ${SERVERNAME}
        DocumentRoot /var/www/<appname>
        ErrorLog ${APACHE_LOG_DIR}/error.log
        CustomLog ${APACHE_LOG_DIR}/access.log combined
</VirtualHost>
Note: Some parts of the configuration are different for each 1-click app, especially the name, which is referenced in this example configuration as <appname>
Replace the existing IP with your domain name by replacing the yellow highlighted part below:
<VirtualHost *:80>
        Define servername www.example.com
        ServerName ${SERVERNAME}
        RewriteEngine on
        RewriteRule ^/.*$ https://\${SERVERNAME}%{SCRIPT_FILENAME}?%{QUERY_STRING} [R=301]
        ErrorLog ${APACHE_LOG_DIR}/error.log
        CustomLog ${APACHE_LOG_DIR}/access.log combined
</VirtualHost>
<VirtualHost *:443>
        SSLEngine On
        SSLCertificateFile /etc/ssl/certs/apache-selfsigned.pem
        SSLCertificateKeyFile /etc/ssl/private/apache-selfsigned.key
        ServerName ${SERVERNAME}
        DocumentRoot /var/www/<appname>
        ErrorLog ${APACHE_LOG_DIR}/error.log
        CustomLog ${APACHE_LOG_DIR}/access.log combined
</VirtualHost>
Enable the SSL and RewriteEngine modules on Apache:
sudo a2enmod ssl rewrite
Test for configuration errors:
sudo apache2ctl configtest
The below output means you can safely reload Apache, otherwise, you will get a specific description pointing out the error you have to fix.
Syntax OK
Restart Apache:
sudo systemctl restart apache2
Adding a Domain Name for Your Nginx-based App

Edit Nginx’s default configuration file:
sudo nano /etc/nginx/sites-enabled/default
For the moment, you will see that the “server_name” attribute is your server's IP. Some parts of the configuration are different for each 1-click app, especially the name, which is referenced in this example configuration as <appname>:
server {
    listen 80;
    listen [::]:80;
    server_name 192.0.0.1;
    access_log off;
    location / {
        rewrite ^ https://$host$request_uri? permanent;
    }
}

server {
    listen 443 ssl;
    listen [::]:443 ssl;
    server_name 192.0.0.1;
    root /var/www/<appname>;
    index index.php index.html index.htm index.nginx-debian.html;
    autoindex off;
    ssl_certificate /etc/ssl/certs/<appname>.pem;
    ssl_certificate_key /etc/ssl/private/<appname>.key;
    ssl_protocols TLSv1 TLSv1.1 TLSv1.2;
    ssl_ciphers HIGH:!aNULL:!MD5;

    location ~ \.php$ {
         include snippets/fastcgi-php.conf;
         fastcgi_pass unix:/var/run/php/php-fpm.sock;
         fastcgi_param SCRIPT_FILENAME $document_root$fastcgi_script_name;
         include fastcgi_params;
    }
}
Replace the existing IP with your domain name:
server {
    listen 80;
    listen [::]:80;
    server_name www.example.com;
    access_log off;
    location / {
        rewrite ^ https://$host$request_uri? permanent;
    }
}

server {
    listen 443 ssl;
    listen [::]:443 ssl;
    server_name www.example.com
    root /var/www/<appname>/;
    index index.php index.html index.htm index.nginx-debian.html;
    autoindex off;
    ssl_certificate /etc/ssl/certs/<appname>.pem;
    ssl_certificate_key /etc/ssl/private/<appname>.key;
    ssl_protocols TLSv1 TLSv1.1 TLSv1.2;
    ssl_ciphers HIGH:!aNULL:!MD5;

    location ~ \.php$ {
         include snippets/fastcgi-php.conf;
         fastcgi_pass unix:/var/run/php/php-fpm.sock;
         fastcgi_param SCRIPT_FILENAME $document_root$fastcgi_script_name;
         include fastcgi_params;
    }
}
Restart Nginx:
sudo systemctl restart nginx
Setting up a Domain Name for NextCloud with Nginx
For NextCloud, you also need to add your domain name to your NextCloud’s trusted domain list. This is in addition to configuring it in your Nginx configuration file.
First open the NextCloud configuration file:
nano /var/www/nextcloud/config/config.php
Then modify the trusted_domains array to include your new domain name:
  'trusted_domains' =>
  array (
    0 => 'your_ip_address',
    1 => 'yourdomain.com',
  ),
Make sure you’ve added your domain name to your Nginx configuration, then restart it:
sudo systemctl restart nginx
Access your Domain Name
Open your browser, and type your website’s domain name with the HTTPS prefix:
https://www.example.com
With your domain set up, you can now upgrade your self-signed certificate to a valid Let's Encrypt certificate. This is especially useful if your application is production-ready.
Step 4: Upgrading Your Self-signed Certificate to a Valid Let's Encrypt Certificate
Although you can use many other valid Certificate Authority issuers to generate your certificate, Let's Encrypt is by far the most convenient.
To get a Let's Encrypt certificate, you'll use the Certbot tool, which automates the process of obtaining and renewing Let's Encrypt SSL certificates. Follow the instructions below to do this.
Note: Webmin uses a built-in server, to add a Let's Encrypt certificate to it, follow Step 3: Securing Webmin with an SSL Certificate from Let’s Encrypt from our Webmin guide.
Temporarily Stop Your Server
Because we'll use a web server from Certbot to obtain the certificate, we'll have to temporarily stop the server that serves our application (Apache or Nginx).
For Apache:
sudo systemctl stop apache2
For Nginx:
Generate a Let's Encrypt Certificate with Certbot
First, install certbot:
sudo apt install -y certbot
Then generate a certificate:
sudo certbot certonly --standalone
The --standalone option tells Certbot to use its own web server to verify domain ownership.
You will be asked to answer a few questions, input the following for each prompt:
1. (Your email)
2. (Y)
3. (N)
4. your_domain_name
These prompts are for:
- Your email address (for important notifications about your certificate)
- Agreeing to the Let's Encrypt terms of service
- Declining to share your email with the Electronic Frontier Foundation
- The domain name you want to secure with SSL
Then you will receive your Let's Encrypt certificate file and a private key:
Successfully received certificate.
Certificate is saved at: /etc/letsencrypt/live/your_domain.com/fullchain.pem
Key is saved at:         /etc/letsencrypt/live/your_domain.com/privkey.pem
This certificate expires on 2025-03-20.
These files will be updated when the certificate renews.
Certbot has set up a scheduled task to automatically renew this certificate in the background.
The following two files will be automatically created under the respective subdirectories as follows:
- The private key:
/etc/letsencrypt/live/your_domain.com/privkey.pem - The certificate:
/etc/letsencrypt/live/your_domain.com/fullchain.pem
Now that you have your Let's Encrypt private key file and your certificate file, you can restart your server and install your certificate on your web server.
Restart Your Server
Now that you have your certificate, restart your server.
For Apache:
sudo systemctl start apache2
For Nginx:
sudo systemctl start nginxInstalling Your Let's Encrypt Certificate for the APACHE Web Server
- Edit Apache’s default configuration file
sudo nano /etc/apache2/sites-enabled/000-default.conf
- Replace the key and the certificate paths to the new values (highlighted in yellow in the below code).
<VirtualHost *:80>
        Define servername www.example.com
        ServerName ${SERVERNAME}
        RewriteEngine on
        RewriteRule ^/.*$ https://\${SERVERNAME}%{SCRIPT_FILENAME}?%{QUERY_STRING} [R=301]
        ErrorLog ${APACHE_LOG_DIR}/error.log
        CustomLog ${APACHE_LOG_DIR}/access.log combined
</VirtualHost>
<VirtualHost *:443>
        SSLEngine On
        SSLCertificateFile /etc/letsencrypt/live/www.example.com/fullchain.pem
        SSLCertificateKeyFile /etc/letsencrypt/live/www.example.com/privkey.pem
        ServerName ${SERVERNAME}
        DocumentRoot /var/www/<appname>
        ErrorLog ${APACHE_LOG_DIR}/error.log
        CustomLog ${APACHE_LOG_DIR}/access.log combined
</VirtualHost>
- Restart Apache
sudo systemctl restart apache2
Installing Your Let's Encrypt Certificate for the NGINX Web Server
- Edit Nginx’s default configuration file
sudo nano /etc/nginx/sites-enabled/default
- Replace the key and the certificate paths to the new values (highlighted in yellow in the below code).
server {
   listen 80;
   listen [::]:80;
   server_name www.example.com;
   access_log off;
   location / {
         rewrite ^ https://$host$request_uri? permanent;
   }
}

server {
    listen 443 ssl;
    listen [::]:443 ssl;
    server_name www.example.com;
    root /var/www/<appname>;
    index index.php index.html index.htm index.nginx-debian.html;
    autoindex off;
    ssl_certificate /etc/letsencrypt/live/www.example.com/fullchain.pem;
    ssl_certificate_key /etc/letsencrypt/live/www.example.com/privkey.pem;
    ssl_protocols TLSv1 TLSv1.1 TLSv1.2;
    ssl_ciphers HIGH:!aNULL:!MD5;

    location ~ \.php$ {
         include snippets/fastcgi-php.conf;
         fastcgi_pass unix:/var/run/php/php-fpm.sock;
         fastcgi_param SCRIPT_FILENAME $document_root$fastcgi_script_name;
         include fastcgi_params;
    }
}
- Restart Nginx
sudo systemctl restart nginx
Verifying Your Certificate

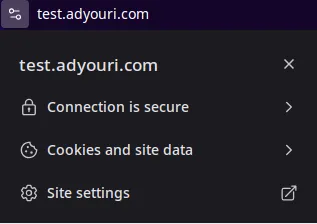
Now that you've installed your certificate, reload your browser and click on the icon on the left hand corner of the URL bar, this will inform you the connection is secure:
Click Connection is Secure and you'll see more details:
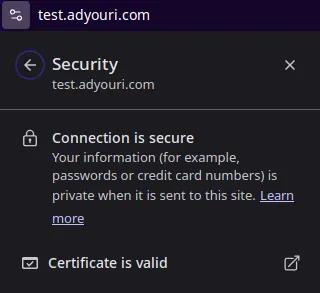
Click Certificate is valid and you'll have all the details of your Let's Encrypt certificate:

Your website is now Certificate Authority certified and you can securely welcome any online transactions, like paid subscriptions and eCommerce services, memberships or charity and online fundraising. For more details, check out Secure Your Site Using HTTPS.
Step 5 (Grafana-specific): Setting up Let's Encrypt for Grafana
Grafana uses custom configurations for its server, and to add a Let's Encrypt certificate to your Grafana 1-Click application, you'll need to modify file permissions and the Grafana configuration file. This section will walk you through the process.
1) Set Up Grafana to Use Your Let's Encrypt Certificate
Temporarily stop the Grafana server:
sudo systemctl stop grafana-server
Rename the existing self-signed certificate files:
sudo mv /etc/grafana/grafana.key /etc/grafana/grafana_old.key
sudo mv /etc/grafana/grafana.pem /etc/grafana/grafana_old.pem
This backs up the original self-signed certificates in case you need to revert changes.
Set up symlinks for the certificates you generated earlier:
sudo ln -s /etc/letsencrypt/live/your_domain.com/fullchain.pem /etc/grafana/grafana.pem
sudo ln -s /etc/letsencrypt/live/your_domain.com/privkey.pem /etc/grafana/grafana.key
These symlinks allow Grafana to use the Let's Encrypt certificates without modifying its configuration.
Adjust permissions:
sudo chgrp -R grafana /etc/letsencrypt/*
sudo chmod -R g+rx /etc/letsencrypt/*
sudo chown -R grafana /etc/letsencrypt/*
sudo chown grafana /etc/grafana/*
sudo chgrp -R grafana /etc/grafana/grafana.pem /etc/grafana/grafana.key
sudo chmod 400 /etc/grafana/grafana.pem /etc/grafana/grafana.key
This ensures that the Grafana service has the necessary permissions to read the certificate files.
Verify the permissions:
ls -l /etc/grafana/grafana.*
The output should be as follows:
-rw-r----- 1 grafana grafana 80484 Dec 22 16:06 /etc/grafana/grafana.ini
lrwxrwxrwx 1 root grafana 50 Dec 22 17:40 /etc/grafana/grafana.key -> /etc/letsencrypt/live/www.example.com/privkey.pem
lrwxrwxrwx 1 root grafana 52 Dec 22 17:40 /etc/grafana/grafana.pem -> /etc/letsencrypt/live/www.example.com/fullchain.pem
2) Configure Grafana
Next, open the Grafana config file:
sudo nano /etc/grafana/grafana.ini
Then modify the domain parameter:
[server]
;domain = localhost
Uncomment the parameter and set up your domain:
[server]
domain = your_domain.com
This tells Grafana which domain name to use for HTTPS.
3) Restart Grafana
Finally, restart the Grafana service to apply the changes:
sudo systemctl restart grafana-server
sudo systemctl status grafana-server
The status command will show you if Grafana started successfully with the new configuration:
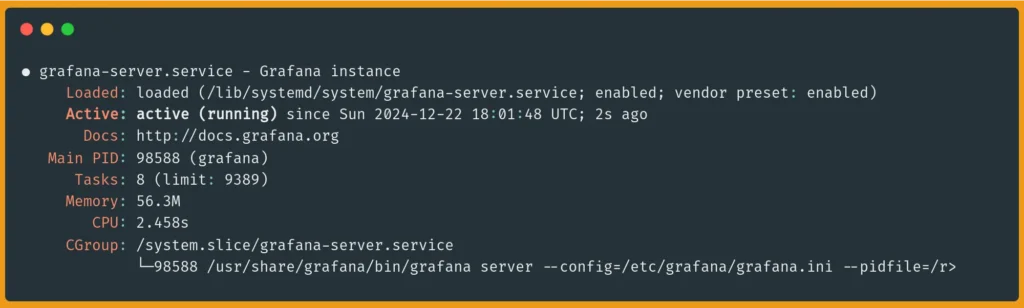
Grafana will now be served on port 3000 using HTTPS with your new Let's Encrypt certificate:
https://your_domain.com:3000/
Conclusion
That's it, you now have your 1-click application configured with an SSL/TLS certificate from a certificate authority, and a domain name for your 1-click applications.
A note about tutorials: We encourage our users to try out tutorials, but they aren't fully supported by our team—we can't always provide support when things go wrong. Be sure to check which OS and version it was tested with before you proceed.
If you want a fully managed experience, with dedicated support for any application you might want to run, contact us for more information.